Configuring Instance Reporting
After you install the ActiveBatch software on a designated system, an ActiveBatch “Management Console” icon will be added to the system’s desktop. In addition, right after the software is installed, the Management Console application will be opened automatically, since this is the next step required in getting your Scheduler environment up and running, and configuring the features you opted to install. The Management Console configuration features are displayed in alphabetical order. To the far right is a Refresh icon which allows you to refresh the properties of the selected component.
Note: The name of the ActiveBatch Management Console application is abatmgmt.exe, located in the bin folder of the ActiveBatch installation directory.
By separating the installation of ActiveBatch features from the configuration of those features and components, it easier and simpler to change configuration parameters without requiring a re-installation or registry modification.
The Management Console is used to configure Instance Reporting.
ActiveBatch provides an advanced reporting facility, empowered with online analytical processing (OLAP). ActiveBatch Reporting Services allows your business to collect and process timely ActiveBatch Job History data, and create useful reports to view, save or print.
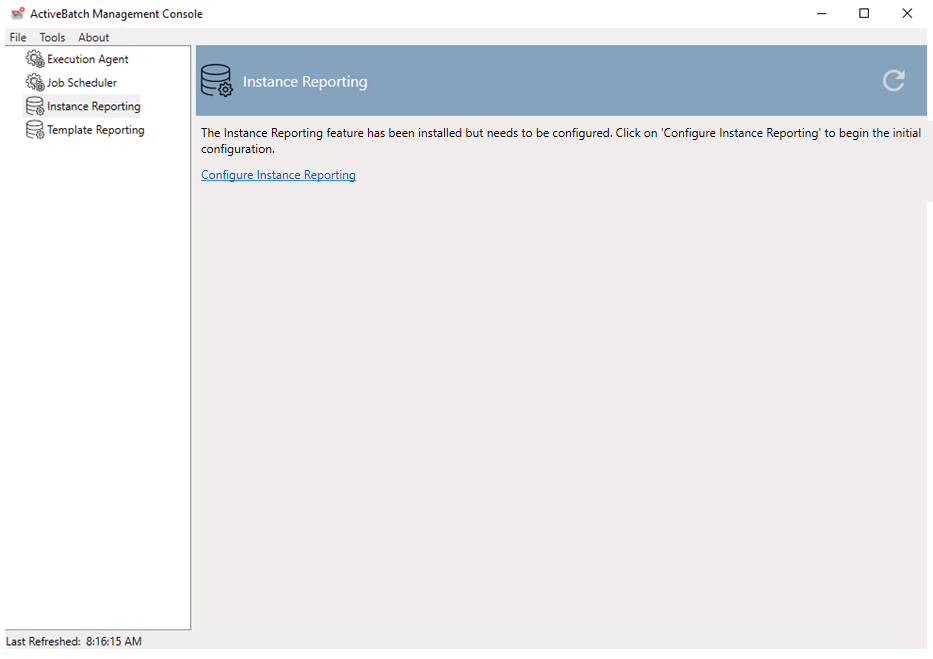
The dialog above symbolizes the beginning of the configuration of Instance Reporting. Begin by clicking on the Configure Instance Reporting link.
Instance Reporting Select Database Family
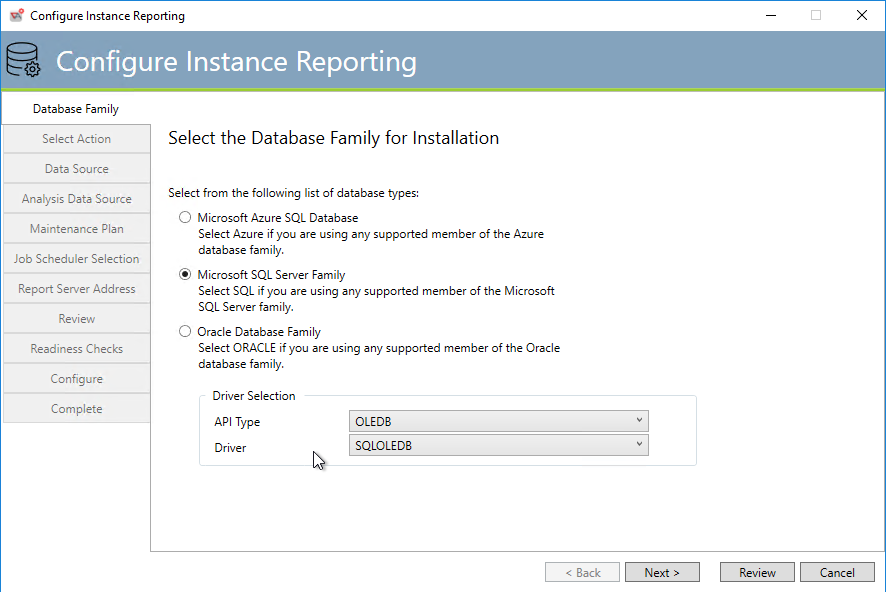
The above dialog requires that you make a selection regarding the database software that you wish to use with Instance Reporting.
Note: The selection you make must be the same type that is being used for the Job Scheduler's backend database. For example, if you use Oracle for the backend database, then the Instance Reporting database must also be using Oracle.
Microsoft SQL Server represents the family of products. If you don’t have a database, you can download SQL Express. Please note there are limitations to using SQL Express Edition. Azure SQL represents the Microsoft Azure SQL cloud database service. Oracle represents the Oracle database products.
If Microsoft Azure SQL or Microsoft SQL are selected, you will have the opportunity to select an OLEDB driver. The driver selected by default should be used unless you are familiar with SQL drivers.
The Back button will move to the previous tab. The Next button will advance to the next sequential tab. The Review button will jump down to the Review tab. For New installations we recommend you click the Next button and look through the most popular component parameters.
Please see below the details regarding prerequisite requirements for Instance Reporting.
Instance Reporting Prerequisites - Microsoft SQL Server
SQL Server 2014 or higher
SQL Server Integration Services (SSIS) and SQL Server Analysis Services (SSAS) - Required on the Execution Agent system that will run the ETL Job that updates the Instance Reporting database. It is also required on the system where the Instance Reporting feature is to be configured through the ActiveBatch Management Console.
SQL Server Reporting Services (SSRS) - Optional during the initial installation, but it will need to be configured at some point to run reports (over 30 canned reports are provided out-of-the-box). SSRS can be installed on any system that the Job Scheduler can access, and the Execution Agent can access if you are running the SQLServerReport Jobs Library Job Step.
Instance Reporting Prerequisites - Oracle
Oracle 11gR2 for ODAC or higher
ODAC - Required on the Job Scheduler and Execution Agent to run the ETL Job that updates the Instance Reporting database. It is also required on the system where the Instance Reporting feature is to be configured through the ActiveBatch Management Console.
Crystal Reports is required to run ASCI provided Crystal Reports that work with Oracle.
-
Crystal Version: XI Release 2 for Crystal Reports.
-
You could use Oracle Business Intelligence Answers to access the Oracle BI repository to create your own reports.
An ActiveBatch User Account object will need to be created. It will be used to link the Job Scheduler database to the Instance Reporting database. The account specified should be the same database account used by the Job Scheduler for backend database access.
Note: While the ActiveBatch Management Console is configuring the reporting feature, the Job Scheduler database user and the newly created Reporting database user will need to be granted the CREATE PUBLIC DATABASE LINK, otherwise the configuration may fail with missing permissions. As an alternative, a DBA may create the Reporting database user with the required permissions and then the ActiveBatch Administrator would select the “Update an Existing Database” option during configuration.
Instance Reporting Database Operation
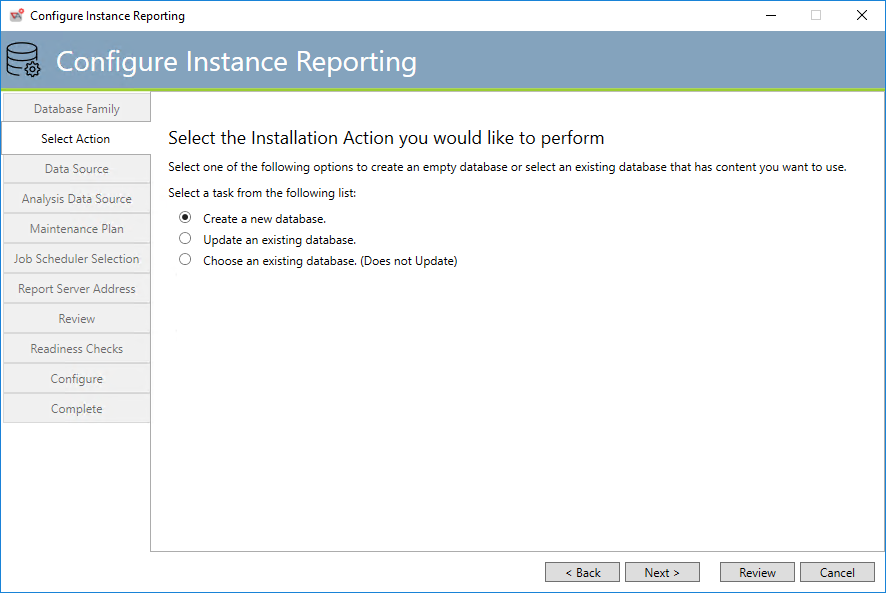
The above dialog requires that you make a selection as to the state of the Instance Reporting databases.
Create a new database (default) means that you have not created an empty database (or tablespace) for ActiveBatch to use for Instance Reporting. New ActiveBatch users would typically make this selection.
Update an existing database means that you have an existing Instance Reporting database that you would like to use and update or if no Instance Reporting tables exist we will add our tables to this database.
Choose an existing database (Does not Update) means that you would simply like this configuration to use an existing database.
If Create a new database was selected then continue reading. If the other choices were selected, please continue to (section Instance Reporting Update Relational Database).
Instance Reporting Database Create Database

ActiveBatch does not support the direct creation of an Azure SQL database for ActiveBatch purposes. This is due to charges incurred by Microsoft for their services. ASCI believes that you should make the size and selection of the database, directly. So you must use the Microsoft Azure portal to create an empty database and then execute the installation. We do highly recommend that you select an S4 or larger database sizing option.
The Back button will move to the previous tab. The Next button will advance to the next sequential tab. The Review button will jump down to the Review tab. For New installations we recommend you click the Next button and look through the most popular component parameters.
Instance Reporting Relational Data Source (SQL)
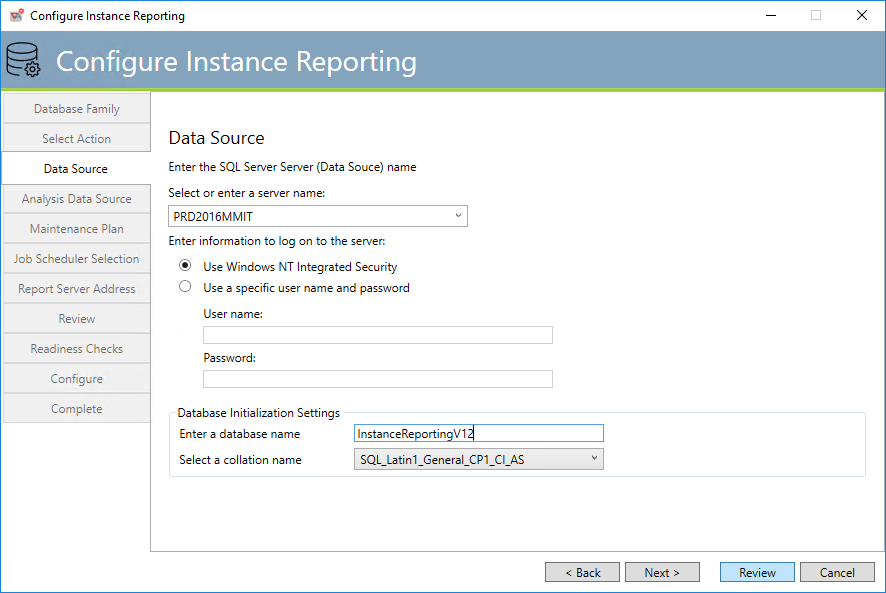
The above dialog asks you to select a machine that is running the SQL Server instance you need. The lower half of the dialog addresses authentication.
Using the "Select or enter a server name" dropdown, select a machine that is running the SQL Server software that you want ActiveBatch to use. If your desired machine is not shown you may type it in (just the machine name and, if applicable, instance name) and the installation will attempt to connect to it. The example above is referencing the SQL Server product on machine PRD2016MMIT. If the product was SQL Server Express the instance would be named “sqlexpress” (the syntax is “machine-name\instance-name”). In that case, PRD2016MMIT\SQLEXPRESS would unambiguously reference that instance on the PRD2016MMIT system.
SQL Server supports two types of authentication: Windows Integrated Authentication and Database. Windows Integrated Authentication refers to the normal Windows security system. This means that the user account you specify for use with the Instance Reporting ETL job will be used to access the database. That account must be given full access. Database refers to the database’s own authentication.
Note: The “Username” specified is not a Windows username but a database user.
Under Database Initialization Settings for the first field you will need to enter the name of the database you want to create. The second is a drop down which asks you to select a collation name. You can specify any collation name as long as it is “case insensitive” (assuming the language supports the concept of case). Look for _CI_ in the collation name for a case insensitive language collation name.
The Back button will move to the previous tab. The Next button will advance to the next sequential tab. The Review button will jump down to the Review tab. For New installations we recommend you click the Next button and look through the most popular component parameters.
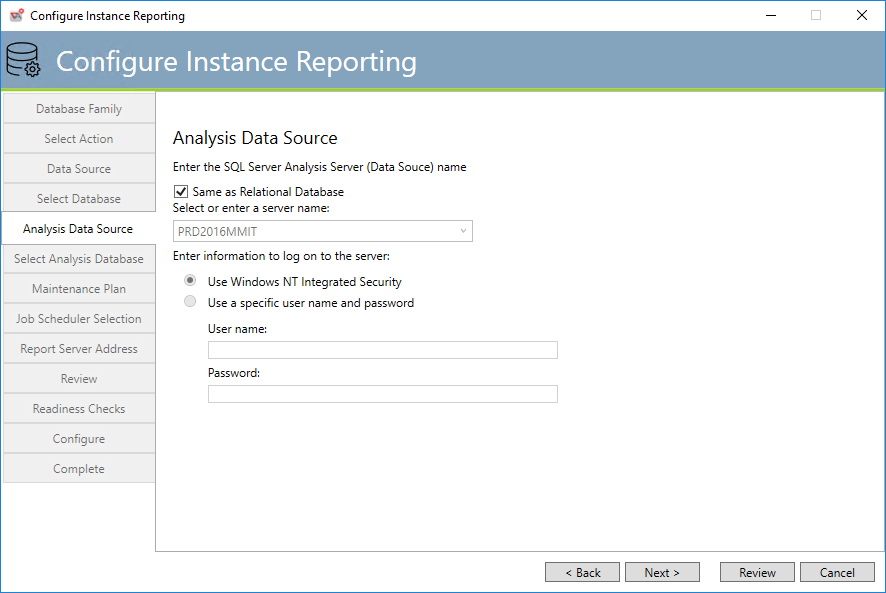
Instance Reporting Analysis Data Source (SQL)
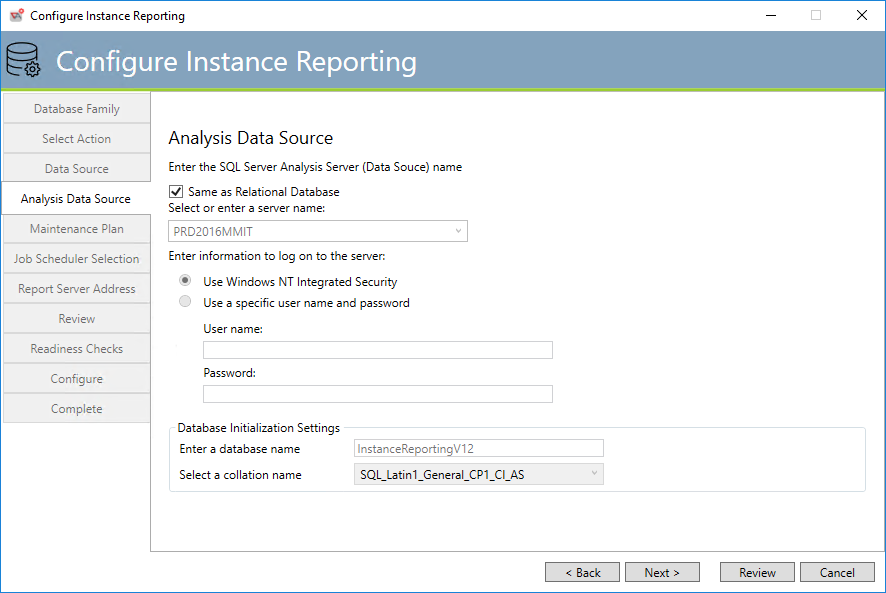
The above dialog is similar to the Relational database on the previous tab and allows you to create an alternate Analysis database on either the same or a different server.
The Back button will move to the previous tab. The Next button will advance to the next sequential tab (go to section Instance Reporting Maintenance Plan). The Review button will jump down to the Review tab. For New installations we recommend you click the Next button and look through the most popular component parameters.
Instance Reporting Update Relational Database
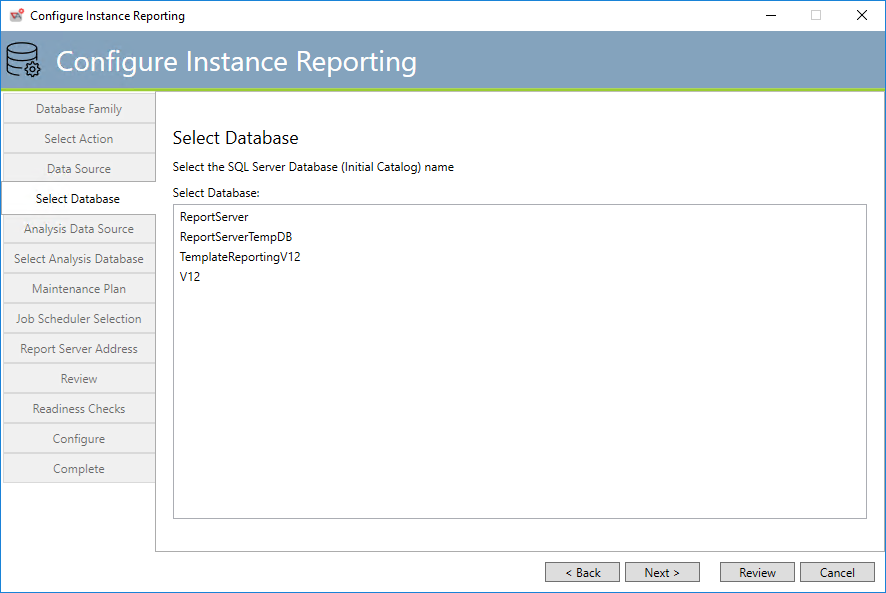
After a slight pause, a large list box will appear with all the databases your selected SQL Server machine offers. Please select the database you want to use for V12 Instance Reporting. If ActiveBatch V9 through V11 tables are detected those tables will be upgraded to V12. If ActiveBatch tables are not detected, we will create those tables and all necessary ActiveBatch database objects within the database.
The Back button will move to the previous tab. The Next button will advance to the next sequential tab. The Review button will jump down to the Review tab. For New installations we recommend you click the Next button and look through the most popular component parameters.
Instance Reporting Update Analysis Database
The above dialog is similar to the Relational database on the previous tab and allows you to update an alternate Analysis database on either the same or a different server.
The Back button will move to the previous tab. The Next button will advance to the next sequential tab. The Review button will jump down to the Review tab. For New installations we recommend you click the Next button and look through the most popular component parameters.
Instance Reporting Select Analysis Database
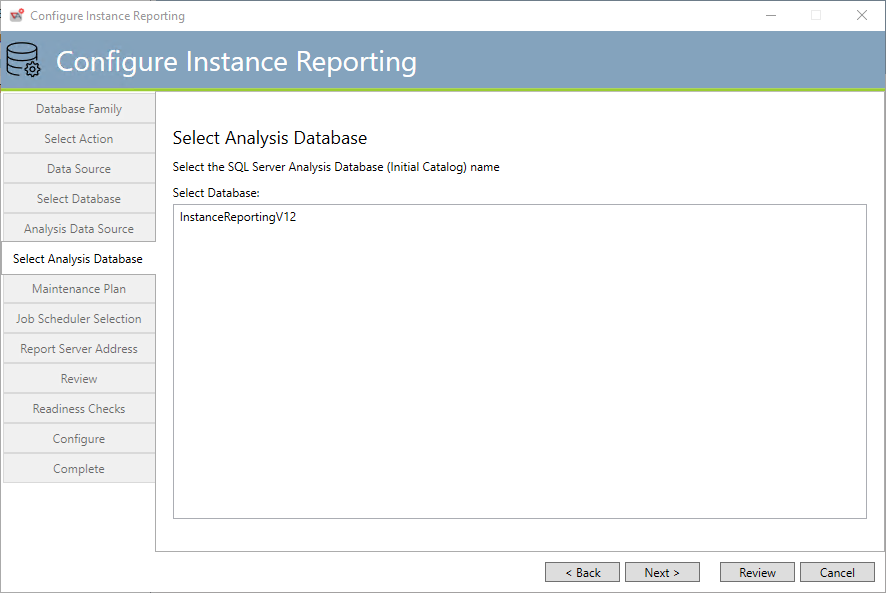
This tab allows you to select an existing Analysis Database to be used for either an update or a use operation.
The Back button will move to the previous tab. The Next button will advance to the next sequential tab. The Review button will jump down to the Review tab. For New installations we recommend you click the Next button and look through the most popular component parameters.
Instance Reporting Maintenance Plan
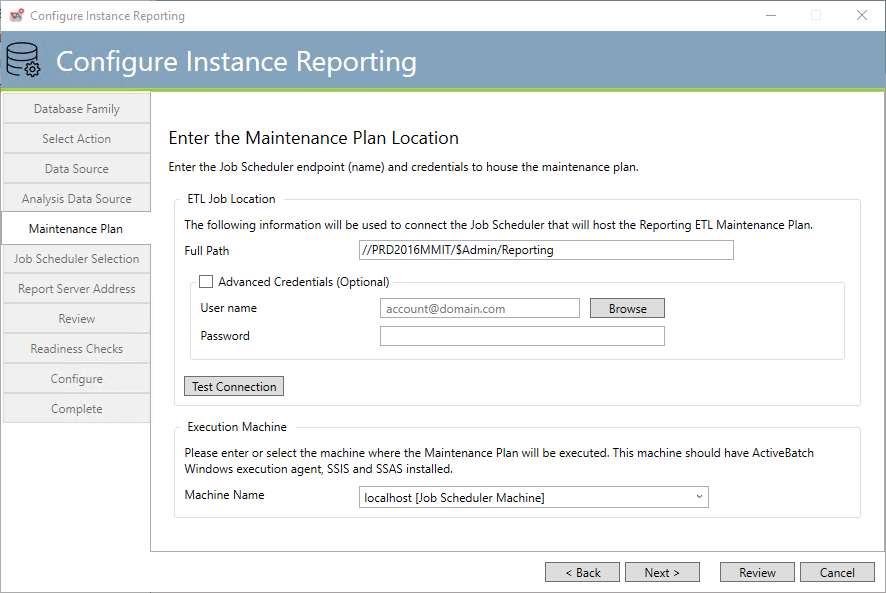
This tab configures the ActiveBatch ETL job that will be used to extract ActiveBatch objects from the operational system to the Instance Reporting database.
Full Path: This property consists of a Job Scheduler hostname (which may optionally be fully qualified) and the remaining portion of the path to the object ($Admin/Reporting) which should not be changed. For example, //DevJSS/$Admin/Reporting indicates that this ETL job is for the Job Scheduler residing on the DevJSS system.
By default, the configuration program will use your logged in Windows credentials to establish the connection to the specified Job Scheduler. If your credentials are insufficient, please enable the Advanced Credentials area and specify a different username and password that should be used to perform the ETL job creation.
We recommend that you click the Test Connection button to verify that the proper connection to the specified Job Scheduler can be made.
The next section indicates where the Maintenance Plan for Instance Reporting will be executed. That machine must have an ActiveBatch Execution Agent as well as Microsoft SSIS and SSAS software installed. The default machine to be used is the Job Scheduler machine.
The Back button will move to the previous tab. The Next button will advance to the next sequential tab. The Review button will jump down to the Review tab. For New installations we recommend you click the Next button and look through the most popular component parameters.
Instance Reporting Job Scheduler Synchronization
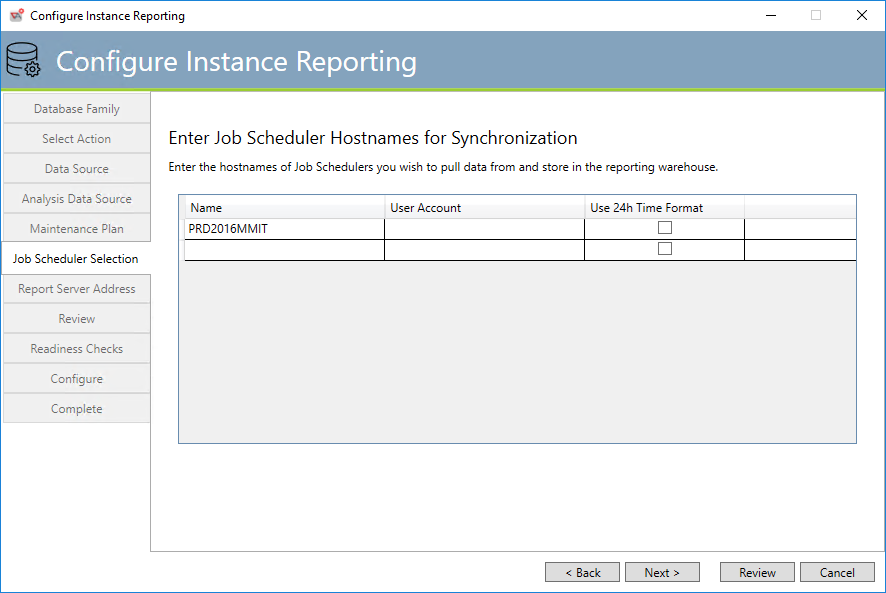
This tab is used by the ETL Maintenance Program (which was defined on the previous tab) to define which Job Scheduler database(s) are to be the subject of the “Extract” of the ETL job.
Name: Hostname of the desired Job Scheduler. The Job Scheduler will be contacted and its database connection string will be used to connect and extract the relevant ActiveBatch objects.
User Account: User Account object that will be used to access the Job Scheduler database.
Use 24h Time Format: If enabled, 24-hour format will be used for time specifications.
The Back button will move to the previous tab. The Next button will advance to the next sequential tab. The Review button will jump down to the Review tab. For New installations we recommend you click the Next button and look through the most popular component parameters.
Instance Reporting Report Server

This tab governs the specification of the SQL Server Reporting Server that you wish to use. The syntax for this property is a URL (i.e. http://myserver/ReportServer or https://myserver/ReportServer).
Click the Test button to test the connection to the Report Server specified.
If you decide not to specify a Report Server address, the next tab is in section Instance Reporting Review.
The Back button will move to the previous tab. The Next button will advance to the next sequential tab. The Review button will jump down to the Review tab. For New installations we recommend you click the Next button and look through the most popular component parameters.
Instance Reporting Target Folder
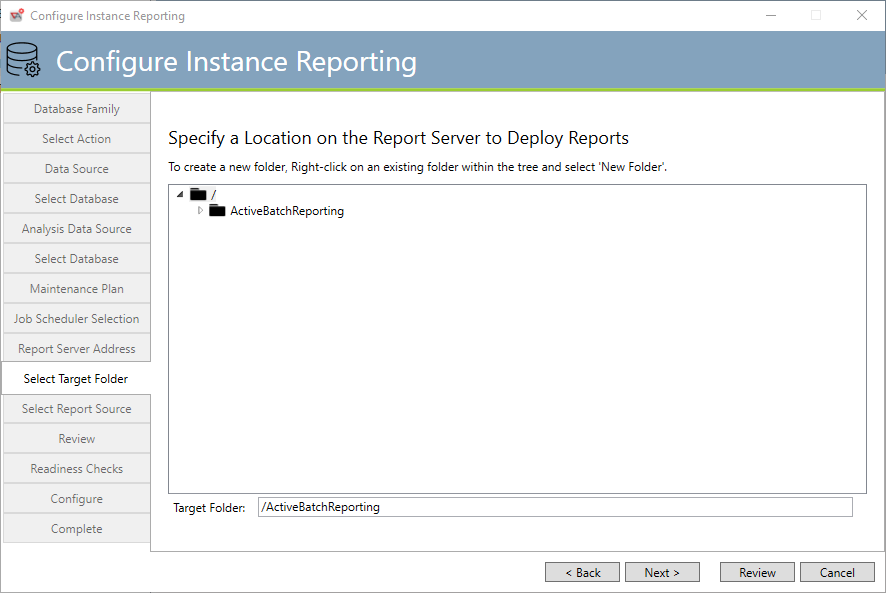
This tab allows you to create a new folder for deploying the ActiveBatch Instance Reporting canned reports.
The Back button will move to the previous tab. The Next button will advance to the next sequential tab. The Review button will jump down to the Review tab. For New installations we recommend you click the Next button and look through the most popular component parameters.
Instance Reporting Source Folder for Report Definitions
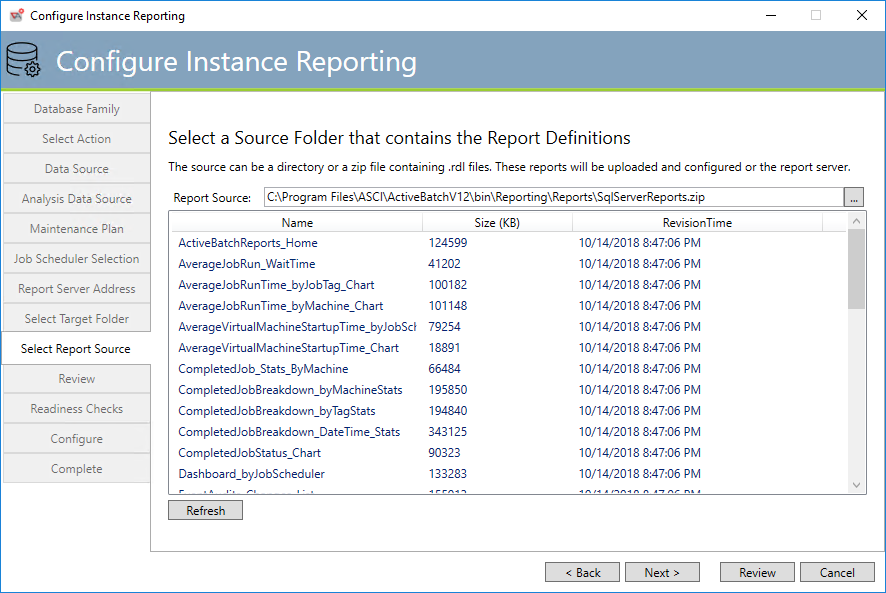
This tab allows you to specify a directory or a ZIP file that contains the .RDL files which are report definition files that contain canned reports for use with instance reporting.
The Back button will move to the previous tab. The Next button will advance to the next sequential tab. The Review button will jump down to the Review tab. For New installations we recommend you click the Next button and look through the most popular component parameters.
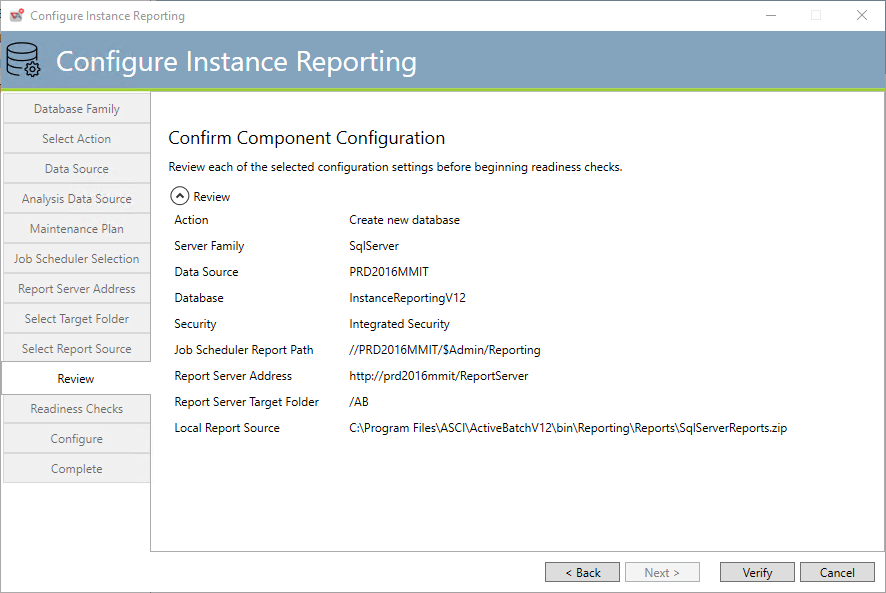
This tab allows you to review the Instance Reporting database answers you’ve provided.
You may click the Back button to go backward to a tab and change an answer or click the Verify button to continue and perform Readiness checks.
Instance Reporting Readiness Checks
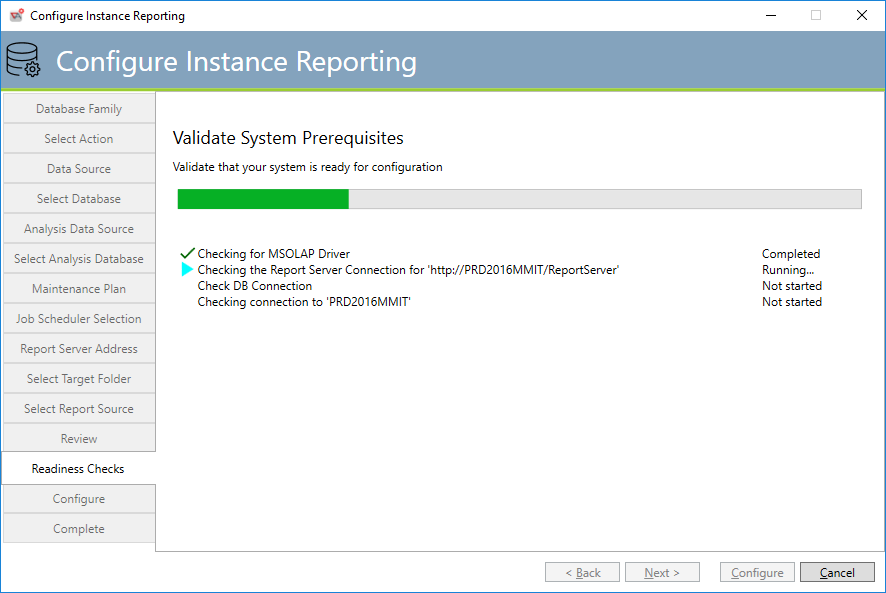
This tab performs prerequisite and readiness checks on the answers provided in this configuration.
Instance Reporting Configuration
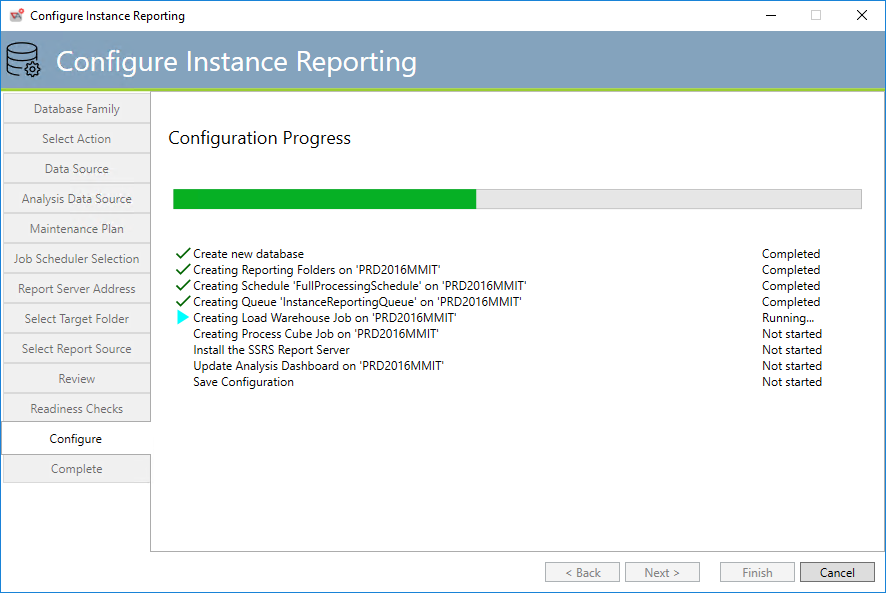
This tab performs the actual Instance Reporting configuration.
Instance Reporting Completion
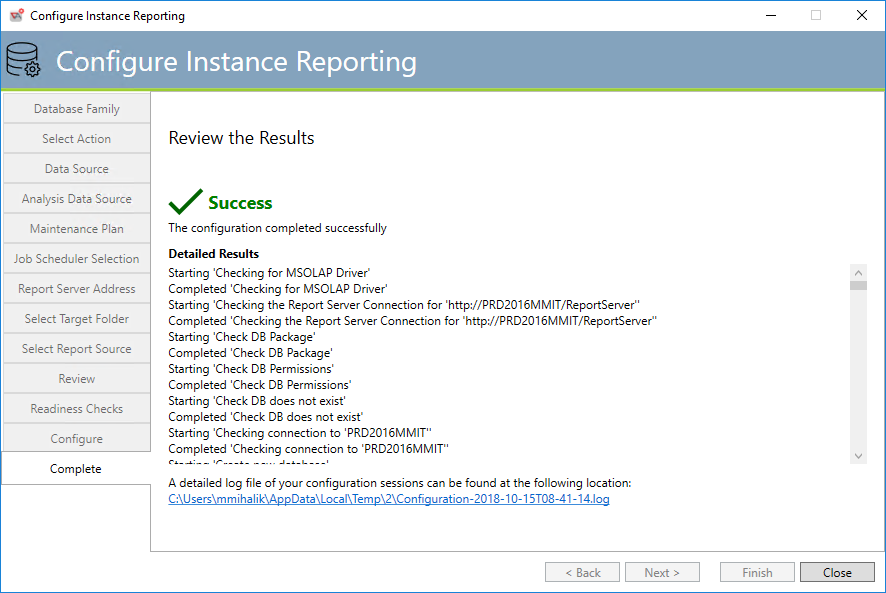
This tab displays a rollup of the results while configuring the Instance Reporting component.
Instance Reporting Configuration Modification
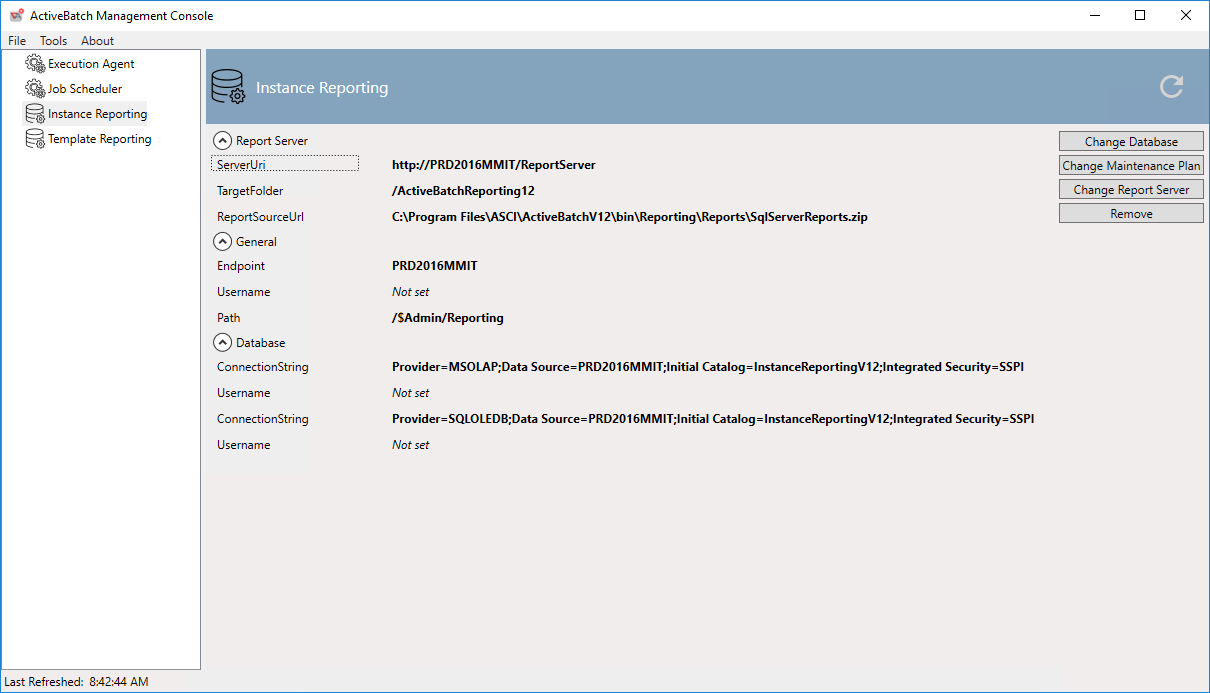
This tab allows you to make various changes to this configured component. You may also uninstall or Remove this component.
Change Database: Allows you to reconfigure the Relational and Analysis database specifications.
Change Maintenance Plan: Allows you to reconfigure the Job Schedulers accessed and other properties of the ETL job.
Change Report Server: Allows you to reconfigure the Report Server properties.
Remove: Allows you to uninstall the Instance Reporting components.