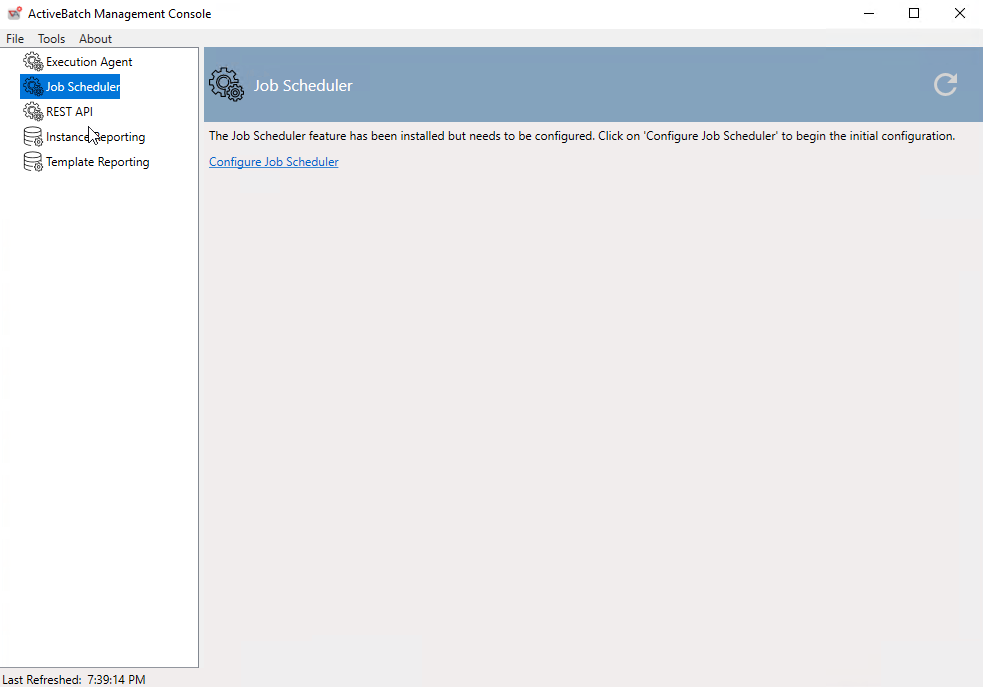
Configuring the Job Scheduler
After you install the ActiveBatch software on a designated system, an ActiveBatch “Management Console” icon will be added to the system’s desktop. In addition, right after the software is installed, the Management Console application will be opened automatically, since this is the next step required in getting your Scheduler environment up and running, and configuring the features you opted to install. The Management Console configuration features are displayed in alphabetical order. To the far right is a Refresh icon which allows you to refresh the properties of the selected component.
Note: The name of the ActiveBatch Management Console application is abatmgmt.exe, located in the bin folder of the ActiveBatch installation directory.
By separating the installation of ActiveBatch features from the configuration of those features and components, it easier and simpler to change configuration parameters without requiring a re-installation or registry modification.
Job Scheduler Configuration
The above dialog above symbolizes the beginning of the configuration of the Job Scheduler. Begin by clicking on the “Configure Job Scheduler” link.
Job Scheduler Licensing
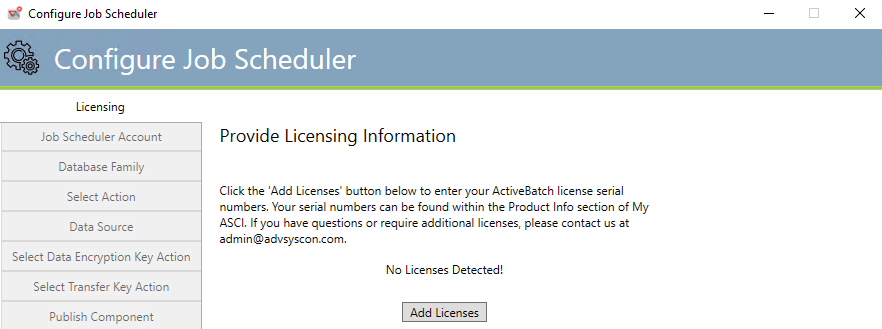
This tab requires licensing information (serial number(s)) that have been provided to you via either an email or from the MyASCI website portal - see the Registered Software section. With those licenses available, please click the Add Licenses button, which pops up the License Manager, depicted in the image below.
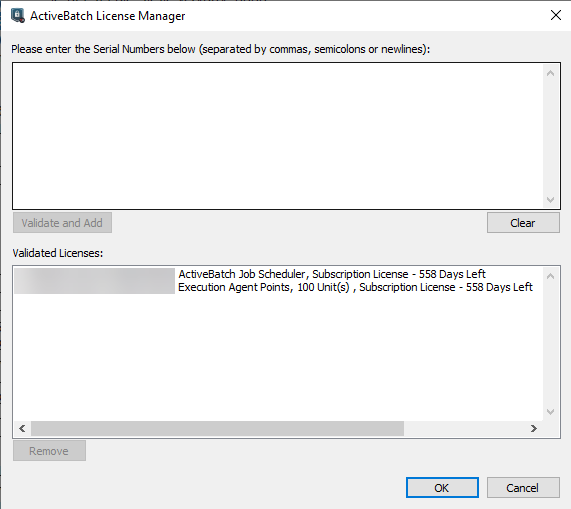
Note: The serial numbers have been removed from the above image.
Installation of a Job Scheduler typically requires that you enter at least two (2) serial numbers. One serial number for the Base Job Scheduler license and one serial number for Execution Agent points. If you are installing an Evaluation Base Job Scheduler license, then you only need that single serial number. That number will enable all ActiveBatch features for the time period of your evaluation.
You may enter serial number(s) using a variety of methods. You would typically retrieve your serial numbers through the My ASCI portal. You could then copy and paste that information into the upper dialog portion. Otherwise, you can manually enter serial numbers (either a single serial number per line or you can separate serial numbers with a semi-colon).
When you click the Validate and Add button, ActiveBatch will accept and validate any legal serial numbers and display information concerning any serial numbers or other information that was not acceptable and ignored. Clicking the OK button allows the configuration to continue.
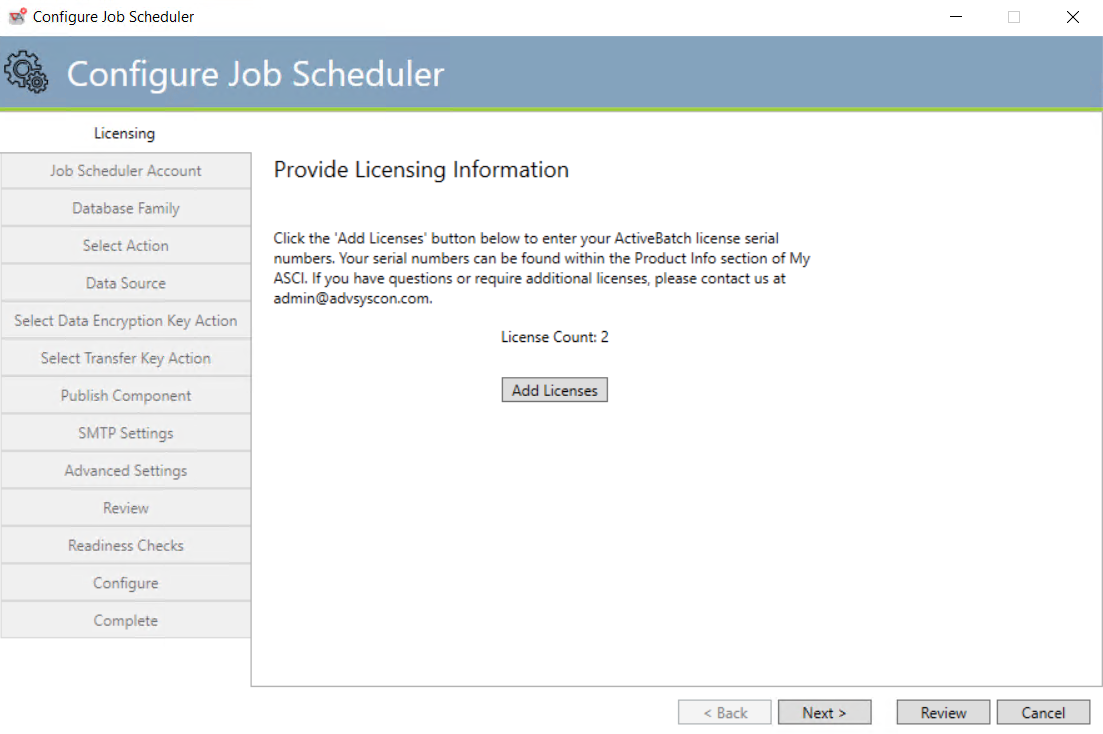
After completing the license validation process, the number of validated licenses appears.
The Next button will move to the next sequential tab. The Review button will jump down to the Review tab. For New installations we recommend you click the Next button and look through the most popular component parameters.
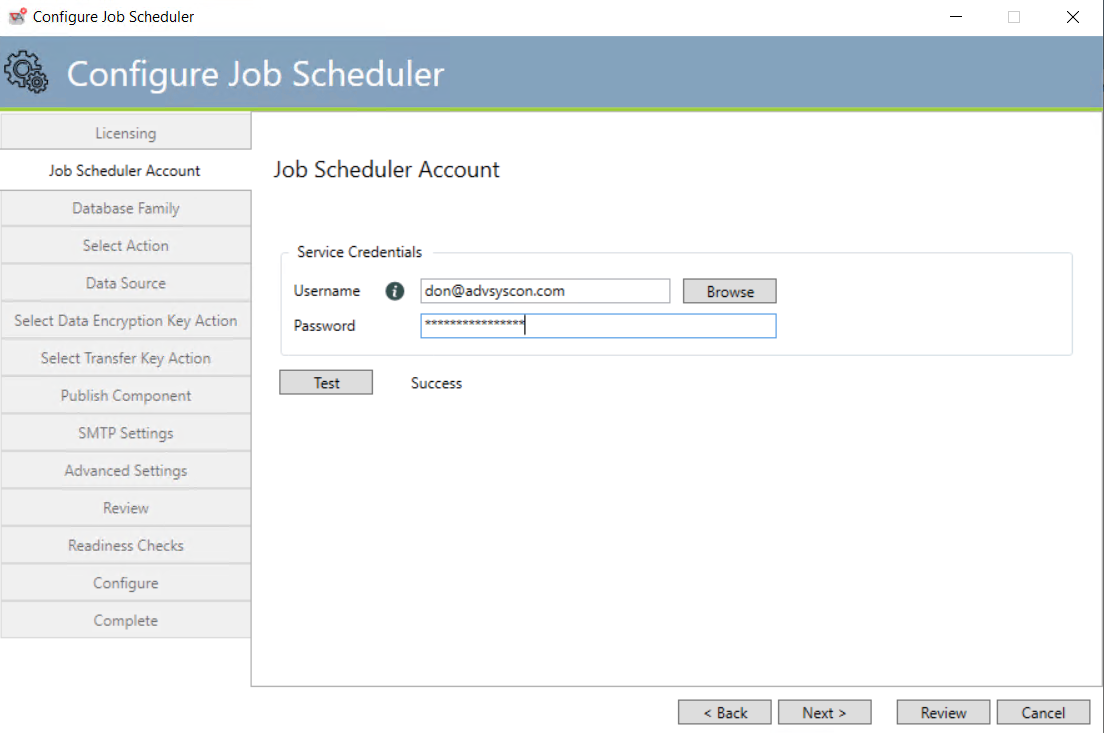
Job Scheduler Service Account
-
ASCI requires that you associate an administrative account when running the Job Scheduler service.
-
This is necessary for various network operations that may need to be performed; Active Directory registration and Windows authentication can be used when accessing the ActiveBatch database.
-
-
This account does require certain local administrative level access as well as privileges.
-
ActiveBatch will implicitly add “Logon as a Service”, “Replace Process Token”, “Logon as a Batch job”, “Change Notification”, “Create Token”, “Debug Process”, “Increase Base Priority”, “Adjust Quota”, “Profile Process”, “Security/Audit”, “Update System Environment”, “Profile System”, “Act as part of Operating System”, “Impersonate Client after Authentication” rights to the specified account, for the local machine, if they are not present.
-
-
The account must exist prior to your specification. ActiveBatch will also attempt to verify that the account and password specified ar valid.
-
You can click on the Browse button to look up an account or simply type one in using UPN syntax (username@domain) or domain\username syntax, as both formats are supported.
-
The information icon to the right of the Username field provides a tooltip that shows the 2 supported formats.
-
-
Next, enter the account password and then click the Test button to verify that the account and password specified are valid.
The Job Scheduler service is configured to allow itself to be automatically restarted in the event of a service failure. This option helps to ensure Job Scheduling continues in the event of a service failure. The automatic restart is presently configured to allow two restarts within a twenty-four (24) hour time period. You can change the recovery options of this service using either the ActiveBatch Service Manager or the Windows Services feature.
Note: If you intend to use the ActiveBatch E-Mail Event Trigger then the Service Account must be granted “Read” access to the target mailbox.
The Back button will move to the previous tab. The Next button will advance to the next sequential tab. The Review button will jump down to the Review tab. For New installations we recommend you click the Next button and look through the most popular component parameters.
Job Scheduler Database Family Selection
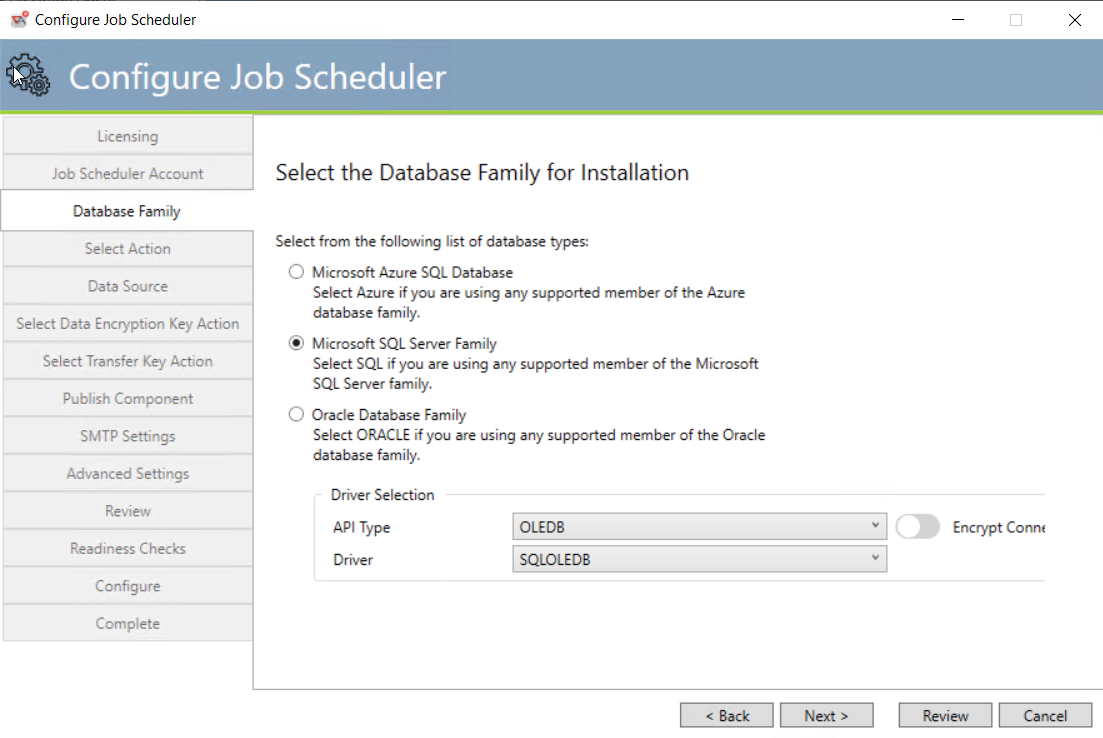
This dialog requires you to make a selection regarding the database software that you wish to use with ActiveBatch. Microsoft SQL Server represents the family of products. If you don’t have a database you can download SQL Express (please note there are limitations when using the SQL Express Edition. Visit Microsoft’s website for more information).
Azure SQL represents the Microsoft Azure SQL cloud database service.
Oracle represents both the Oracle database products.
If Microsoft Azure SQL or Microsoft SQL are selected, you will have the opportunity to select an OLEDB driver. The driver selected by default should be used unless you are familiar with SQL drivers.
If Microsoft SQL Server or Azure SQL was selected, please continue reading this section.
If Oracle was selected, please continue to section Job Scheduler Database Operation (Oracle).
The Back button will move to the previous tab. The Next button will advance to the next sequential tab. The Review button will jump down to the Review tab. For New installations we recommend you click the Next button and look through the most popular component parameters.
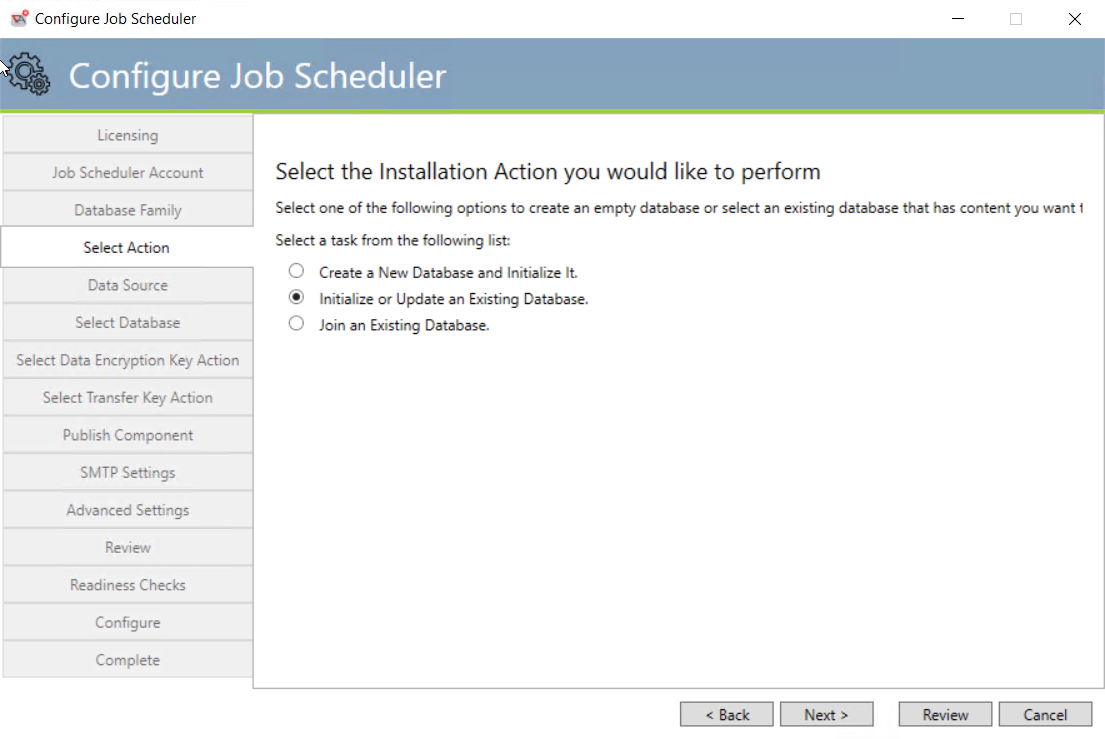
Job Scheduler Database Operation (SQL and Azure SQL)
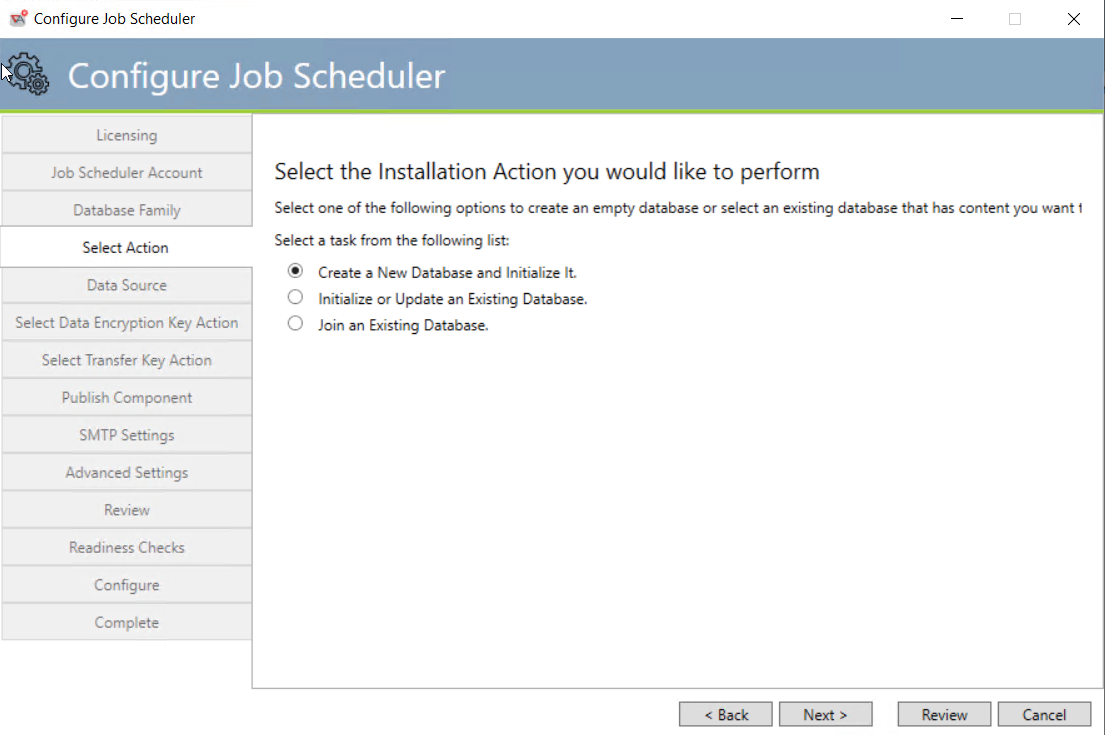
This dialog asks you to make a selection as to the state of the ActiveBatch database.
Create a New Database and Initialize it (default) means that you have not created an empty database for ActiveBatch to use and you would like ActiveBatch to perform that task. New ActiveBatch users would typically make this selection, which is applicable when the database choice is SQL Server Family (it will not work for Microsoft Azure SQL Server).
Initialize or Update an Existing Database means that you have an existing ActiveBatch database that you would like to use and update, or if no ActiveBatch tables exist in the database you select, we will add our tables to this database. Existing ActiveBatch V12 customers who would like to upgrade an existing database would make this selection.
Join an Existing Database means that you are installing a standby (high availability) Job Scheduler and you would simply like this installation to use an existing database.
If “Create a New Database and Initialize it” is selected, then continue reading this section. If the other choices were selected, continue to section Job Scheduler Update an Existing Database (SQL and Azure AQL).
As previously stated, ActiveBatch does not support the direct creation of an Azure SQL database for ActiveBatch Job Scheduler purposes. This is due to charges incurred with Microsoft for their services. We believe that you should make the size and selection of the database, directly. Therefore, you must use the Microsoft Azure portal to create an empty database and then execute the installation. We do highly recommend that you select an S4 or larger database sizing option. Since the creation of a new database for Azure SQL is not supported, you should select the initialize option, depicted in the image above.
The Back button will move to the previous tab. The Next button will advance to the next sequential tab. The Review button will jump down to the Review tab. For New installations we recommend you click the Next button and look through the most popular component parameters.
Job Scheduler Database Data Source (SQL)
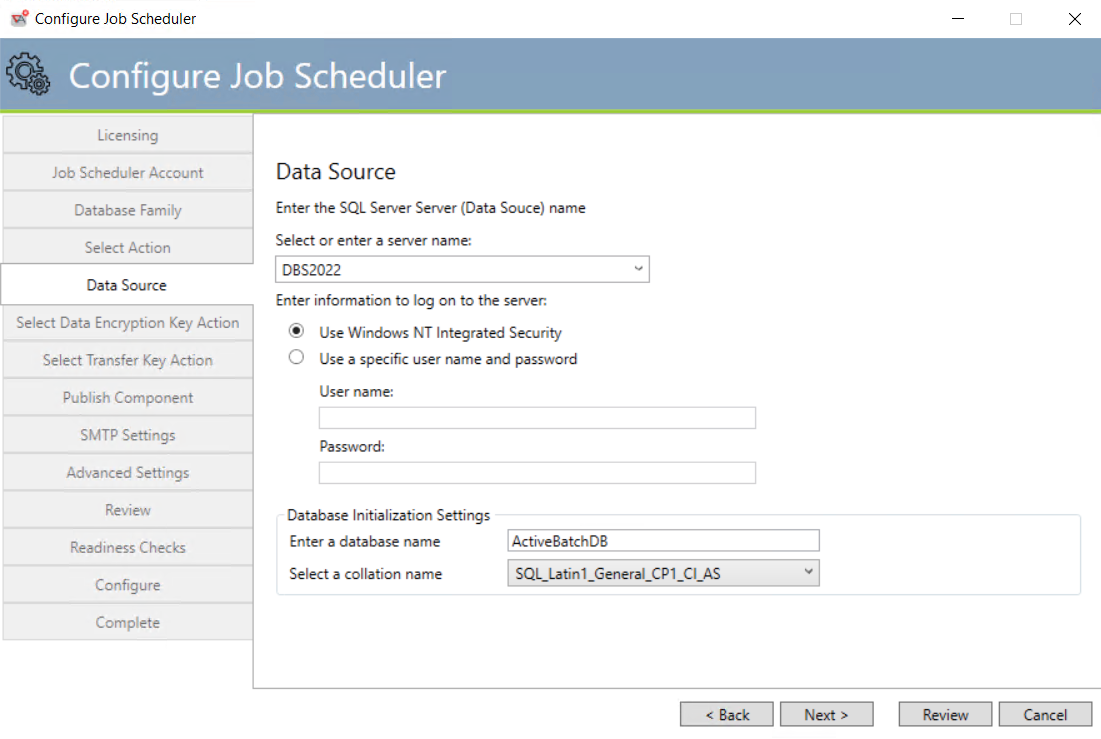
This dialog asks you to select a machine that is running the SQL Server instance you need. The lower half of the dialog addresses authentication and the database settings.
Using the dropdown, select a machine that is running the SQL Server software that you want ActiveBatch to use. If your desired machine is not shown you may type it in (just the machine name and, if applicable, instance name) and the installation will attempt to connect to it. The example above is referencing the SQL Server product on machine DBS2022. If the product was SQL Server Express edition, the instance would be named “sqlexpress” (the syntax is “machine-name\instance-name”). In that case, DBS2022\SQLEXPRESS would unambiguously reference that instance on the DBS2022 system.
SQL Server supports two types of authentication: Windows Integrated Authentication and Database. Windows Integrated Authentication refers to the normal Windows security system. This means that the user account you specify for the Job Scheduler service will be used to access the database. That account must be given full access. Database refers to the database’s own authentication.
Note: The “Username” specified is not a Windows username but a database user.
Under Database Initialization Settings for the first field you will need to enter the name of the database you want to create. The second is a drop down which asks you to select a collation name. You can specify any collation name as long as it is “case insensitive” (assuming the language supports the concept of case). Look for _CI_ in the collation name for a case insensitive language collation name.
The Back button will move to the previous tab. The Next button will advance to the next sequential tab. The Review button will jump down to the Review tab. For New installations we recommend you click the Next button and look through the most popular component parameters.
Job Scheduler Update an Existing Database (SQL and Azure AQL)
Updating an existing database consists of requesting the Data Source as per section Job Scheduler Database Data Source (SQL)
Once you’ve entered the Data Source, the following dialog appears. Select Database.
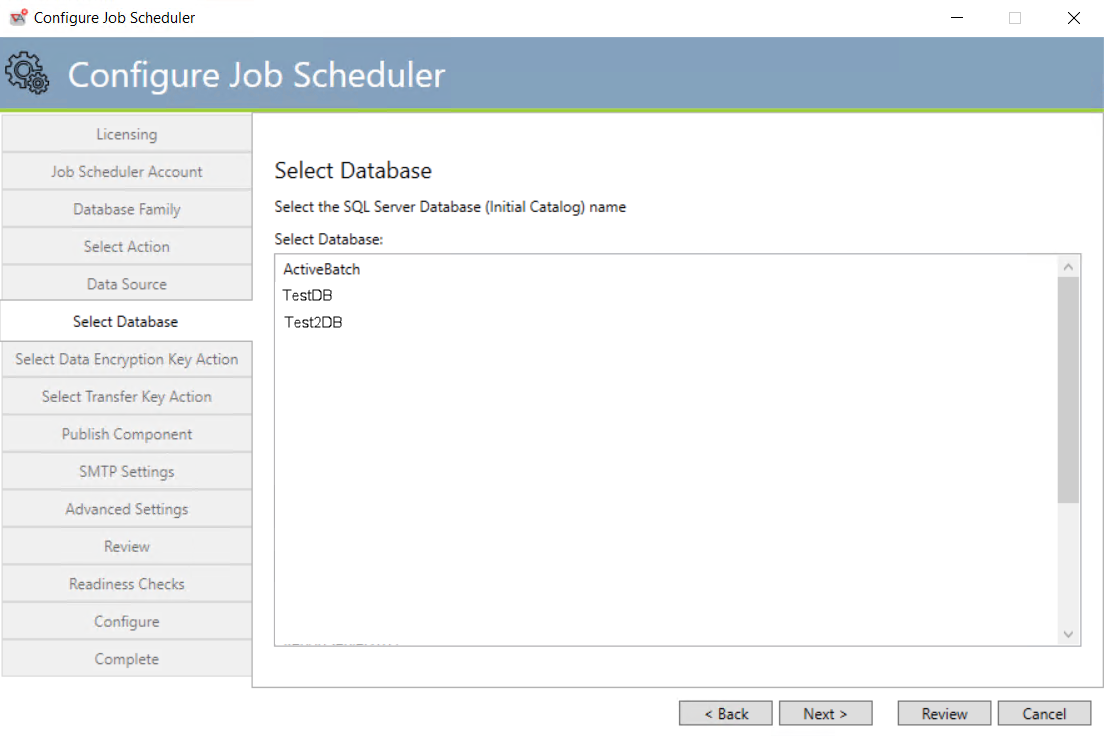
After a slight pause, a large list box will appear with all the databases your selected SQL Server machine offers. Please select the database you want to use for 2023 or higher. If V12 tables are detected, those tables will be upgraded to 2023 or higher. If ActiveBatch tables are not detected, we will create those tables and all necessary ActiveBatch database objects within the database.
The Back button will move to the previous tab. The Next button will advance to the next sequential tab (see section Job Scheduler Disable Objects). The Review button will jump down to the Review tab. For New installations we recommend you click the Next button and look through the most popular component parameters.
Job Scheduler Database Operation (Oracle)
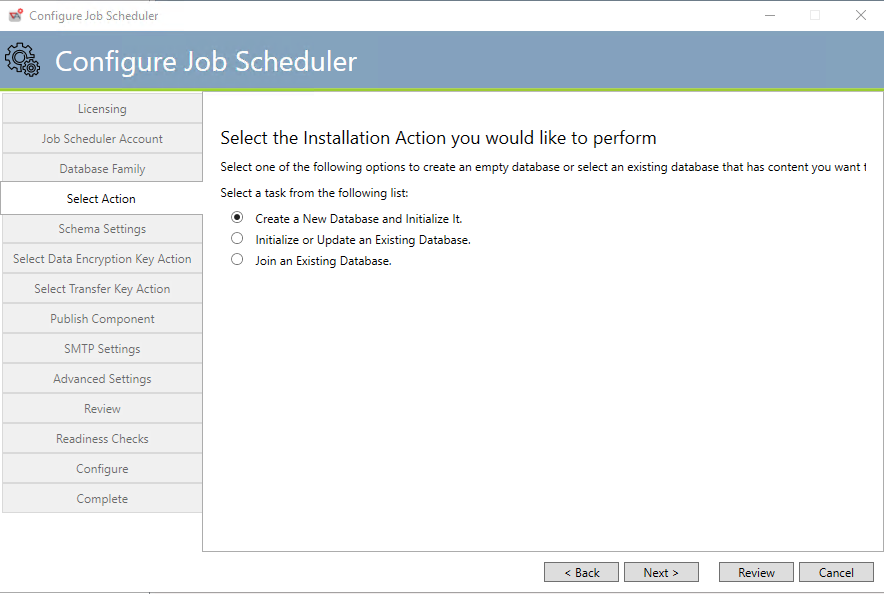
This dialog asks you to make a selection as to the state of the ActiveBatch database.
Create a new database and initialize it (default) means that you have not yet created a tablespace for ActiveBatch to use - and you would like ActiveBatch to perform that task. New ActiveBatch users would typically make this selection.
Note: There must be an Existing Oracle instance that ActiveBatch can add its schema to.
Initialize or Update an Existing Database means that you have an existing ActiveBatch database that you would like to use and update or if no ActiveBatch tables exist we will add our tables to this database.
Existing ActiveBatch V12 customers who would like to upgrade an existing database would make this selection.
Join an Existing Database means that you are installing a standby Job Scheduler and you would simply like this installation to use an existing database.
If “Create a new database” was selected then continue to the next image. If the other choices were selected, please continue to section Job Scheduler Data Source – Existing (Oracle).
Job Scheduler Schema Settings – New (Oracle)
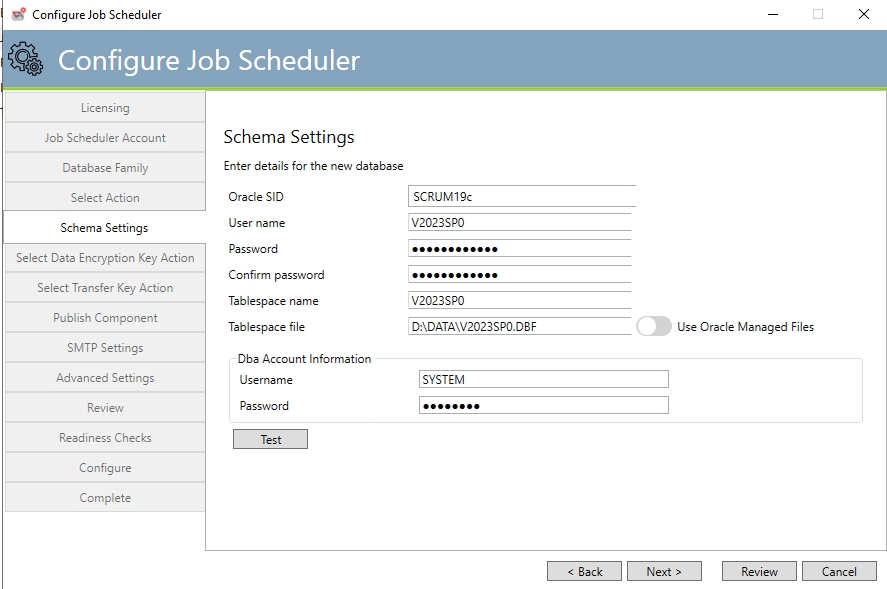
This dialog requests various information needed to initialize a tablespace for ActiveBatch purposes.
Oracle SID: This refers to the “Service ID” or the database server/instance that hosts the database.
User/Schema Name: refers to the database user that is used to form the schema name that ActiveBatch will use for its tables.
Tablespace: is the name of the tablespace that the installation process will add the ActiveBatch database objects to. The default specification is “abat”.
Tablespace Data File: refers to the physical location of the tablespace (for example, C:\OracleXE\OraData\XE\Abat.dbf).
Note: The Schema User will be granted the following Oracle privileges: Create Session, Alter Session, Create Table, Create View, Create Procedure, Create Sequence, Create Trigger, Create Type, Connect, Grant on SYS.DBMS_SESSION and Grant Any Context for ABAT_schema-user.ABAT_SETCONTEXT.
If you receive an Oracle “Insufficient Privileges” error it is almost always due to one or more missing privileges from the above list.
DBA level access (under the Dba Account information label depicted in the above image) is required to create the ActiveBatch schema. This dialog requests a system level username and password with which the installation process will be able to add the schema to the previously named tablespace.
The Back button will move to the previous tab. The Next button will advance to the next sequential tab. The Review button will jump down to the Review tab. For New installations we recommend you click the Next button and look through the most popular component parameters.
Job Scheduler Data Source – Existing (Oracle)
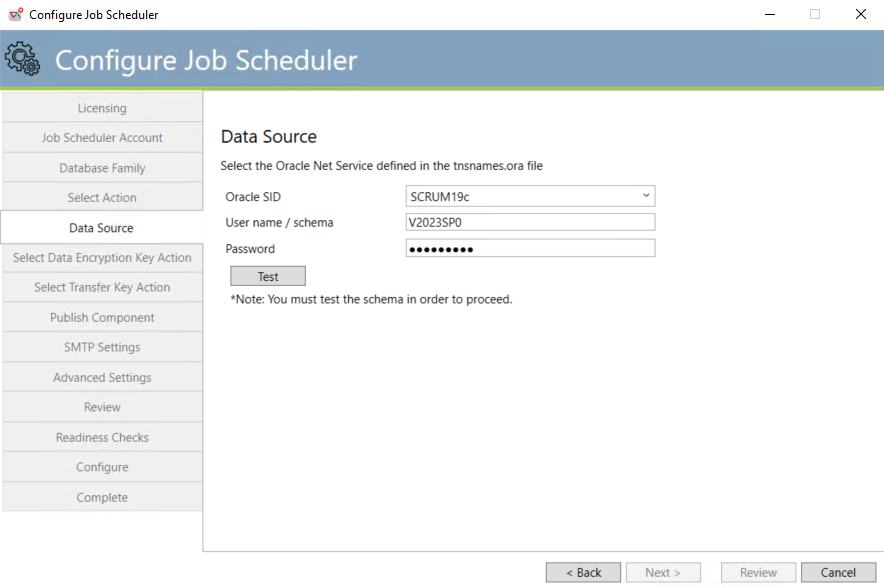
Oracle SID: This should be the Oracle SID that represents the Oracle database instance/server that hosts the tablespace.
Username/Password is the security information that represents the schema user.
Click the Test button to verify that the account and password specified are proper.
The Back button will move to the previous tab. The Next button will advance to the next sequential tab. The Review button will jump down to the Review tab. For New installations we recommend you click the Next button and look through the most popular component parameters.
Note: If you are an ActiveBatch V12 user who is migrating to 2023 or higher, please read this page in its entirety before proceeding.
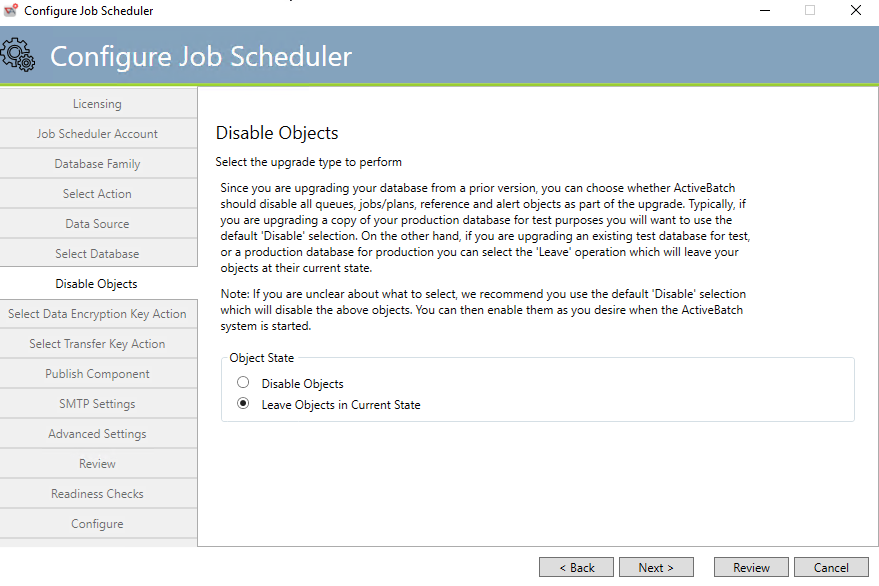
If the database you’re attempting to upgrade from is V12, the above confirmation dialog will appear to verify whether you want all queues, jobs, plans, reference objects and alert objects to be initially disabled after the upgrade has been completed. This disable process protects you from inadvertently running a production system when you really mean to simply verify operations under 2023 or higher (in a 2023 or higher test environment). By default, with Disable Objects selected, ActiveBatch will upgrade the V12 database to 2023 or higher and disable the above mentioned objects. You (or another ActiveBatch Administrator) would then enable the objects as you require. If you select the Leave Objects in Current State radio button, then all objects will remain in their current state at the completion of the upgrade. Leaving objects in their current state is typically selected when upgrading your current V12 system to 2023 or higher. Disabling the objects is typically selected when testing objects in a test environment, and you wish the objects to be initially disabled when the test Scheduler starts.
The Back button will move to the previous tab. The Next button will advance to the next sequential tab. The Review button will jump down to the Review tab. For New installations we recommend you click the Next button and look through the most popular component parameters.
Select Data Encryption Key Action
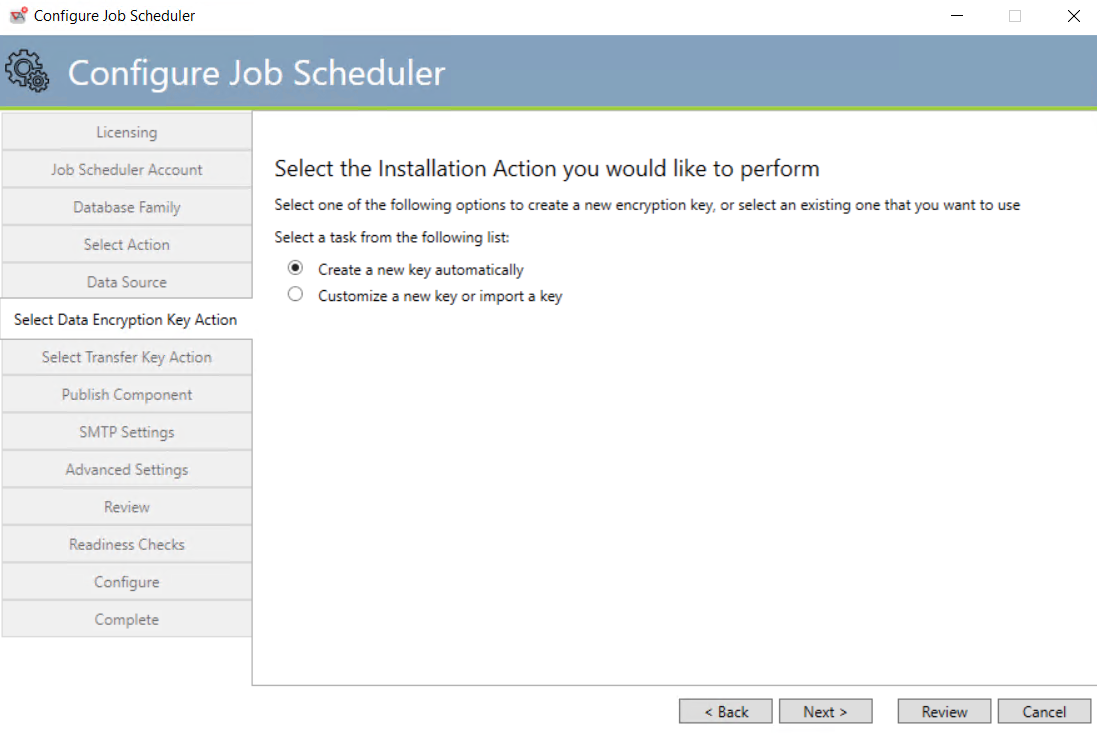
This dialog requires a selection regarding data encryption keys. The system uses a Data Encryption Key (DEK) to secure all sensitive data at rest and in transit. By default, Create a new key automatically is selected. If you keep this option, the system will create the key for you (when the configuration settings are applied), and nothing else is required of you.
If you choose Customize a new key or import a key, then click Next, the following dialog will appear:
New Data Encryption Keys
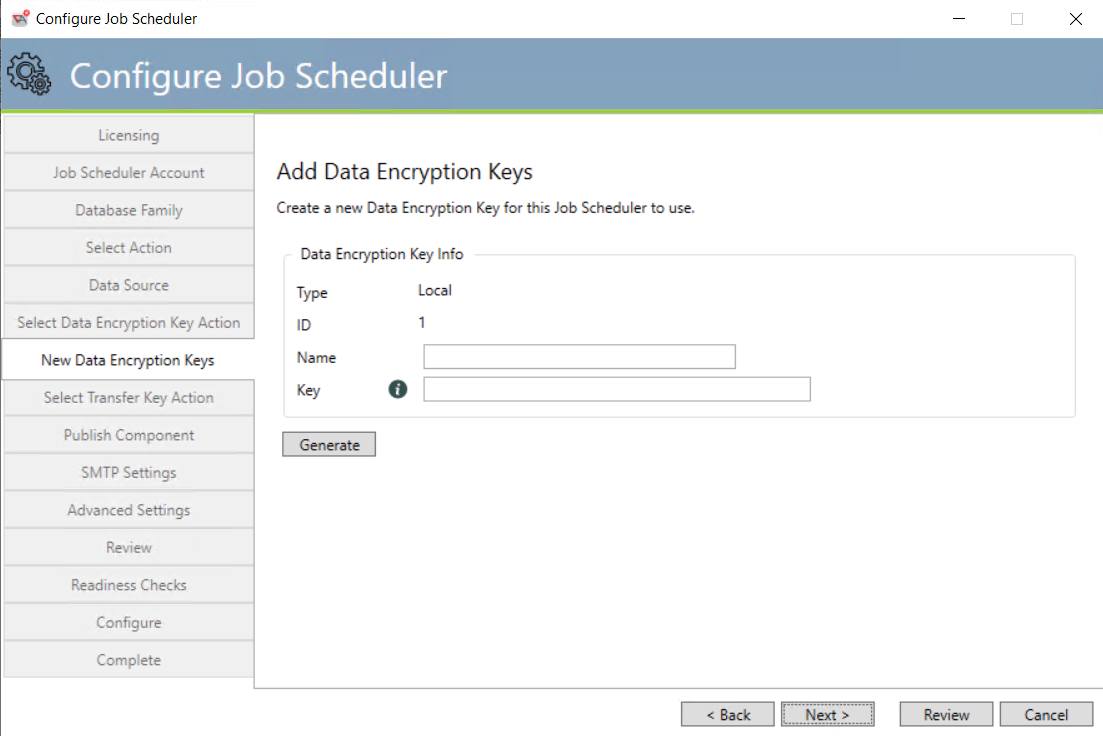
You have the option to add your own existing key (the “import” option). To do this, enter a Name, then enter your existing key in the Key field. Or, you can enter the Name, then click the Generate button. The configuration tool will generate the key for you, which will be placed in the key field.

This dialog requires a selection regarding data encryption keys. The system uses the Transfer Key (TK) for securing sensitive data while being transferred between different Job Schedulers within an environment. By default, Create a new key automatically is selected. If you keep this option, the system will create the key for you (when the configuration settings are applied), and nothing else is required of you.
If you select Customize a new key or import a key, the following window will appear, as depicted below.
New Transfer Keys
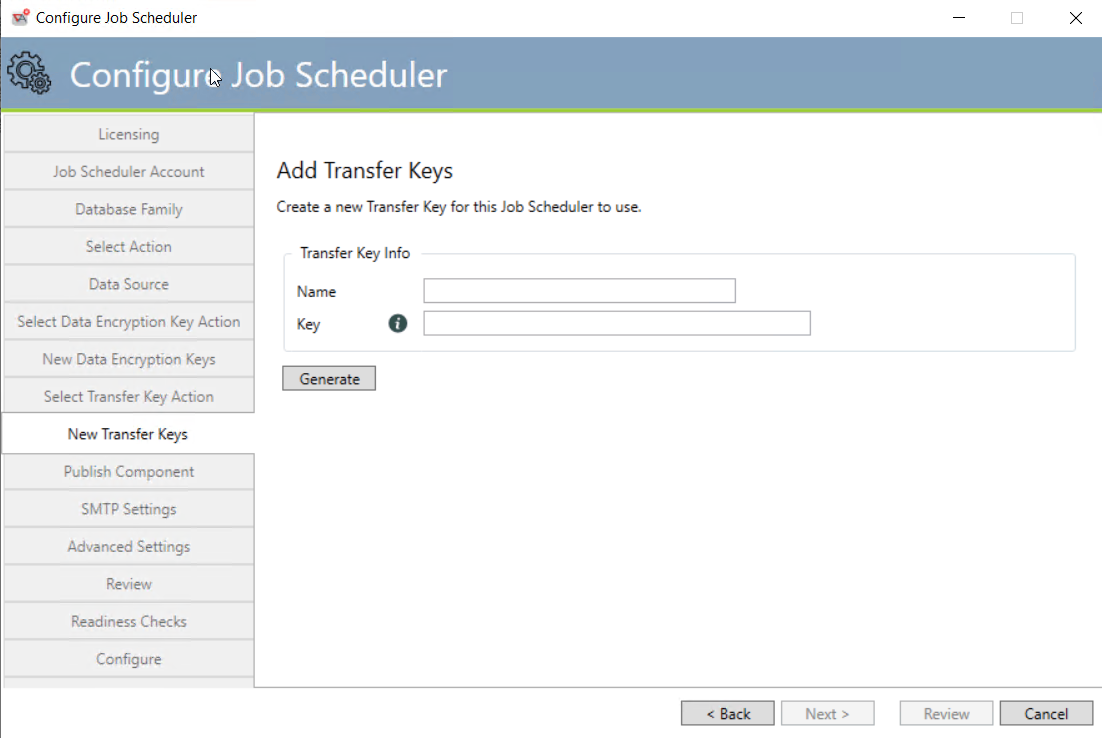
You have the option to add your own existing key (the “import” option). To do this, enter a Name, then enter your existing key in the Key field. Or, you can enter the Name, then click the Generate button. The configuration tool will generate the key for you, which will be placed in the key field.
Job Scheduler Published Name
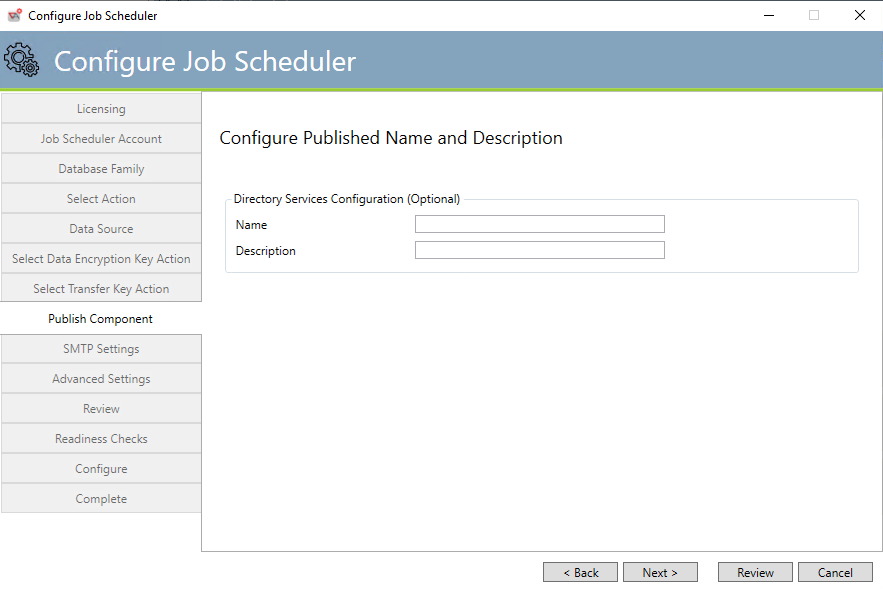
This tab is optional. Configuring a Published Name for a Job Scheduler allows ActiveBatch the use of aspects of High Availability and simplicity for your end-users. For High Availability, having the Job Scheduler feature move from machine to machine transparently requires that a hostname or IP address be avoided. A single name that can be assigned to the active Job Scheduler machine allows for seamless recovery in the event of a failure. Even if high availability isn’t the goal, creating a simple name that is distinct from a hostname or IP address makes it easy to connect to a desired Job Scheduler.
Note: For the published name feature to work, you must download a separate installer from the ASCI website named ActiveBatchDS.msi, and run it to allow the publication of Job Scheduler systems to Active Directory (AD) or Active Directory Lightweight Directory Services AD LDS).
The Back button will move to the previous tab. The Next button will advance to the next sequential tab. The Review button will jump down to the Review tab. For New installations we recommend you click the Next button and look through the most popular component parameters.
Job Scheduler SMTP Settings
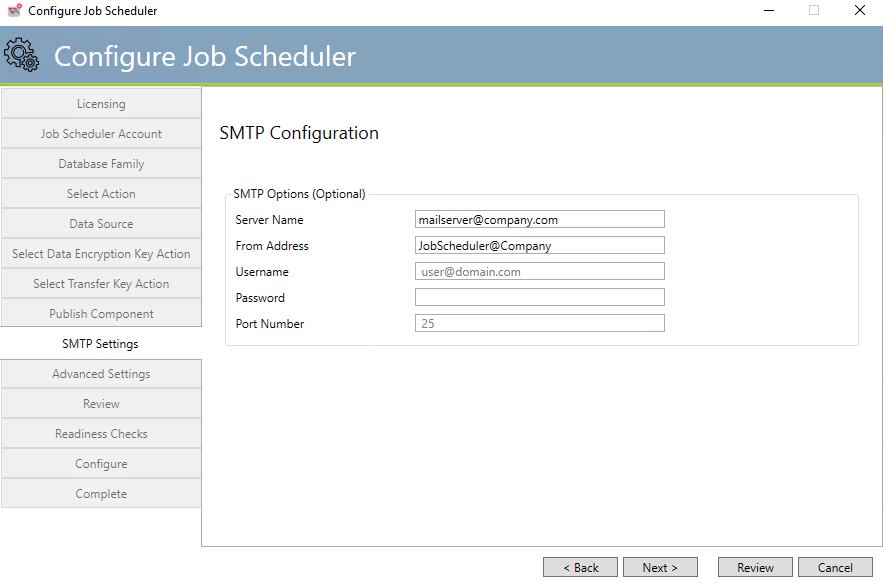
This tab is optional. This tab allows you to configure the SMTP settings for the Job Scheduler.
Server Name: This value represents the name of the machine on which an SMTP Server resides. The value should be represented in TCP format. Either as a fully qualified machine domain name (e.g. machine.commerce.com) or an IP address.
From Address: This value controls the “From:” field on an SMTP E-Mail that can be sent by the Job Scheduler for notification or alerts. You should specify a valid E-Mail address (e.g. name@commerce.com) that represents a real E-Mail destination on your company’s E-Mail system.
Username: This value allows for Authenticated SMTP to be enabled. The value represents the Windows username that, when combined with a proper password provides authenticated access to the e-mail server noted in SMTP Server. The syntax for this username value is domain\user.
Password: This value, used when Authenticated SMTP is enabled, represents the password of the Username.
Port Number: This value name controls the TCP port number for communication to the SMTP server denoted in “SMTP Server”. The default port number for SMTP server operations, when omitted, is 25.
The Back button will move to the previous tab. The Next button will advance to the next sequential tab. The Review button will jump down to the Review tab. For New installations we recommend you click the Next button and look through the most popular component parameters.
Job Scheduler Advanced Settings
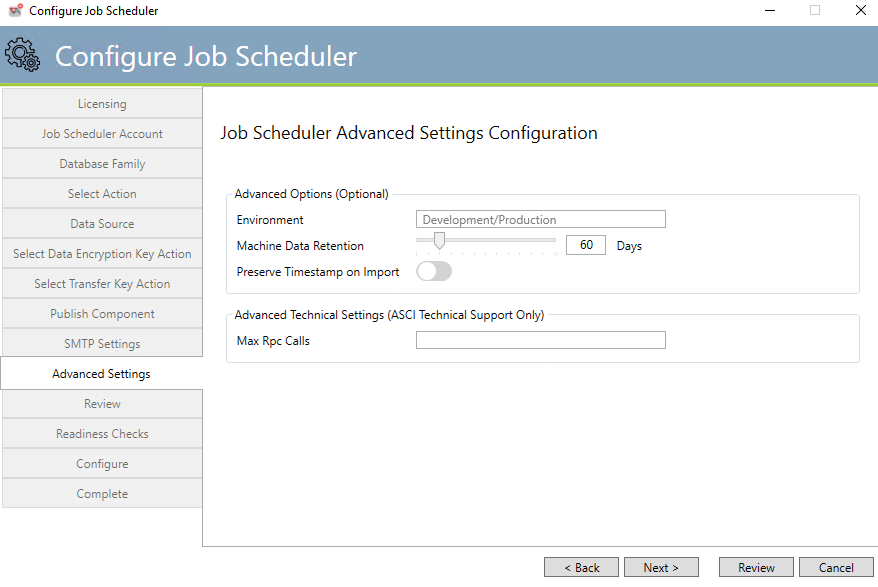
This tab is optional. This tab allows you to configure advanced settings for the Job Scheduler.
Environment: This property controls the environment for the Job Scheduler. The value itself is free-form, however, the specific keyword “Production” will prevent the use of the Simulation feature (see Trigger Advanced). The idea of to avoid simulation of production runs on a production system.
Machine Data Retention: This property controls the number of days that machine data metrics are maintained for the purposes of the “Machine Load” view.
Preserve Timestamp on Import: This Boolean property controls whether the import of an ActiveBatch object inherits the date and time of the original imported object as opposed to the date and time that import occurs. By default, the date and time of the newly imported object is when it occurs (or False). If true, the date and time of the original imported object is applied to the newly imported object.
The Back button will move to the previous tab. The Next button will advance to the next sequential tab. The Review button will jump down to the Review tab. For New installations we recommend you click the Next button and look through the most popular component parameters.
Job Scheduler Configuration Review
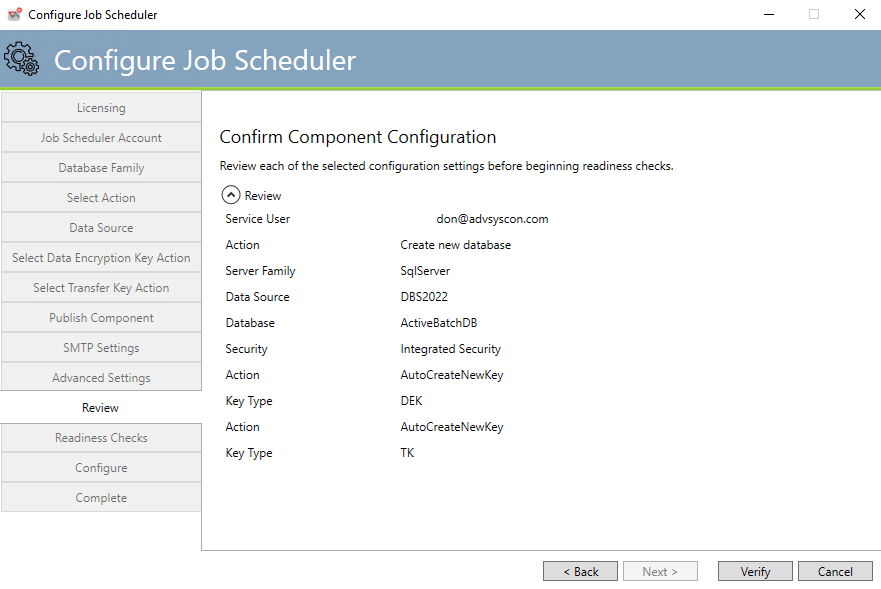
This tab allows you to review your specifications for the Job Scheduler.
The Back button will move to the previous tab. The Verify button will cause a check of the specification entered before applying configuration changes to the Job Scheduler.
Job Scheduler Readiness Checks
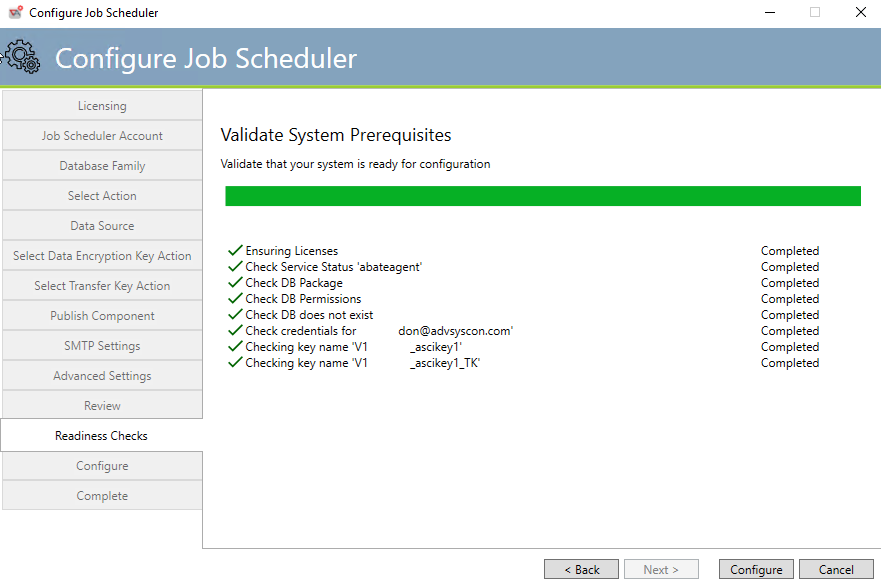
This tab performs validation of the various configuration parameters, database and service credentials.
The Back button will move to the previous tab. Clicking the Configure button will cause the actual Job Scheduler configuration parameters to be processed and applied.
Job Scheduler Configuration
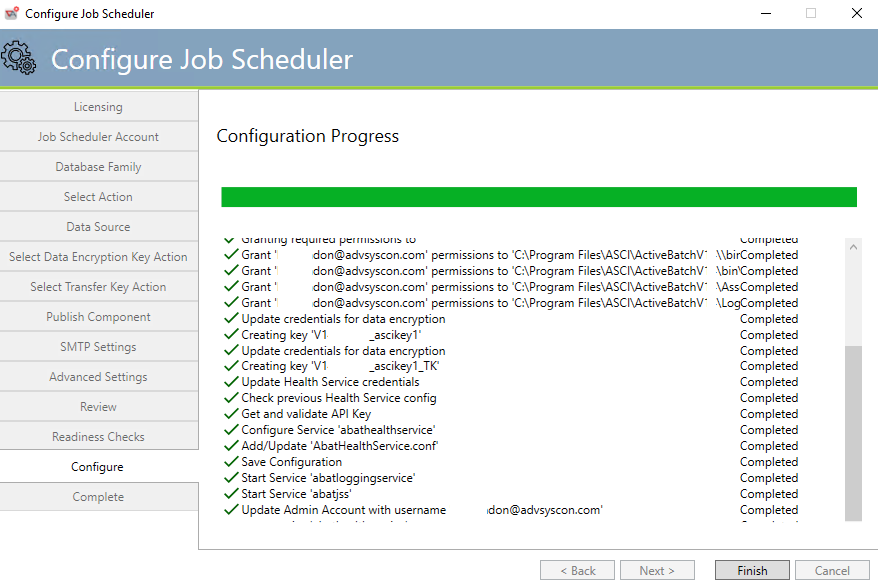
This tab performs the actual configuration changes to the Job Scheduler and its environment.
Job Scheduler Configuration Completion
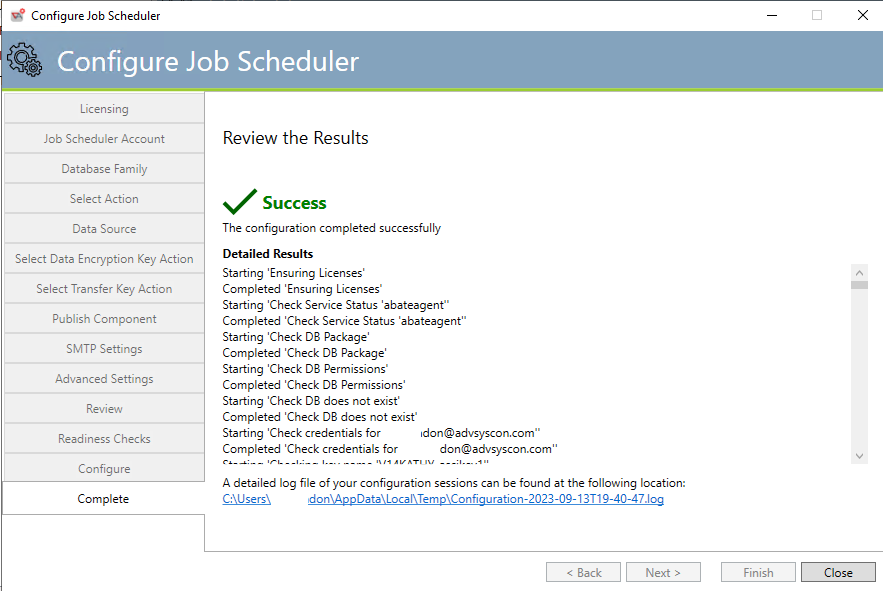
This is the final tab for the Job Scheduler service configuration. All action items are present with an overall indication as to whether the configuration was successful. A detailed logfile is also available.
Clicking the Close button will cause the Configuration Manager home page to be displayed. This allows you to configure the next component.
Job Scheduler Configuration Modification
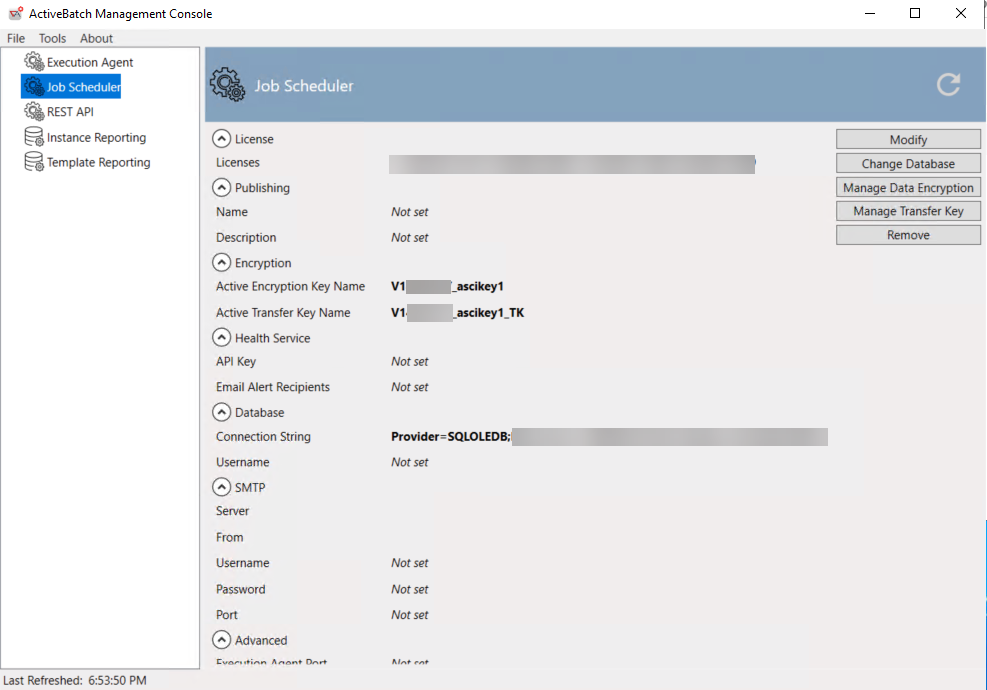
Once you’ve configured the Job Scheduler the initial configuration will contain three (5) additional buttons: Modify, Change Database, Manage Data Encryption, Manage Transfer Key and Remove.
Clicking the Modify button will cause the Job Scheduler configuration tabs to appear. You will then be able to change any of the parameters you were shown during the initial component configuration.
Clicking the Change Database button will cause those dialogs that allow you to configure the database software and database that the Job Scheduler should now use.
Clicking the Manage Data Encryption button will allow you to create a new data encryption key. You can also copy the existing key to the clipboard.
Clicking the Manage Transfer Key button will allow you to create a new transfer key. You can also copy the existing key to the clipboard.
Clicking the Remove button will cause the Job Scheduler component to be removed as a Windows service (and its other associated services, such as the abathealthservice). It will also remove other configuration items related to the Scheduler, but it does not remove the software that was installed in the ActiveBatch installation folder, which by default is Program Files\ASCI. This means you can reconfigure the Scheduler if desired, from scratch, using the ActiveBatch Management Console, without having to install the software again. To remove the software, run the Windows installation kit. There will be a an Uninstall button you can select to remove the software. You are not prompted to confirm the removal of the software, so please be certain this is the task you wish to perform. There still are residual folders left behind in the ASCI installation folder (the 64-bit folder only), as these items are dynamically created after the installation. You can manually delete the installation folder, if desired, after uninstalling the software.