 CyberArk Integration with ActiveBatch
CyberArk is a security company which provides a variety of security and identity management solutions in a comprehensive approach to Identity Security centered on
privileged access management to protect against advanced cyber threats.
ActiveBatch objects require credentials, usernames and passwords that are stored within the product. The ActiveBatch – CyberArk integration will allow customers to use CyberArk’s secure vault, so passwords can be rotated and retrieved at runtime while protecting against cyber attacks and the actions of a rogue employee.
For the CyberArk integration, we integrate with the ActiveBatch Application Access Manager software. This software provides access to a central credential storage vault to allow passwords to be stored in one place and managed by CyberArk. Permissions can be defined, and passwords can be rotated automatically by the Application Access Manager.

ActiveBatch requires either the CyberArk Credential Provider locally installed as a Local Credential Provider or networked via the Centralized Credential Provider.
Local Credential Provider – Installed on the developer machine, the Local Credential Provider can securely retrieve the application’s secrets from the Vault without any downtime or functionality-loss.
Central Credential Provider - Installed on a separate Windows server, The Central Credential Provider allows you to use the Credential Provider capabilities without the need to install it on each end user machine. The applications call the Central Credential Provider to securely retrieve their credentials from the Vault during run-time.
Local Credential Provider vs. Central Credential Provider
For business critical applications that require the highest level of availability, performance and security, it is recommended to use the Local Credential Provider.
The Local Credential Provider, installed on each server running an application, enables the highest level of anti-tampering security mechanism, as well as high-availability and performance, using the secure local cache. Furthermore, the local cache enables high performance password requests and high-availability in the case of a network outage to the Vault.
For non-mission critical applications or when there are challenges deploying an agent on each server, it is recommended to use the Central Credential Provider.
The Central Credential Provider, installed remote to the applications and on a central IIS server, alleviates the challenges of agents deployment. For increased availability and performance, the Central Credential Provider can be load balanced.
For more information, see CyberArk's Credential Providers.
Pre-Installation Requirements
Credential Provider
Supported Platforms for CyberArk Credential Provider 14.0:
|
Credential Provider Compatibility
This section lists the supported versions of CyberArk products that Credential Providers v14.0 is compatible with.
Supported CyberArk Products for CyberArk Credential Provider v14.0
| Credential Provider Version |
Works With |
Supports |
| 14.0 |
|
Application Password SDKs v12.1 and later |
Installation
Configuring ActiveBatch Extensions Manager:
ActiveBatch requires the CyberArk Local Provider Credential SDK be installed on the Job Scheduler machine.
The SDK provides the most security versus using the CyberArk REST API. ActiveBatch gives you a choice between using the Local Provider or a Central Provider.
Starting with ActiveBatch V14, support for Gen 2 of the CyberArk REST API was added to ActiveBatch. This is the only version supported by Privilege Cloud Standard, and is also supported by Self Hosted PAM. You can find more information on REST Gen 2 here.
It is recommended to continue using the Gen 1 REST API for self-hosted Privilege Access Managers
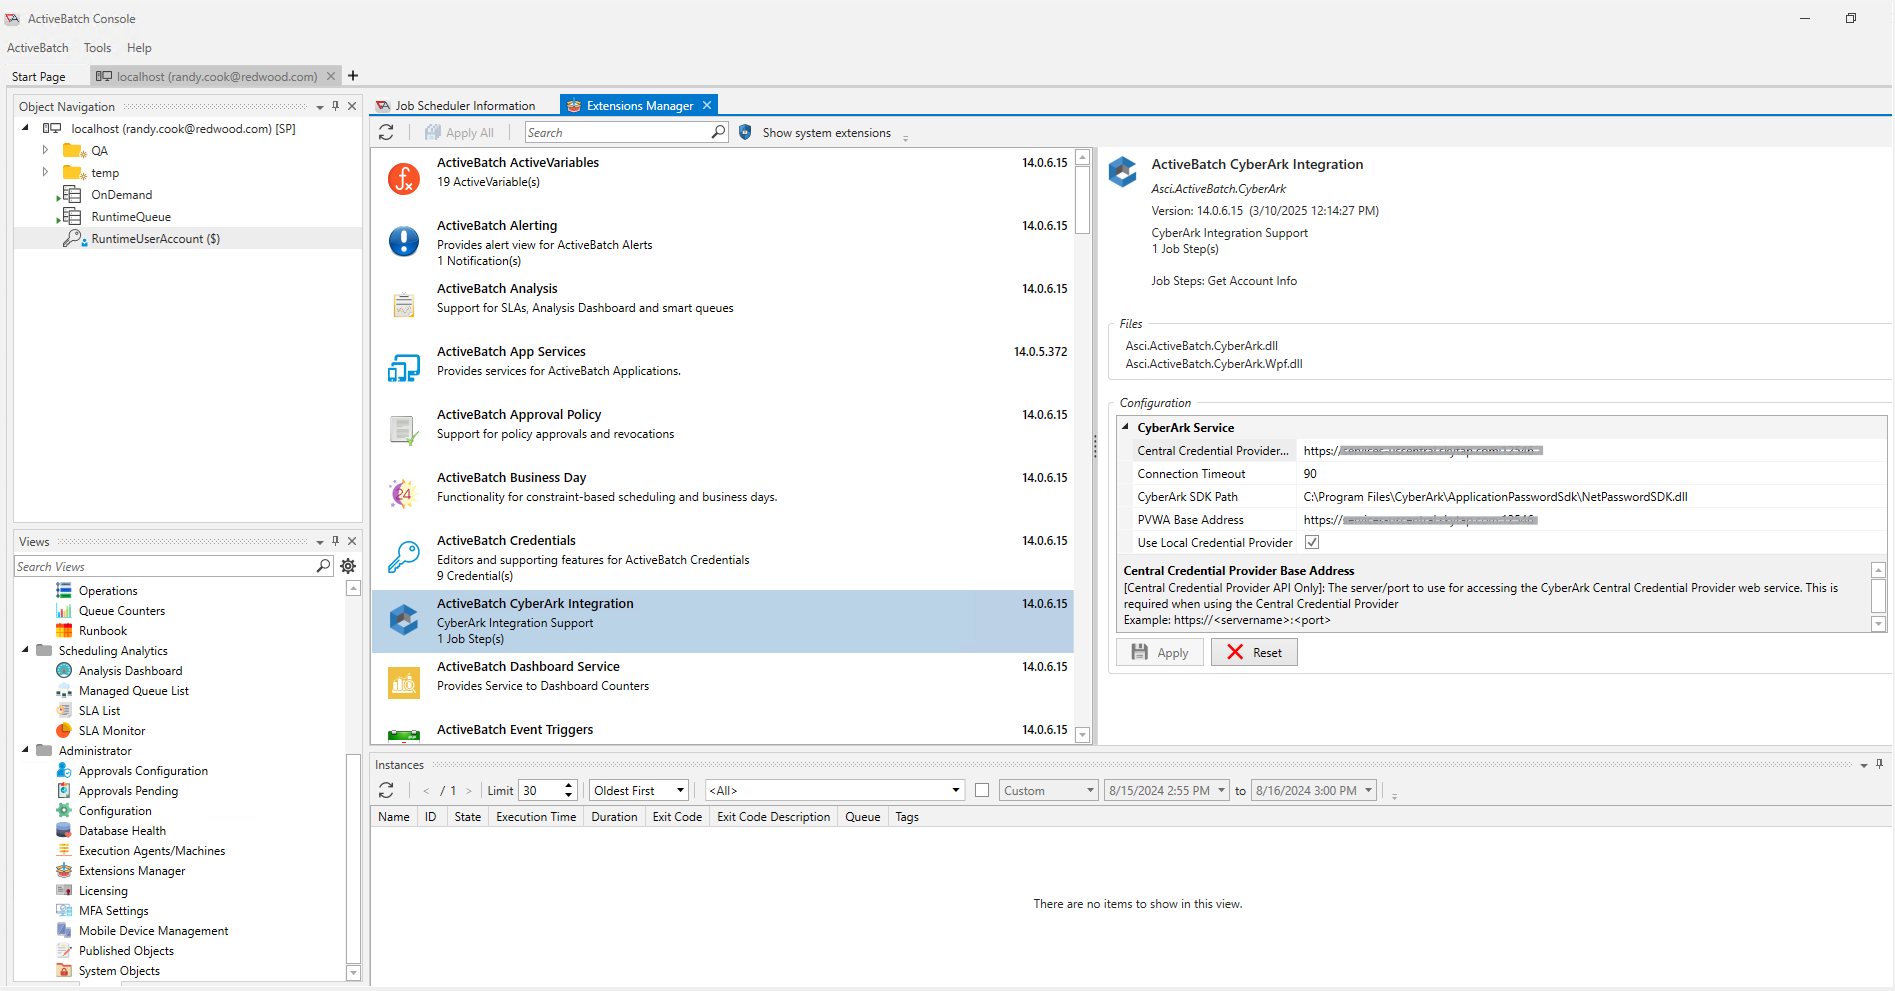
Configure the Extensions Manager in ActiveBatch Console to provide configuration information and the CyberArk Marketplace (ActiveBatch) for the Integration Guide.
To access the Extensions Manager, from Views select the drop-down Administrator menu, and select Extensions Manager.
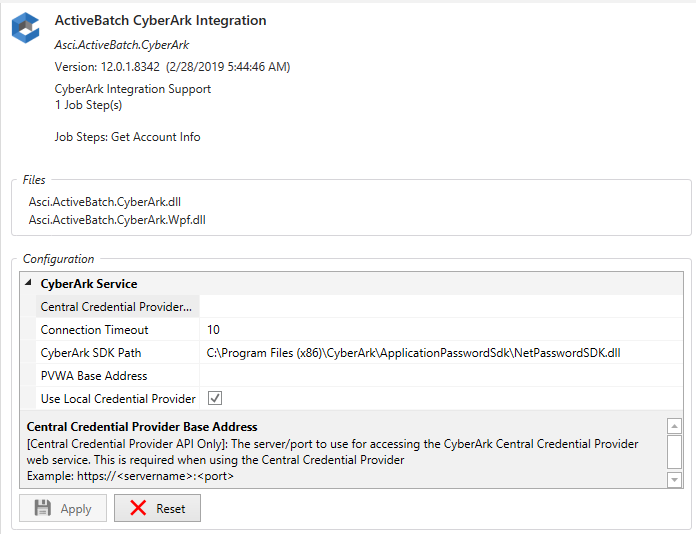
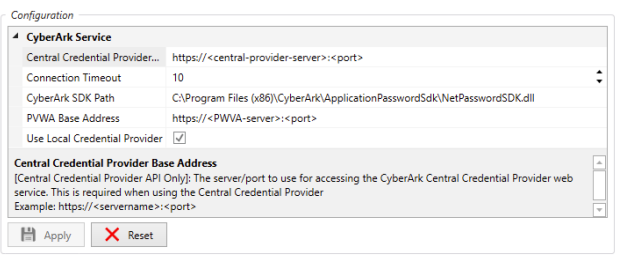
Central Credential Provider Base Address – This parameter specifies the servername and port number (https://servername:port) to use for accessing the CyberArk Central Credential Provider Web Service (REST). This is only required when using the Central Credential Provider.
Connection Timeout – The timeout value in seconds to use when connecting to CyberArk.
CyberArk SDK Path – The path to the CyberArk NetPasswordSDK.dll file on the Job Scheduler. This is required when using the Local Credential Provider.
PVWA Base Address – This parameter specifies the servername and port number (https://servername:port) to use for accessing the Password Vault Web Access SDK. This is required when setting up CyberArk User Accounts.
Use Local Credential Provider – If TRUE, this Boolean checkbox determines the Local Provider should be used to retrieve credentials from CyberArk. If FALSE, the Central Provider is used.
While Central Credential Provider allows for ease of management, the Local Credential Provider is strongly recommended for better security and performance.
CyberArk Configuration
Secrets Manager Configuration
The following sections provide details on ActiveBatch IT Automation configuration with CyberArk Secrets Manager
Application ID (APPID) and Authentication Details – To define the application, define it manually through the CyberArk Password Vault Web Access (PVWA)
interface and configure the authentication details.
Adding applications in CyberArk
This topic describes how to define an application in the Vault from the PVWA.
For additional details in managing applications see CyberArk: Manage Applications.
To define an application in the Vault through the REST API, see CyberArk: Add Application in Privileged Access Security,
To define multiple applications , see CyberArk: Add multiple applications.
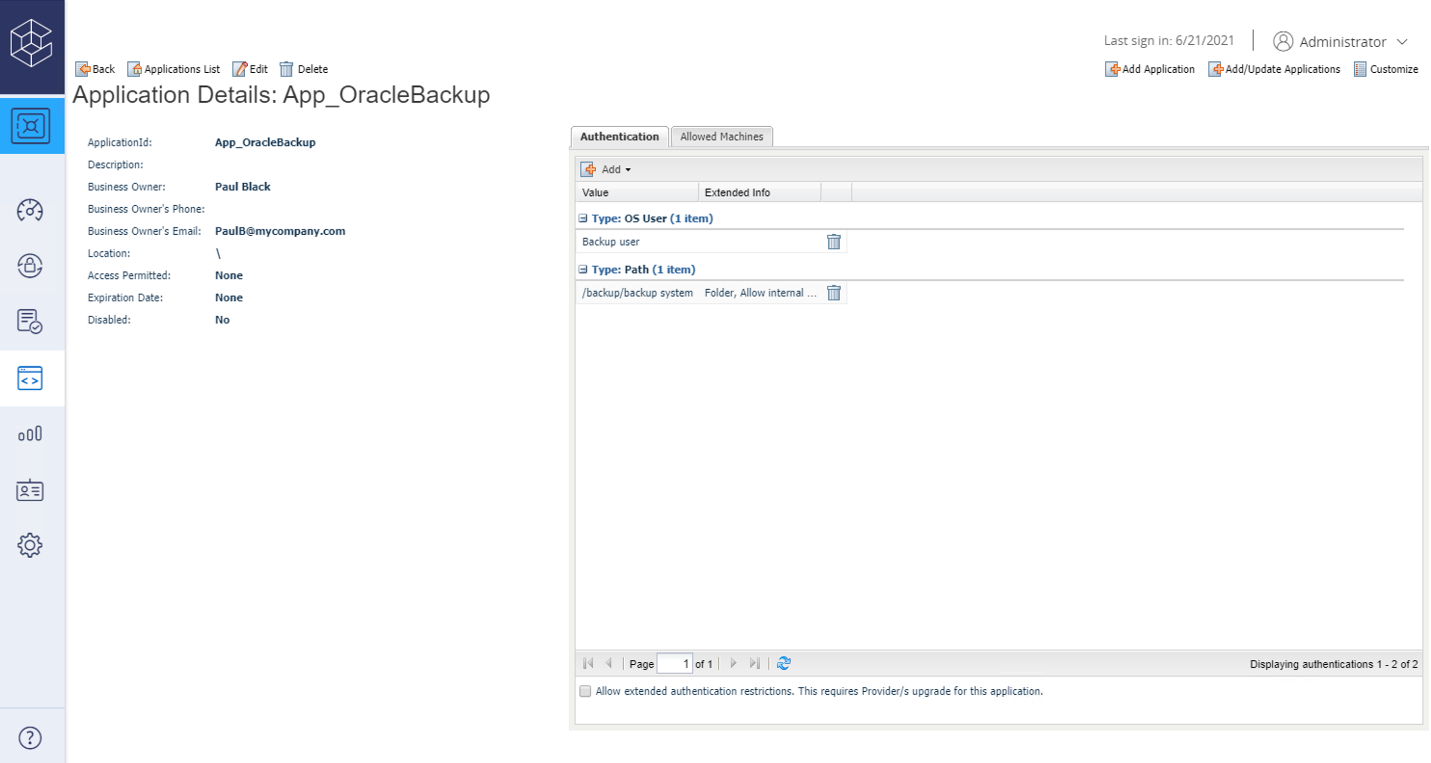
To define an application in the Vault from the PVWA:
1. In the Applications tab, click Add Application and specify the following information in the Add Application dialog box:
| Option | Description |
| Name | A unique name (ID) for the application. |
| Description | A short description of the application to identify it. |
| Business Owner | The contact details of the application’s business owner. |
| Location | The location of the application in the Vault hierarchy. If a location is not specified, the application is added to the location of the user who is creating the application. |
| Time Restrictions | Time restrictions for secret retrieval. |
| Expiration Date | The expiration date for this application. |
|
Disabled |
Disables the application. |
2. Click Add. By default, applications are added with the following properties:
| Properties | Description |
| Application authentication method | No method is specified by default and no credential file is used. |
| User type | AIMAccount |
| Allow extended authentication restrictions | You can disable the default limitation of PVWA application maximum character count (4000 characters). When selected, you can configure the Credential Provider to support extended authentication for applications. This enables you to specify more machines, OS users, path values, and hash values for a single application. |
| Use credential file authentication |
You can configure applications to access the Vault with a credential file and retrieve passwords as in previous versions of the Credential Provider.
If you select this option, you will be prompted to acknowledge that all authentication and allowed machines for this application are deleted if you proceed.
Click the download button to download the credential file.
You can specify the following application authentication characteristics for the application. These restrictions will be applied when creating the credential file for the application:
To change the authentication type for applications that were previously configured to authenticate to the Vault with a credential file, clear Use credential file authentication, then specify application authentication characteristics as described below. (This authentication has been deprecated and is documented for backward compatibility. For more information on application authentication methods see CyberArk: Application Authentication Methods. |
Adding Application Authentication
The following procedure describes how to add application authentication.
Specifying the application's authentication details enables the Credential Provider to check runtime application characteristics before retrieving the application password.
For more information about which authentication is supported by each of type of Credential Provider, see CyberArk: Application authentication methods.
To add application authentication:
1. In the Authentication tab, click Add.
2. Select the authentication characteristic to specify. Multiple values can be specified for each authentication type. The Credential Provider verifies each authentication type and value defined for each application.
| Type | Description |
| OS user | Specify the name of the OS user who will run the application |
| Application path | Specify the path where the application will run. To indicate that the specified path is a folder, select the Path is folder option. To enable internal scripts to retrieve the application password for this application, select the Allow internal scripts to request credentials on behalf of this application ID option. |
| Hash |
Calculate a hash
Run the AIMGetAppInfo utility to calculate the application’s unique hash.
Copy the hash value that is returned by the utility. In the Hash edit box, paste the application’s unique hash value.
You can also specify multiple hash values with a semicolon.
You can add additional information in a comment after each hash value specified for an application by specifying ‘#’ after the hash value, followed by the comment.
For example,
1A6F2A14E4C30729AA1E392261D A47568465ED47FFD8ED4E03082C E13ACB44819BF34D9D902668E47 82C450D22EFC8F573F329657B1E AF20E5228BB49D613827 # app2
The comment must not include a colon or a semicolon. |
|
Certificate Serial Number |
For Central Credential Provider only.
Prerequisite:
Extract the Serial Number value from the Client Certificate. You can use Windows Certificate Manager or any other management utility to do this.
To specify a Certificate Serial Number:
In the SN field, paste the Client Certificate Serial Number value.
To add more information about an SN value, add a ‘#’ after the SN value and then the comment. The comment must not include a colon or a semicolon.
For example: A1B4F6D8#app2
In the SN field, add the Certificate Serial Number.
|
When an authentication type is added, it is displayed in the Authentication tab.
To delete a method, highlight it and select the Delete Authentication button.
Add allowed machines
Enable the Credential Provider to verify that only applications that run from a specified machine can access secrets.
To specify allowed machines:
-
In the Allowed Machines tab, click Add.
-
Specify the IP subnet in CIDR IPv4 or IPv6 format, IP, hostname, or DNS of the machine where the application will run and will request passwords, then click Add.
To specify the host name or DNS of the machine where the application will run, make sure that PVWA v6.0 patch#5 or later is installed.
Provisioning Accounts and Setting Permissions for Application Access
For the application to perform its functionality or tasks, the application must have access to particular
existing accounts, or new accounts to be provisioned in CyberArk Vault.
Configure authentication methods
The following authentication methods that can be used to authenticate to Privilege Cloud.
All of the following authentication method are supported for both LDAP and CyberArk users. For details on user provisioning, see CyberArk:Add and manage users.
Supported authentication methods:
| Method | Description |
| CyberArk password | You can assign this method when you create or edit a CyberArk user or when you edit an LDAP user. Password policy: the default is a minimum of 6 alphanumeric, mixed case characters. To configure the password policy, contact Privilege Cloud support. |
| LDAP |
To apply this method to a user, Privilege Cloud must be connected to the organization's LDAP server. For details, see CyberArk: Connect your LDAP directory server.
By default, users provisioned from LDAP can use their LDAP credentials to authenticate to Privilege Cloud. |
| SAML | To apply this method, you must configure SAML authentication in Privilege Cloud and in your IdP. For details, see CyberArk: Configure SAML authentication. |
| RADIUS | To apply this method, you must configure RADIUS authentication in Privilege Cloud For details, see CyberArk: Configure RADIUS authentication |
| Smart Card | This authentication method is used for RDP connections from your desktop, not to authenticate to Privilege Cloud Portal.
To apply this method, you must configure PKI authentication in Privilege Cloud For details, see CyberArk: Configure PKI authentication for RDP connections |
Self-Hosted Privileged Access Manager
The following section describes authentication to Privileged Access Manager (PAM).
To work with PAM - Self-Hosted, users must authenticate to the Vault using a predefined authentication method.
This section introduces you to the authentication methods that PAM - Self-Hosted supports and describes how they work.
General authentication considerations
PAM - Self-Hosted supports two layers of authentication, a primary layer and a secondary layer.
The secondary layer is optional and can be set to increase the authentication strength according to your needs.
Primary authentication
Primary authentication establishes an initial secure connection between the CyberArk interface and the CyberArk Vault server in order to grant access to users.
The CyberArk Vault supplies the following primary authentication options:
-
Amazon Cognito authentication
-
CyberArk Password authentication
-
LDAP authentication
-
NT/Windows authentication
-
OpenID Connect (OIDC) authentication
-
PKI authentication (Personal Certificate)
-
RADIUS authentication
-
SAML authentication
Secondary authentication
Secondary authentication strengthens the secure connection by adding an additional user identification procedure. This is mainly useful for forcing additional authentication in case of automatic authentication (SSO), such as Windows authentication, PKI authentication or Web SSO.
The following authentication methods can be used as primary authentication methods when applying secondary authentication methods:
-
NT/Windows authentication
-
PKI authentication (Personal Certificate)
-
SAML authentication
-
Amazon Cognito authentication
The following authentication methods can be used together with the above primary authentication methods as secondary authentication methods:
-
LDAP authentication
-
RADIUS authentication
-
CyberArk authentication
For more information about configuring secondary authentication, see CyberArk: Configure a secondary authentication method.
Considerations when configuring PVWA authentication
-
LDAP – To enable users to authenticate to the Vault with LDAP authentication, make sure that an LDAP authentication has been installed and configured on the Vault. For more information, see
CyberArk: LDAP Authentication.
-
Windows – If users will log on to the Vault through the PVWA with Windows authentication, the PVWA must be installed on a machine in the domain that can connect to the Active Directory that will authenticate the user. For more information, see CyberArk: Windows authentication.
-
Radius – To enable users to authenticate to the Vault with Radius authentication, make sure that a Radius authentication has been installed and configured on the Vault. For more information, see
CyberArk: RADIUS Authentication.
-
PKI – To enable users to authenticate to the Vault with PKI authentication, the web server and the Vault user properties must be configured to identify the certificate that will enable the user to log on to the Vault through the PVWA. For more information, see CyberArk: Configure and enable PKI authentication (Personal Certificate) for the PVWA.
ActiveBatch User Account Configuration
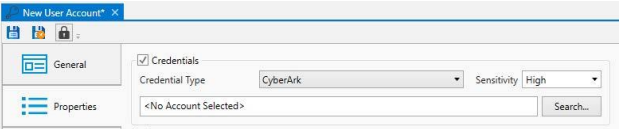
Configuration of an ActiveBatch User Account to retrieve credentials from CyberArk:
Select the CyberArk entry from the Credential Type drop-down on the Credential Object
Properties page
Click the Search button to search for a CyberArk account. This will open the Search dialog. Enter
CyberArk credentials that have ‘List and Retrieve’ access within Secrets Manager to the desired
CyberArk object.
Note: These credentials will NOT be stored by ActiveBatch, they are only used to validate that
the user creating the ActiveBatch object has the appropriate permissions within CyberArk.
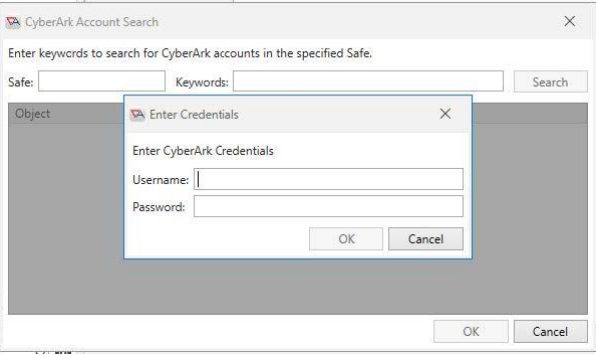
Enter the safe to search in and keywords to search for the account, then click the Search button.
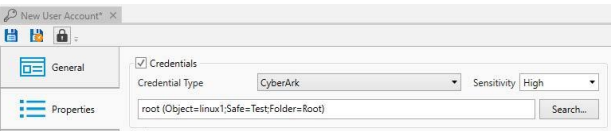
Multiple results may be returned. Select the desired account and click OK.
Clicking OK will validate that the user has Retrieve permission, and if successful, the account
information will be saved into the ActiveBatch User Account Object.
Note: The account’s password is NOT saved by ActiveBatch, it will be retrieved at the job’s
runtime by the Application using either the Local or Central provider.
Save the ActiveBatch User Account Object, and it is now ready to be associated to Jobs to
The following configuration options are available within the ActiveBatch Extensions Manager to allow
the user to configure the CyberArk Extension within ActiveBatch:
Central Credential Provider Server: The address of the CyberArk web endpoint to use with the REST API
Connection Timeout: The timeout value (in seconds) to use for the CyberArk API calls.
CyberArk SDK Path: The path to the NetPasswordSDK dll for use with the Local Client API
PVWA Base Address: The server/port to use for accessing the Password Vault Web Access SDK. This is
required for permission validation when initially creating the CyberArk account object in ActiveBatch.
Use Local Credential Provider: When checked, ActiveBatch will use the CyberArk local client with the
.NET API to retrieve the credentials from CyberArk (requires SDK path to be set). When unchecked, the
REST API will be used (requires Webservice Endpoint to be set).