Jobs Library - Overview
The Jobs Library is an ActiveBatch job type. It consists of built-in functionality that is accessed through Job Steps. A job author can select a production-ready job step to obtain the benefit of the step's functionality without having to write a script. There are many built-in job steps to choose from. ASCI provides the tried and proven underlying job step logic. The job author constructs workflows using one or more steps as the building blocks.
Job Step
A job step represents specific functionality (or a feature) that you want to execute as part of your ActiveBatch job. Job steps are arranged in categories for easy display. For example, the “Messaging” category reveals various ways to send messages (e.g. E-Mail, Tweet, MSMQ, Skype, etc.). As another example, if you need to SFTP a file to another machine you would select the Managed File Transfer category of Steps. As the Jobs Library is an extensible library of job steps, this library will grow as new categories and/or Job Steps are added in future Servicepacks and/or major releases.
The job steps themselves have several forms. One group of job steps implement a specific feature, for example, SQLBlock, SFTP, ShellCommand all allow access to specific functionality without having to write a script. A second group of job steps provide iteration or looping capability. For example, ForEachRow (database), ForEachFile (files), ForLoop, etc. all provide looping of one or more job steps.
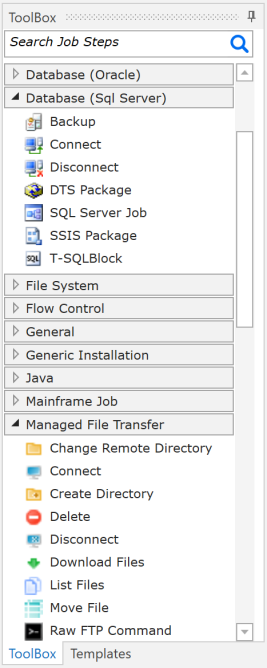
The above figure shows a partial listing of job steps within the Jobs Library.
With so many job steps the “Search” bar along the top can be very useful when searching for the right job step to use.
Note: The ActiveBatch Integrated Jobs Library is implemented using the Microsoft .Net Framework technology when executed on Windows systems. For that reason, ASCI requires that .Net Framework 4.8 (or later release) be installed on all Microsoft Windows execution machines. For Non-Windows systems, Java is used.
One method to extend the Jobs Library is through the association of Service Libraries. Service Libraries provide a mechanism for sharing reusable code. For example, REST services, Web Services, .Net Assemblies, SQL Server Procedures/Functions, Oracle Procedures/Functions, etc can be placed in a Service Library and their “methods” used in the form of Job Steps.
Any Service Libraries that you have associated with the Plan and/or Job will also appear at the bottom left of the Job Steps area. Clicking on the small arrow for the Web Service will reveal the various methods supported by the Web Service.
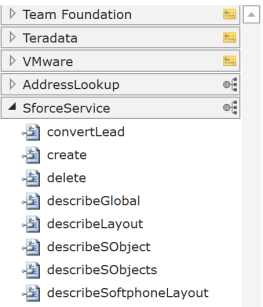
Web Services are listed with a small light blue logo representing the icon of Service Library object. In this example, SforceService (Salesforce is a CRM SaaS service) is a Web Service in which only a portion of its methods are visible.
Hint: If you’ve forgotten to associate a Service Library with a Job and therefore don’t see the associated job steps; don’t exit the Job Step Editor! Just drag and drop the Service Library into the unused portion of the Job Step Editor palette and the Service Library’s Job Steps will appear.
Licensed Job Steps
Certain Job Steps require specific licensing. Those steps appear with a small yellow lock and will also have text that indicates the Job Step(s) are either “Not Licensed” or “Evaluation Only”. If you attempt to drag and drop a Job Step which has not been licensed you will receive an appropriate error. If you use a Job Step under the Evaluation License please remember that when the evaluation license expires the only eligible operation will be to remove it (or purchase the appropriate license).
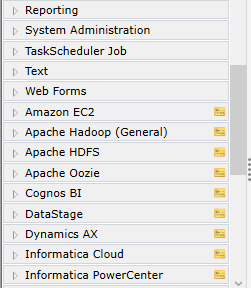
The “Amazon EC2” and “Apache Hadoop” job steps, for example, are shown with a yellow tab indicating they are subject to separate licensing. Job Steps that are not licensed also have additional wording indicating they are not licensed.
For documentation on extensions to ActiveBatch Job Steps that are separately licensed please read the ActiveBatch Extensions Guide.
Job Step Properties
The table which follows provides specific information on the properties that are required for each Job Step. As you click on each property a brief description appears in the lower portion of the dialog. In the “Description” section, an underlined value represents the property default if not specified.
Job Step Editor
A major part of the design of a “Jobs Library” job is that the Job Steps that you select can be arranged and executed in a logical fashion. Job steps are executed in sequential order. Several job steps are available to either iterate (or loop through job steps) or perform a logical evaluation (as in an IF statement).
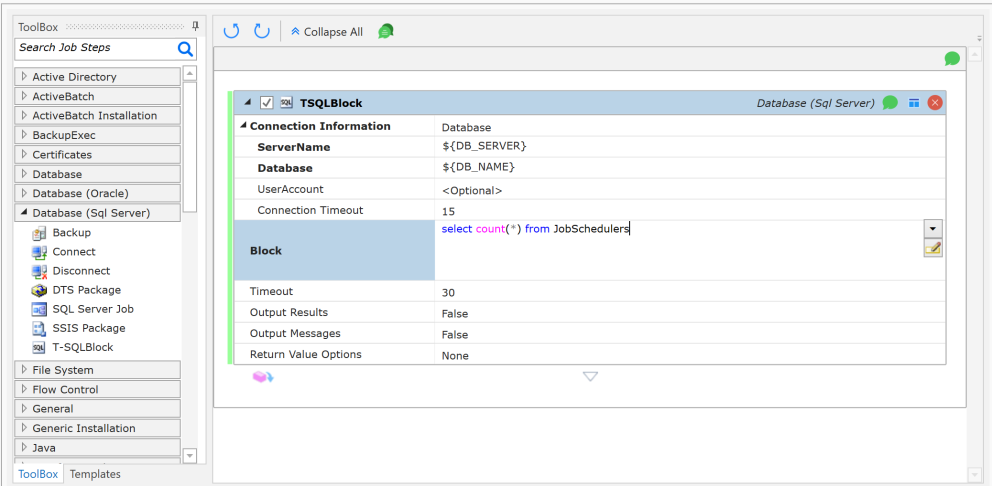
The above figure displays a T-SQL Block job step.
The Job Step Editor is graphical and allows you to select a job step from the left side job steps categories palette and drag it to the “canvas” portion of the editor to create your workflow. A grey bar will appear visually showing the location of where the new job step will be. Changing the order of an existing job step is as simple as dragging the job step to its new position. New or modified job steps appear with a green bar on the left. This allows you to visually see what you’ve changed or added.
The uppermost portion of the canvas from the leftmost area contains a set of icons that allow you to control the undo and redo aspects of your job step modifications. The next button controls whether all job steps should be compressed or expanded. Finally the last icon indicates whether comments for all steps should be visible or hidden.
The next area governs the overall job steps. The leftmost icon when enabled, indicates that the job steps below may be executed (please note that each job step itself also has an enable/disable checkbox that governs its execution). The rightmost icon governs the insertion and visibility of a comment. The comment for this area which describes the overall execution and flow of the job steps below.
All job steps have common properties. By default, the name of the job step is the same as the job step category name. The example job step above is named T-SQL Block. Renaming the job step is as simple as selecting the step name area and typing in a new job step name
Note: If you do rename a Job Step, remember that any later return values variables may also need to be changed.
To the left of the job step name is a checkbox that determines whether the job step is enabled. If the checkbox is selected, the job step is enabled. To the left of the checkbox is a small arrow. Clicking on the arrow allows you to expand or collapse the job step. Expanding the job step reveals the step’s inner properties. Continuing down the Job Step bar is the category of the job step feature, followed by the comment icon. By default, comments are hidden but clicking on the icon allows you to enter/display a comment concerning the Job Step. The next icon allows you to save a job step as a template. More on that feature can be found by reading Section Template Job Steps.
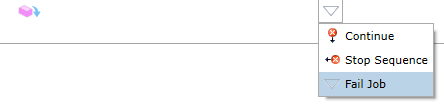
Each step is bounded with icons similar to the one above. The leftmost icon is visible for Job Steps that return data. The second and dropdown icons represent the step’s ErrorAction property. This property indicates what should be done if an error occurs. Three (3) options are: Continue (the next job step is executed), StopSequence (used during an iteration job type to “break” the loop. If nested, the next inner loop continues, otherwise the job ends with success) and FailJob (the ActiveBatch job fails. This is the default). The dropdown allows you to select which ErrorAction you would like this step to take.
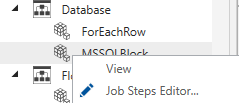
If you right click on an existing Jobs Library Job in the Object Navigation pane and select “Job Steps Editor…” the job is tabbed in the Main view, and focus is set to the Jobs Library tab (as depicted in the image below). If you right click on an existing Jobs Library Job in the Object Navigation pane and select “Properties”, the job is tabbed in the Main view, but in this case the General property sheet has focus.
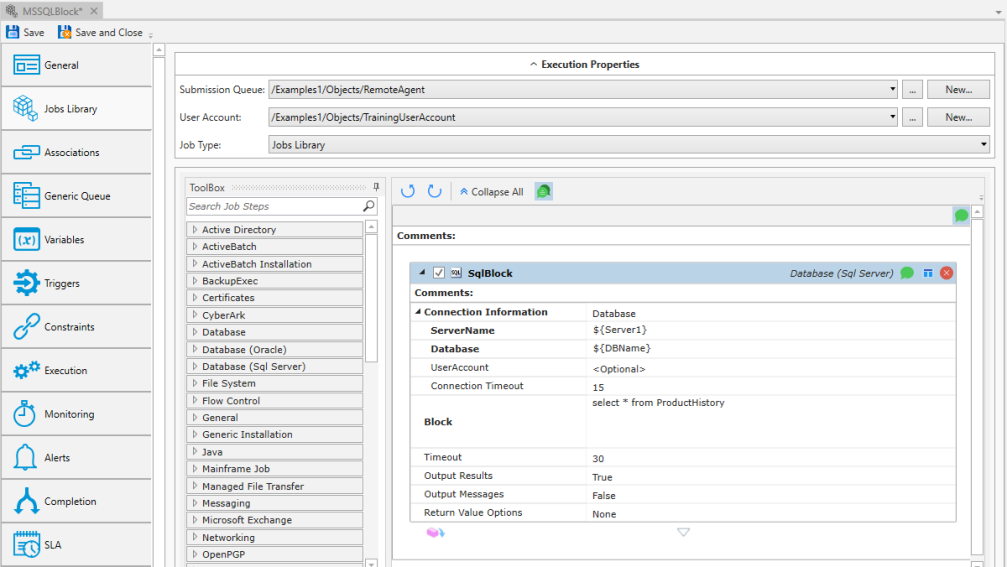
Note that the Save/Save and Close buttons are at the top left of the window. If you decide not to save your job step changes, right-click on the job’s tab (in this example, MSSQLBlock) and select Close. A confirmation message will appear asking whether you want to save or discard your changes.
Next, observe the undo/redo icons, Collapse All, and the green comment icon at the top of the Job Steps Editor.

Undo/Redo controls undoing and redoing the addition and/or deletion of Steps, and Step movements (e.g. moving a Step to a different location in the flow). It does not undo or redo Step property edits. The Collapse All button will close all the Steps (to hide the details of the Steps), and upon doing so, the label will change to Expand All. The green comments icon to the far right toggles on and off the visibility of the all the comment fields.
The properties of the specific Job Step are displayed within the Step itself.
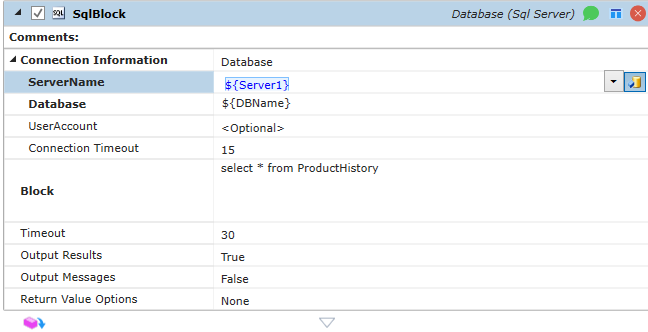
For a SQL Block job step, three (3) properties as depicted above are required (and several are optional although defaults are provided). Required properties are shown in bold. ServerName represents the name of the database server. Some properties contain a dropdown. This dropdown provides selections depending on the property itself. In this case, the selections are SQL Server machines that you can use. If your selection isn’t present, you can always type it in (using a variable is recommended).
To the far right of the property is a small “variable binding” button that allows you to enter an ActiveBatch variable name. It is not required you specify a variable in properties where you see this button, but its intended use is to allow you to soft code properties as opposed to entering (or selecting) a hard coded value. As a best practice, use variable substitution whenever possible, especially if you have multiple jobs using the same property values (e.g. ServerName, Database etc.).
Next, the Database property represents the name of the database and the Block property represents the T-SQL code block that is to be executed.
To move from field to field in a forward manner press the TAB key. To move from field to field in a reverse manner press the Shift+TAB keys.
Note: Variable substitution is supported for the properties that make up a job step.
Certain job types also support iteration. For example,
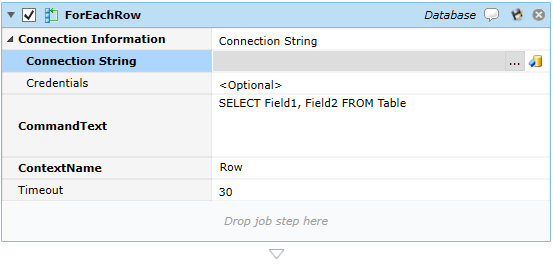
This is the dialog for the ForEachRow job step. This job allows a series of job steps to be performed based on the resulting record set that is passed back from the operation performed in the CommandText property. As the iteration loops through the record set, the variable Row (ContextName) is used to hold one (1) row of the record set. You’ll note two (2) buttons to the right of the Connection String property. The left button  is the universal ActiveBatch helper button and the right button
  is a variable binding button that allows you to enter an ActiveBatch variable.
The helper button is property sensitive. In this case the helper will ask you whether you want the Microsoft Universal Data Language (UDL) editor or JDBC editor to assist you with completing the connection string.
The binding button is useful when helping to complete a variable specification. Begin by typing ${ which is the sequence that begins an ActiveBatch variable. A window will appear with any variables that are defined from root level down through the job object that you are now defining. As you enter more variable data the window will change dynamically to show a refined view of remaining variables. When you ultimately see the variable you want, select it from the window.
Several properties contain a dropdown icon. Typically the dropdown icon is populated with values dynamically. When this occurs you will see a spinning blue wheel indicating that processing is occurring. Please note that a property may be dependent on other properties values. If the values are incorrect and/or an ActiveBatch substitution sequence has been specified you may see this icon  which indicates that the dropdown processing failed.
Note: When building a Job Step with dynamic dropdown processing, we suggest you specify the actual values to ensure you see all possible job step property values. Once you’ve done that you are free to change those values to ActiveBatch variables and/or execution variables.

In the figure above, the icon to the far right (beneath the arrow) depicts an “external” pop-up editor. The ActiveBatch sensitive editor allows for easier editing of multi-line properties.
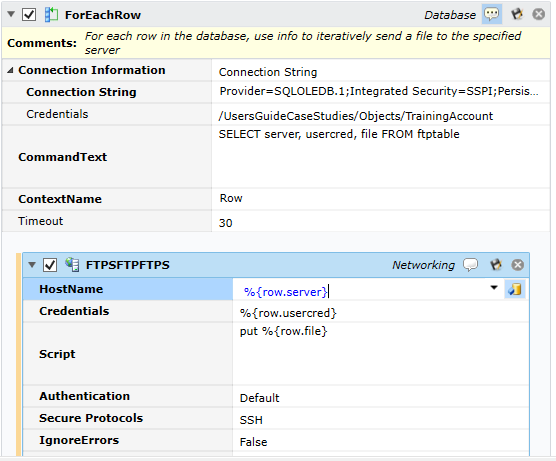
To add job steps to the iteration simply drag whatever job step you desire from the left menu and drop it into the iteration job step (not under the step; that will add the step as the next step after the iteration step). That area is marked with a “Drop job step here” designation. A successful drag/drop might look like the figure above. Note the blue oval rounded selection covers the entire iteration and its embedded job steps. You can add comments to either the entire collection of job steps or to any specific job steps by clicking on the comment balloon icon.
The Job Step Editor allows supports the Cut, Copy, Paste and Deletion of a job step. To select a job step simply click on the heading the job step and right click to specify one of the four above operations. Pasting a job step causes the job step(s) to appear before the selected step. The small ‘x’ to in the upper right hand corner of the step enables you to easily delete the job step (and any embedded steps).
One of the Best Practice approaches to Job Steps are to try and, through the use of variables, attempt to make them as generic as possible. For example, instead of hard-coding a file specification into an MFT job step, a better approach is to use a variable. By setting a variable the job step can be reusable. This section describes the process of actually recreating reusable job steps or job steps that can act as a template and be changed in a simple manner.
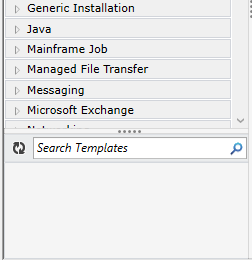
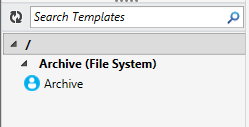
The figure above is an extract of the list of job step categories and their job steps. You’ll notice an area at the bottom. This is the job steps template area. The area under the search bar is empty. The search bar allows you to refresh template job steps as well as search for them.
To add a job step to this template area, look for the “save template job steps” icon. For example, the Archive job step.
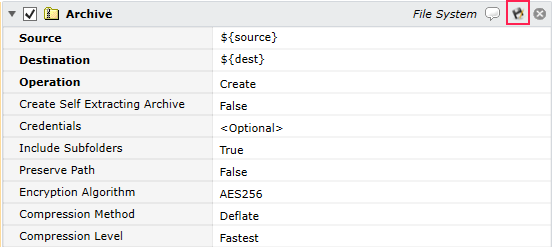
Through the use of the “source” and “dest” variables this job step is somewhat generic. To use this job step, with these variables and properties set, click on the icon shown above in the outlined red box.
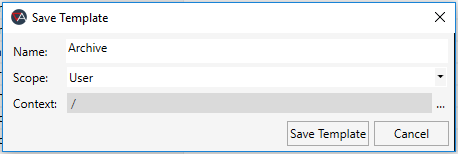
The Save Template dialog allows you to: 1. Name the template 2. Indicate the scope. Two (2) choices are available: User (default) means only the User saving the template will have it be accessible OR Global means that all users will be able to access the template and 3, Context indicates the location in the ActiveBatch hierarchy for saving the template. To save a template you must have “Create Objects” access rights on the underlying job. This is very useful because you may want to have the same job step with different variables and usage depending on the underlying app workflows (and their respective location in the hierarchy). If we leave the properties as you can see above, the following is now displayed in the Templates area:
To access the template simply drag and drop it into the canvas as you would any job step.
When ActiveBatch populates the Templates section, it begins by examining the root and proceeding down to your current location in the hierarchy. In addition, those templates marked as Global are also added.
To perform operations on the template, simply select the template and right-click to see the applicable operations:
You can perform Move, Rename and Delete operations.
Move allows you to move the template to a different location.
Rename allows you to renme the template.
Delete allows you to delete the template.
Execution Variables
Execution variables (sometimes referred to as “Context” variables) are created as part of a job step and are specific to the job type. For example, in a prior example, the execution variable “Row” was used to hold a row of values during a specific iteration. Variable substitution for a context variable uses the following syntax: %{ context-variable }.
For example, %{row} would potentially allow substitution of the context variable Row. Since Row will hold several values, Row is also a structured variable. For example, if the fields passed back from the Select statement contained; Name, Address, City, State and Zip, you would access each field using this sample syntax: %{row.name}. This would substitute the “Name” field value for this row in the record set.
Note: ASCI-sense is enabled for both Active and Execution variables. This means that as you type the variable, the GUI will provide a list of possible matches. This is particularly useful when you’re not sure of a particular field or sub-field that’s part of an execution variable’s structure.
Within an iteration the scope of an execution variable is such that you simply need to ensure uniqueness of the variable name. Certain operations, for example, the result of a Web Services job step, are expected to be used by other job steps regardless of whether an iteration is present. For those variables, you would specify the job step name (the label of the job step) as part of the execution variable substitution sequence. For example:
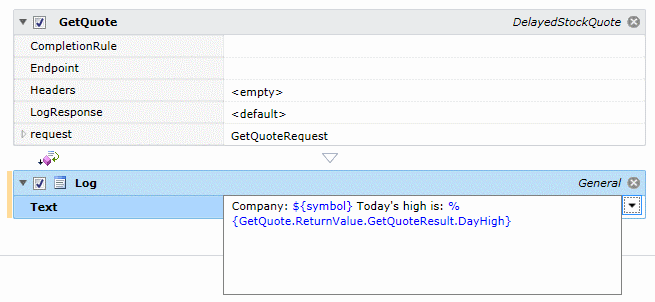
The execution variable is GetQuote.ReturnValue.GetQuoteResult.DayHigh. GetQuote is the job step name.
Note: Remember that ${ } notation refers to an Active variable. Active variables are resolved prior to a job’s dispatch (during its PreProcessing state).
An Execution variable is only present and active during the actual execution of the job step. If you needed to save an execution variable’s value so it can be used by other downstream jobs (however, not in the same job) the ActiveBatch “SetVariable” job set allows you to perform that operation by saving the variable’s value into an Active variable.
Another annotation capability is the use of equal sign (=) to denote an execution variable that contains a collection. Remember that the %{ } notation performs string substitution. On occasion you may need to retain an object and all its elements in type. The ForEachItem Job Step supports this type of assignment.
For an example on the use of the Jobs Library (and various job steps) please read the ActiveBatch User’s Guide.
Variables and ActiveBatch Objects
Many job steps include references to ActiveBatch objects. The User Account object, in particular, is very popular since security credentials are stored in the object. For many Job Steps a hard-coded reference to an ActiveBatch object doesn’t represent a restriction or limitation in that functionality, but for some job steps it can. For example, let’s say we needed to FTP a file to a customer’s FTP site. The FTP site itself should be a variable and so could the file that needs to be downloaded, but what about the User Account object? Each FTP site is bound to require different credentials. Having a hard-coded User Account object within the FTP job step would limit its generic usefulness.
This is where the use of variables can come in very handy. Wherever a reference to an ActiveBatch object is required you can bind a variable (Active or Execution) that references the absolute path of the object. Seems simple enough but what about the security implications? Normally ActiveBatch checks security of an object on reference or use. With a variable, the object can’t be checked until run-time. To avoid a security and/or performance issue, ActiveBatch requires that any ActiveBatch object that might be referenced by a variable at run-time be declared through the Associations property sheet. Associations is responsible for ensuring that all objects referenced in the list have the minimum level of access required to use the object. If you fail to enter the object you intend to reference via a variable you will receive an “Access denied” error (with a sub-code of UseAssociation).
For example:

The variable PATH_TO_UA represents a User Account object (by path). Here’s what the variable section might look like:

In this case the PATH_TO_UA variable references /VmsAccount. Lastly, that object must be listed within the Associations area. (Use Associations was renamed "Associations" in a later version of ActiveBatch).

If you need to switch between several accounts you would list each one. If the Associations objects are to be shared by several jobs/plans, the Best Practices approach would be to create an Object List object; enter the associations in that list and then add the single Object List to the underlying job's Associations property.
Job Library – Job Steps
The following sections will explain each job step in further detail. Most of the job steps for a given class are similar. In that case, the common properties will be explained in greatest detail on the first job step and then referenced in succeeding steps.
See below some key points to keep in mind as you are reviewing the Jobs Library documentation.
-
If no platforms are specified, only Windows is supported. If no prerequisite software is specified, none is required other than the usual prerequisites for ActiveBatch itself.
-
Where Java and/or JDBC is referenced, please install Java Run-Time Environment (JRE) as per the ActiveBatch Installation Manual.
-
Software Prerequisites indicates what, if any, software is required for proper use of the job step. Every Job Step has both design and run-time usage. Design time requirements denote software that must be installed on the Job Scheduler machine (“Design and Windows” means the prerequisite applies to both the Job Scheduler and Execution machines). Run-Time requirements denote software that must be installed on the target Execution Agent machine.
-
Active and Execution variables can be used wherever a string can be specified and/or an ActiveBatch object.
-
When an ActiveBatch object path is specified in a Step property, please understand that if you move that object resulting in a path change, any referenced paths in these job steps will not be changed. You will need to manually change them.