Object Check Out and Check In
ActiveBatch supports multiple users connecting to a Job Scheduler and adding, modifying and deleting objects. If two or more users happen to access the same object at the same time, the check-in feature manages this. For example, if two users modify the same object but change different properties, the changes are merged when they are checked in (both changes are saved). Merges happen under-the-hood, and does not require user intervention. Alternatively, if two users modify the same property(s), the check-in process considers this a conflict that must be resolved. The conflict details will be presented to the user in a pop-up window, and the user will have to decide how to resolve the conflict. All of this is discussed in the following topics.
Whenever you create a new object, modify an object or delete an object, a Check-Out operation occurs. Whenever you attempt to apply that change (new, modify, delete) to the ActiveBatch Job Scheduling system, a Check-In operation occurs. Check-Out and Check-In operations can be implicit or explicitly performed. Implicit check-outs and check-ins occur under-the-hood and require no user intervention. Explicit check-outs are initiated explicitly by the user, and therefore it is required that a corresponding check in (or cancellation of the changes) also be initiated by the user.
Implicit Check-Out/In
An implicit Check-Out is paired with an implicit Check-In. For example, assume you wish to modify an existing Job, and you open the Job's property sheets and begin to make a change. When doing so, an implicit Check-Out operation is performed. If you click the Save, or Save and Close button to apply the changes, an implicit Check-In operation is performed. Finally, if you discard the changes, an implicit “Undo Pending Changes” operation will occur which effectively cancels the Check-Out. All these operations occur under-the-hood, requiring no user intervention. In fact, when it comes to implicit Check-Out and implicit Check-In, a user would have no idea this happening under-the-hood, unless a conflict occurs - or if they read about it in the documentation.
Note: To modify an object, you need to be granted Modify rights to the object you are attempting to change.
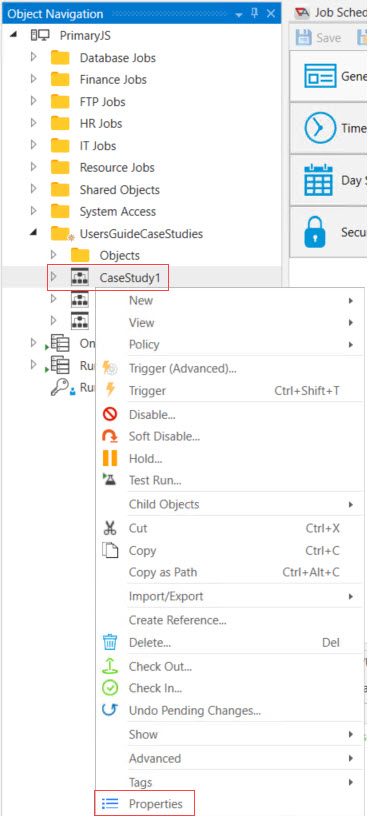
As stated above, an implicit Check-Out will occur when you modify an object's properties. To modify any object's properties, right-click on the desired object in the Object Navigation pane, then select Properties (see the image below). The property sheets will be tabbed in the Main view. An implicit Check-Out will occur when you initiate the first object property change.
Once the changes are made and the object is saved, an implicit Check-In occurs. The same internal Check-Out and Check-In operations occur when you implicitly add or delete an object.
Note: You can only modify an object definition. An instance (i.e. Plan/Job/Reference) cannot be changed.
Explicit Check Out/Check In
An explicit Check-Out is an operation performed before any object action is taken. In other words, you perform a Check-Out operation prior to creating, modifying or deleting any objects. See below the Check-Out menu option.
Let's look at explicitly checking out an existing object. Please note that to modify an object, you need to be granted Modify rights to the object you are attempting to Check Out. All security is managed on each object's Security property sheet.
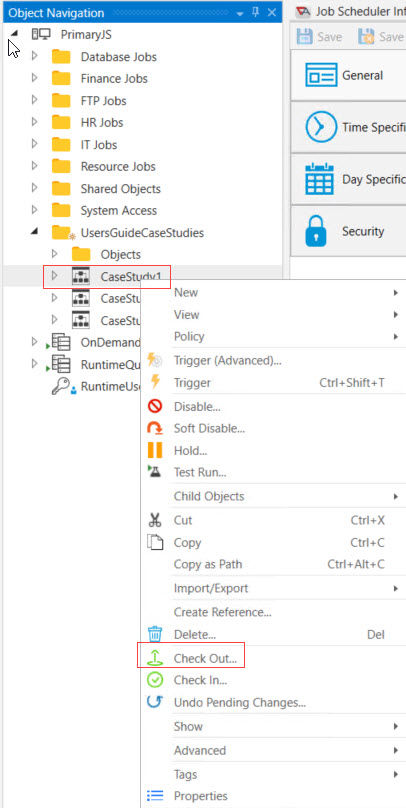
The Explicit Check-Out operation can be performed on one or more selected objects. Check-Out is a right-click menu option, as depicted in the image below.
When you select an explicit Check-Out , a Check-Out dialog will appear. In the example below, the user is checking out a single existing Job named Powershell. The intent is to make some changes to the Job.
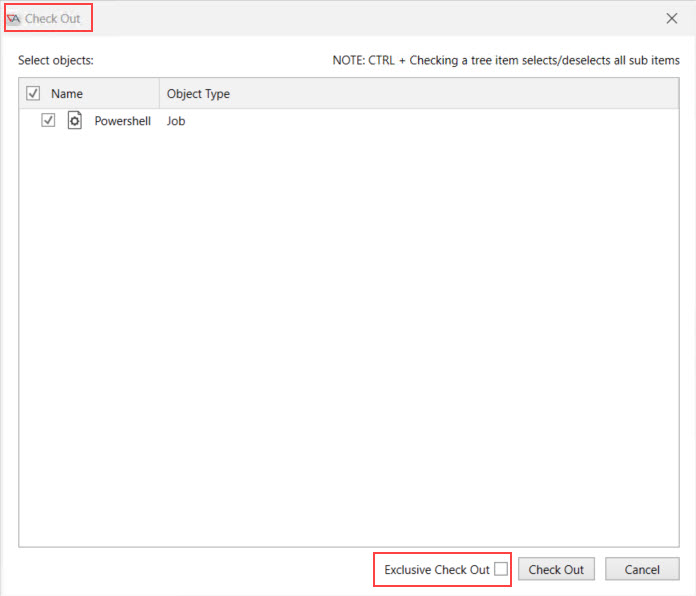
Explicit Check-Out offers you a choice of an Exclusive or Non-Exclusive Check-Out. By default, the Exclusive Check-Out checkbox is not selected, as depicted in the image above. When not checked, the Check-Out supports collaboration. That is, other users may also check the object out non exclusively, and make changes. If you choose to make the Check-Out exclusive, no one else can have the object checked out, and no one can Check Out the object (explicitly or implicitly) after you do. If you attempt to modify an object that is currently exclusively checked out, you will see a message as indicated below (for this example, an implicit Check Out was attempted).
Message: Implicit checkout failed: DomainName\testuser1 has already been granted a lock on JobA. The property sheet will be made Read Only.
After explicitly checking out an object, you need to access its property sheets to begin to make changes. Checking out objects explicitly means you don't have to Check In the changes until you are ready to do so. For example, assume you Check Out JobA, make a few change, then save your changes thus far. You then take a break with the intent on getting back to the changes at a later time. This is a benefit of explicitly checking out an object or group of objects (e.g. a Plan and its Jobs). You can make the changes you need to make, then check them in all at once, creating a single Changeset (discussed below) that consists of multiple object members.
When an existing object is explicitly checked out, a green check mark appears to the left of the object's icon in the Object Navigation pane. This allows you to visually determine whether an object has been explicitly checked out by you.
Note: The green check mark icon denoting a checked out object is only seen by the person who performed the Check-Out operation. For others to see which objects have been checked out, please read the “Pending Changes” section.
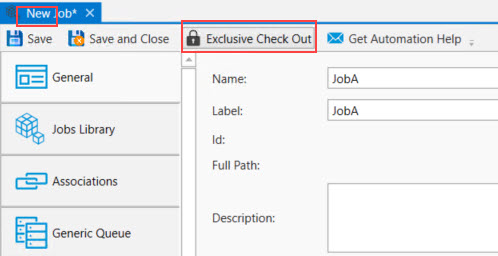
In the above discussion, it was described how to explicitly Check Out an existing object, with the intent to modify it. That said, you can also check out new objects, and this is done in exclusive mode only. Every new object you create has an Exclusive Check Out button at the top of the New <Object type> property sheets. See the image below. This button can only be enabled if you have not yet clicked on Save, or Save and Close. If you click on Exclusive Check Out before clicking on Save, or Save and Close, the button's background color changes to a darker color, meaning it's enabled. If you accidentally enable it, you can click on it again to disable it.
When Exclusive Check Out is enabled for new objects, it means that when you set the object's properties, then click Save, or Save and Close, the object will not be added to the server side for others to see/access until you (the object creator) exclusively check it in. Think of it as a temporary object or "local" object, not yet added to the Scheduler's server-side for general consumption. As the object creator, you will see the object in the Object Navigation pane with a green plus icon "+" to the left of the object name. This is a visual reminder to you that future action needs to be taken on this object for others to see it. After configuring the object and saving it, you can check it in anytime. Note, as a reminder, for existing objects you have explicitly checked out (typically with the intent to modify), a green check mark icon is placed to the left of the object name.
Next, to make a new object you have checked out exclusively available to other users, you must check it in. To check it in, right-click on the object in the Object Navigation pane, then select the Check In menu option. If you don't want to check it in (but rather, you want to discard it), select the right-click Undo Pending Changes menu option. Either way, you will be prompted to confirm your action. If you check it in, other users will see the new object in the Navigation pane, and it will be available for general use (saved on the server side). If you Undo Pending Changes, the object will be permanently deleted and not placed in the recycle bin.
Check-Out Restrictions
The following circumstances may leave objects as checked out regardless of any implicit or other operations.
-
Job Scheduler service is started during an Import operation.
-
Database service is restarted during an Import operation.
-
COM script is terminated during an Import operation.
-
An ActiveBatch Job with an Import Object Job step is aborted or otherwise terminated.
Pending Changes
To see a list of objects which are currently checked-out, click on the “Pending Changes” view. See Views > Developers > Pending Changes. The view will be tabbed in the Main view, as depicted in the image below.

Pending Changes View
This view shows all objects that have been checked out; both implicitly and explicitly. Objects are listed as implicit check outs when a change is made to the existing object. When the implicitly checked out object is saved or discarded, it is no longer pending changes. Objects that have been explicitly checked out (for both new and existing objects) appear in the Pending Changes View. When they are explicitly checked in, they are no longer pending changes. The figure above depicts a single object that is checked out implicitly, to be modified. The Filter option allows you to select a specific user who has objects checked out. There is a "None" option, allowing you to see all objects checked out by all users. The Pending Changes view is not real time refreshed so a Refresh button is available.
If you right-click on an object in the Pending Changes View, menu options will appear, as follows:
-
Check In - This option allows you to Check In the checked out object. Use this option for explicitly checked out objects only, since implicitly checked out objects are only in the list until they are saved (or changes are discarded). If you check in the object with unsaved changes, it creates another (needless) revision that is the same as the prior revision.
-
Undo Pending Changes - This allows you to undo your pending changes (don't save changes - discard them permanently).
Note: Check In and Undo Pending Changes are also accessible when you right-click on an object in the Navigation pane.
-
Compare - This option allows you to compare the currently saved revision on the Scheduler server side to the saved changes that are not yet checked in. When selected, a "Diff" dialog will appear, providing you with comparison information - i.e. property change(s). If the Diff dialog is blank, no changes are detected.
-
Copy Temp Path(s) - This option copies the path of the selected object.
-
Find Template in Tree - This option finds the object in the Object Navigation pane.
-
Properties - This option opens the property sheets for the selected object in the Main view.
Note: An ActiveBatch Administrator can Undo Pending Changes for any user. This can be helpful if an object has been exclusively checked out and needs to be freed.
Testing Pending Changes
When you’ve checked out various objects, ActiveBatch does provide a limited method of testing those changes before you check them back in. To test checked out objects, you must issue a Trigger Advanced operation (a right-click menu option) and ensure the Test Pending Changes checkbox is selected. See the image below.
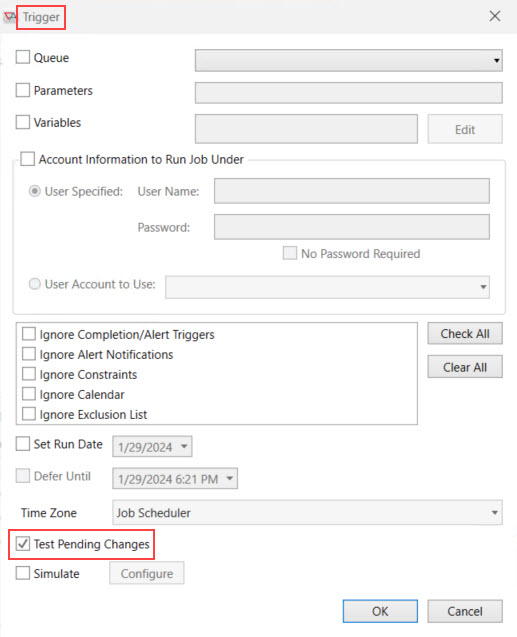
The checkbox will be enabled by default if the object you have selected is checked out. If the object you have selected is not checked out, but your intention is to test an underlying object, you must manually enable the Test Pending Changes checkbox.
With the Test Pending Changes enabled, any object that you have checked out will be used and subject to being triggered. If “Test Pending Changes” is not enabled, then all objects are taken from the Scheduler database server-side (i.e. objects which are checked out by you will not be used).
Note: Selecting Test Pending Changes is limited to Trigger Advanced (the Trigger operation will always perform a Test Pending Change if the object has been checked out). You cannot test alternate scheduling (Date/Time, Events, etc.) because testing of checked out objects is limited to your scope. In addition, if you disable an object that is also checked out, it’s the checked out object that’s disabled; not the server version. Someone else who doesn’t have a checked out version of the object would need to perform operations on the server version.
Explicit Check-In
Checking objects in which have been explicitly checked out requires a Check-In operation. When you right-click on an object, a dialog similar to Check-Out will appear. Check-In supports multi-object selection. This means that just as you can check out multiple objects, you can also check in multiple objects at the same time by simply ensuring they are selected when you request the Check-In operation.
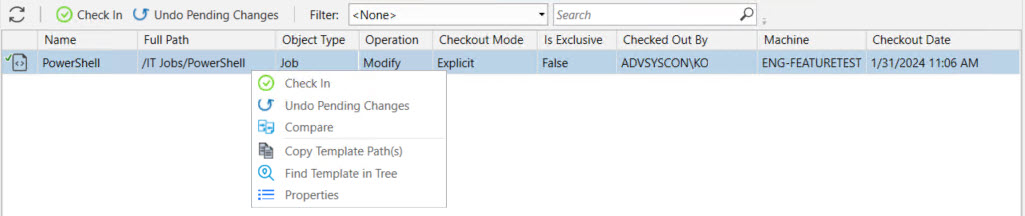
A confirmation message box will appear to confirm the requested check-in.
Note: Note: When you create a new object and associate that object to an existing object, the newly created object may seem to have lost its association. In fact, it hasn’t but will only be seen once you explicitly Check In the newly created object.
Conflict Resolution
Since ActiveBatch allows you to check out objects in a non-exclusive manner (implicitly and explicitly) what happens when two (or more) people change the same properties in the same object? How does the system know what property value to apply? For that matter, what is a conflict anyway? If you add a variable “A” to a Plan and another colleague adds variable “B” to the same Plan, is that a conflict? Finally, if a conflict is detected how does the resolution work? Whose change is applied?
A “conflict” occurs when two or more users modify the same object’s property. If the property is a collection of properties, a conflict occurs when the same label is modified. For example, if you change the Description property in Job A and another user changes the User Account object reference in Job A; that is not a conflict. On the other hand, if both users change the Description property in the same object; it is a conflict. For collections, as in our variable collection, if you change “A” and another user changes “B” in the same Job; that would not represent a conflict. If, on the other hand, both users changed “A”; that would represent a conflict.
When objects are checked in, the object is compared to the original pre checked in object to produce a delta of the differences made to the modified object. If the object was changed before you attempt to apply your changes (i.e. check in) ActiveBatch determines if a conflict occurred based on the rules noted above.

The above figure shows two different users who have implicitly checked out the same object. Unknowingly, user Testuser1 changed the working directory of Job Powershell to c:\ActiveBatch and has saved that change, which implicitly checked it in. User KO is also in the process of making a change to the same object and property but intends to change it to ${app_path}. When KO saves the object, the following merge conflict dialog appears.
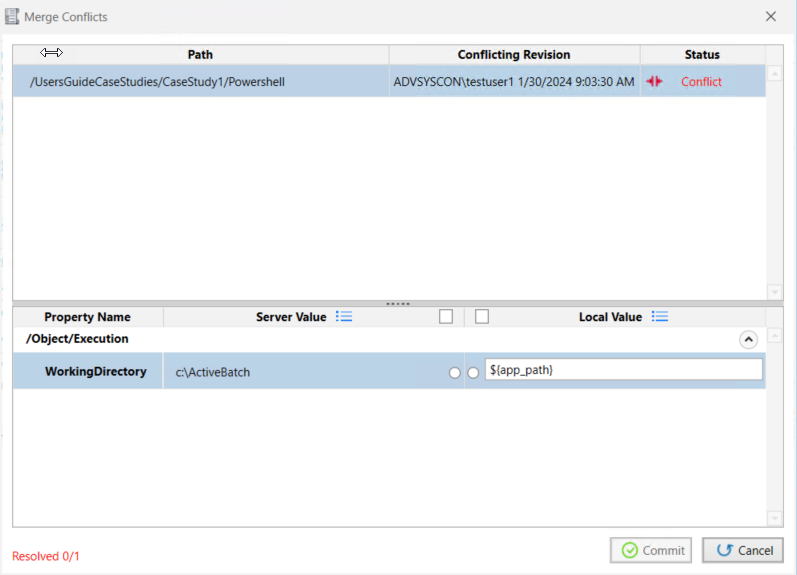
The above dialog consists of two parts. The top portion contains one or more objects that are to be checked in but are exhibiting a property merge conflict. When you select an object to resolve in the top portion, the bottom part displays the property(s) in conflict. The properties are arranged in category order for ease of identification. To the immediate right of the conflicting property name, is you will see the present server value. To the right of that is the local property value. These are the conflicting values. In the above example, the server value is c:\ActiveBatch, the value entered and saved by TestUser1. The local value is ${app_path}, not yet saved, but in attempting to do so, the conflict emerged.
You have four (4) possible actions when a conflict happens:
-
You can Cancel the merge entirely and research what the proper value should be (e.g. perhaps talk to the other user who made a change you are unsure of).
-
You can select the Server value (what is currently saved on the Scheduler).
-
You can select the Local value (the value you entered and attempted to save before the conflict was detected).
-
You can change the “${app_path}” to another value not represented by the Server or Local values. Note: This option may not be available; it depends on the complexity of the property in conflict.
In the middle portion of the property conflict area, you will see two (2) radio-style buttons side-by-side. Click on the appropriate radio button for the value you want to use. In the above example, click on the radio button to the right of c:\ActiveBatch to keep the server-side value. Or, click on the radio button to the left of ${app_path} to keep the local value. If many conflict properties are present and you want to use all the properties from either the Server or Local object, that is the purpose of the checkboxes that appear at the top of the bottom half of the dialog. You can click the appropriate checkbox (server value on the left, local value on the right) as a convenience. In doing so, all the appropriate radio buttons will be auto-enabled. Lastly, if you want to use a different value (not server or local), then enter a new value in the textbox.
As you resolve each conflict, the number of “Resolved” conflicts located in the bottom left-hand portion of dialog increases. Once all the conflicts have been resolved, the “Conflict” button will be enabled and you will be able to complete the check-in process.
When you click the Commit button, you will be prompted to commit the change, which will result in the completion of the check-in process.
Changeset
As you Check In one or more objects, a changeset is created. A changeset can be a single object that was changed. A changeset can also be a collection of objects, usually related, that form an atomic change. In other words, the author intended for all the objects changes to be checked in together and if, for some reason, an issue arises, it's possible to rollback all the changes at once.
You can view changesets on any object including the Job Scheduler itself by right-clicking and selecting “View…” followed by “Changeset History”. The Changeset view was opened for the Managing Files Folder object, depicted in the image below.
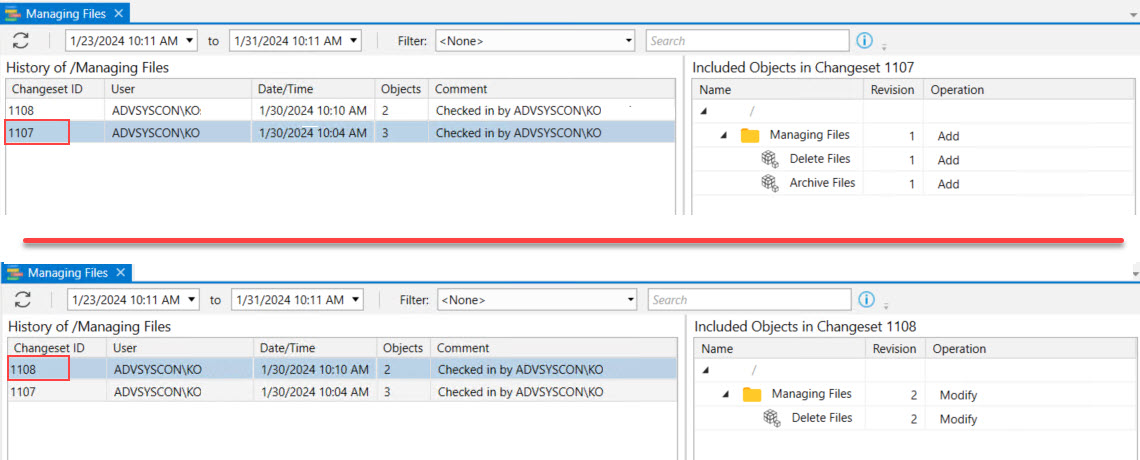
In the above image, we are looking at the only two changesets associated with the Managing Files Folder. Two screenshots were taken, allowing us to compare what you see when you click on each changeset. In the top image, Changeset ID 1107 is selected. In the bottom image, Changeset ID 1108 is selected. The Changeset view's left side panel displays each changeset. Each changeset consists of an ID, the username of the person who made the change (or import), the date and time the change was checked into the system, the number of objects that the change consisted of and a comment concerning the changeset itself. Selecting a changeset will cause the right-side window to display those objects that are included as part of that changeset.
Observe the top Changeset ID 1107 consists of the addition of a Folder and two Jobs (see the Operation column indicating "Add"). This was grouped together as a single changeset because the user created a new Folder, then clicked on the Exclusive Check Out button at the top of the New Folder's property sheets. After the required and optional new Folder properties were entered, the Folder was saved. This resulted in the new Folder being created and visible only to the object creator (since it was exclusively checked out when adding - it won't be visible to other users until checked-in).
Next, before checking in the new Folder, the Job author added new Job objects to this exclusively checked out Folder. When new objects are added to an exclusively checked new Folder (or Plan) that is not yet checked in, the child objects added are automatically exclusively checked-out. After the two Jobs were added and saved in the above example, the Job author checked in the Folder and its child Job objects (all at once). The results of this check in is what you see on the right-hand side of the 1107 changeset. This includes the addition of the Folder and two Jobs.
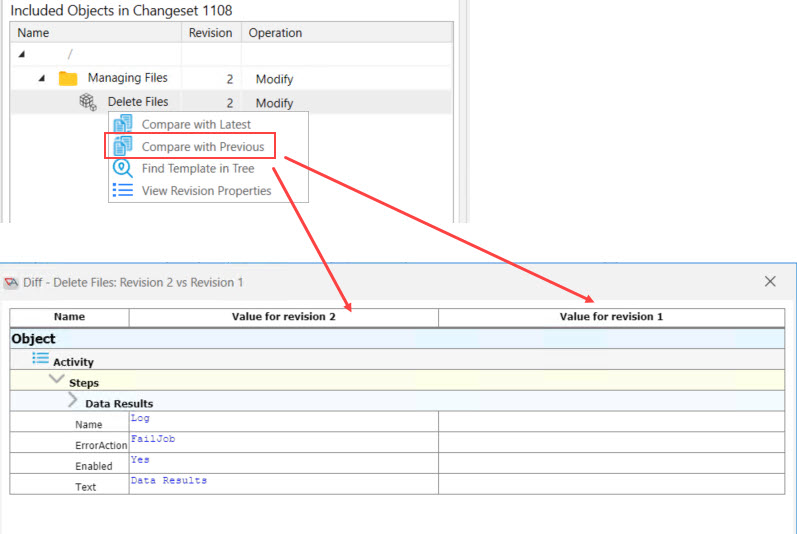
For Changeset ID 1108, the user checked out the Managing Files Folder, then modified the Delete Files Job. There are right-click operations you can use, when looking at the changed objects. For example, if you right click on Delete Files in Changeset ID 1108, you will see a popup menu allowing you to:
-
Compare the selected object with the latest - This option compares the currently selected object to the latest revision.
-
Compare the selected object with the previous - This option compares the currently selected object to the previous revision.
-
Find the object Template in the tree - This option finds the currently selected object in the Object Navigation pane.
-
View Revision Properties - This option pulls up a read-only view of the properties as they were set in currently selected revision.
In the image below, you will see what pops up when Compare with Previous is selected for the Delete Files Job. Revision 1 is being compared with Revision 2. Revision 2 depicts that a new Jobs Library Log step was added to the Job (that wasn't there in Revision 1), and the Log step's property settings.
While Changeset History is useful for tracking the various changes made to one or more objects, you can also perform several operations on the changesets themselves. The operations are Rollback Changeset, Restore Changeset and Restore All. See the image below. These are menu options you will see, when right-clicking on a changeset.
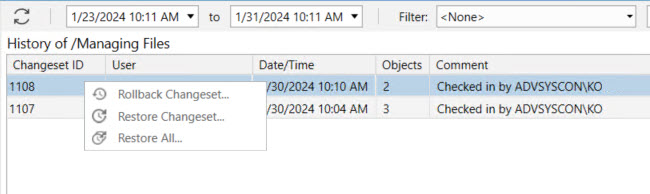
Rollback Changeset applies to the specific selected changeset and rolls that back using the prior version of the object(s) in the changeset. In other words, the prior version of the object not the prior changeset.
Restore Changeset applies to the specific selected changeset and rolls back only those objects that appeared in the changeset from the latest changeset to the selected one. Any objects that do not appear in the selected changeset are ignored.
Restore All applies to the specific selected changset and rolls back all objects that appear in any of the changesets beginning with the latest changeset to the selected one. So unlike Restore Changeset, this operation will restore all objects back to a specific version that appeared on the system at a specific time.
As an example using the above image, if you Rollback Changeset ID 1108, the Preview Rollback dialog will appear, depicted below. If you wish to roll back to revision 1, you must Check Out the objects by clicking on the Check Out button.
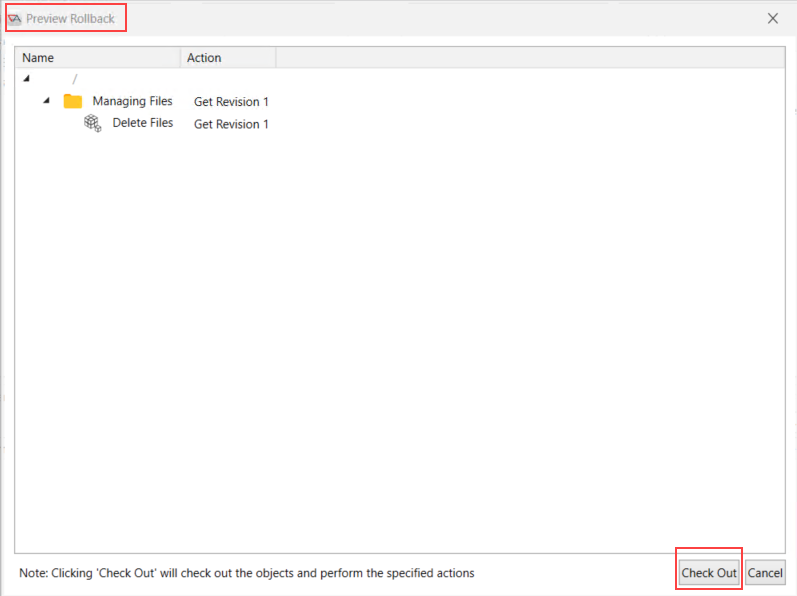
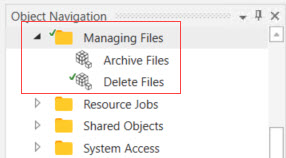
After doing so, the Navigation Pane will depict Managing Files and Delete Files as explicitly checked out, as per the image below. Observe the green check to the left of the object icons. This depicts checked-out objects.
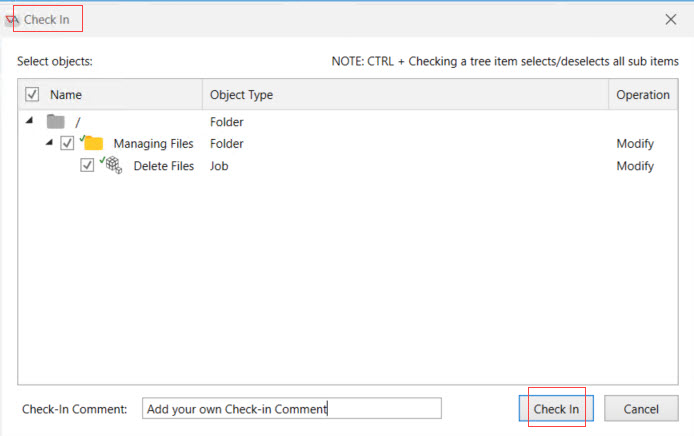
To complete the process, right click on Managing Files in the Object Navigation pane, then select Check In. By default, the checked-out objects check boxes will be checked, indicating they should be part of the check in.
After clicking the Check In button, another Changeset will be added. See the image below, where ID 1109 is the new Changeset. If you selected Changeset ID 1107 in the list, then right-clicked on the Deleted Files Job, then selected Compare with Latest, the Diff dialog that appears would be blank, because we restored the Job back to its original revision, and therefore the object properties are the same. That is, the Delete files Job in changeset 1107 and 1109 are the same. If you clicked on ChangeSet ID 1108 and compared Delete Files to the latest revision, you would see the revision differences in the pop-up Diff dialog.
