Instance Operations
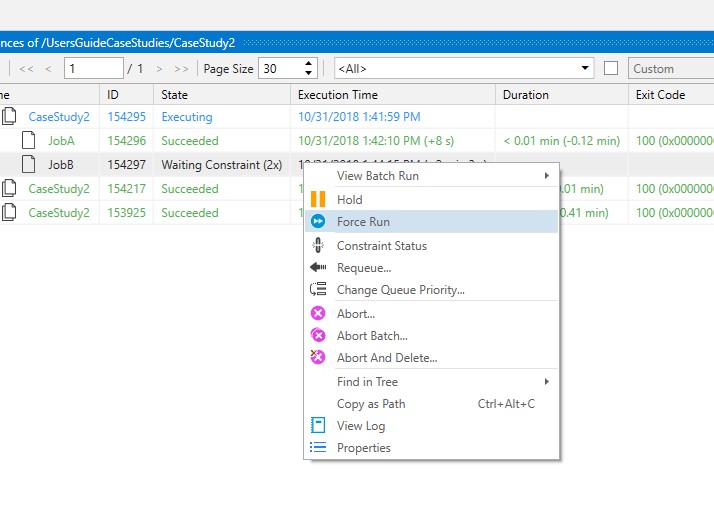
This section describes Instance operations. There are times that an ActiveBatch operator may need to perform an action against an instance. Instance operations vary depending on the current state of the instance. As an example, the image below depicts operations that can be performed against a waiting instance. Once the instance starts executing, the menu options will change.
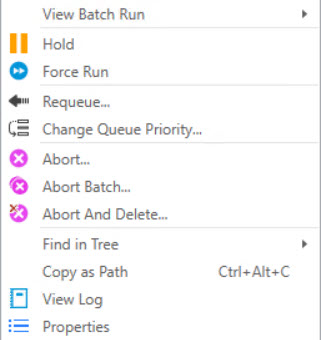
Below are the menu options for an executing Job instance.
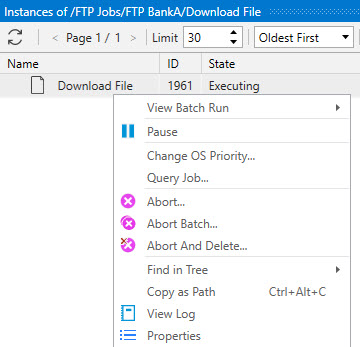
Note the differences between the menus when a Job is in a waiting state versus an execution state. The operations provided are always in-context to the applicable state.
Instance operations require that the user attempting to perform an operation be granted “Instance Control” access - unless otherwise noted. Instance Control is a security permission located on triggerable objects (Job/Plans and references) Security property sheet.
Expand the operation you would like to learn more about.
This operation, valid for Job instances that are in a Waiting state, allows you to change a Job’s Queue Priority. By default, all Jobs have a Queue Priority of 10. This means that all Jobs are treated the same if/when they start to queue up (the Queue has reached its executing Job limit, or the Queue has been stopped temporarily etc.). Whatever the reason, Jobs are queuing up. When all Jobs have the same Queue Priority, the Jobs waiting the longest are at the front of the queue, and the Jobs more recently triggered are at the back of the queue. They are queued up based on their trigger date/time. If a waiting Job has a higher Queue Priority than other Jobs, it will be moved to the front of the Queue. Changing the Queue Priority for an existing instance does not update the Queue Priority on the Job definition. It is used to allow a waiting Job instance to move to the front of the queue (cut the line, so-to-speak). An operator may need to do this from time-to-time, if Jobs get backed up and more critical Job(s) need to move forward in the line sooner than other Jobs. The higher the Queue Priority, the closer to the front of the queue the Job moves.
This operation, valid for Job instances that are in an Executing state, allows you to change a Job’s operating system priority. By default, all processes are treated the same (a "normal" priority). When changed to a higher priority, the message to the OS is, pay more attention to this process (allocate more resources to it). An operation can use this feature when an Agent system is busy, they would like a more critical Job to have more resources so it completes sooner.
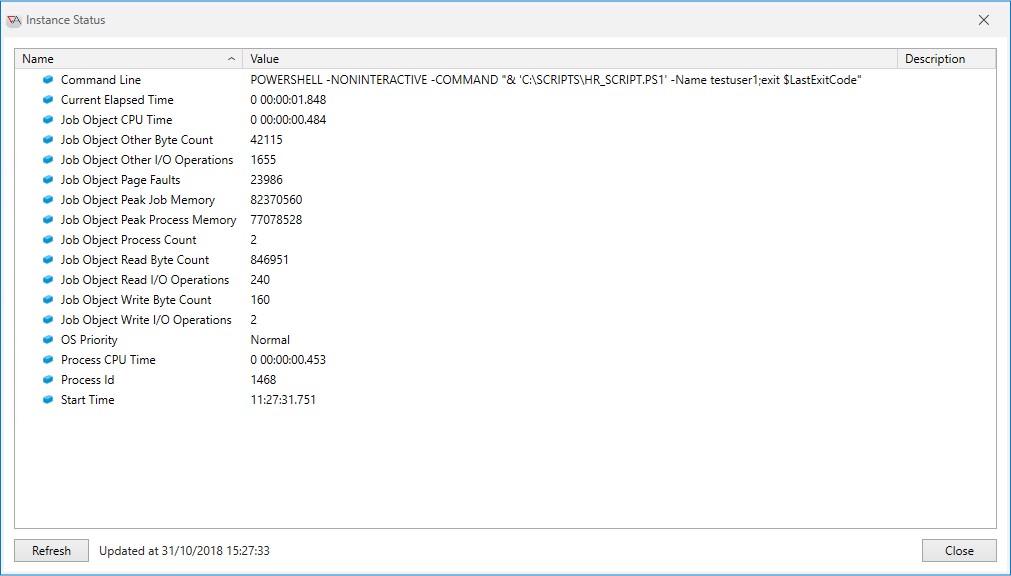
This operation, valid for Job instances that are in an Executing state, allows you to query the Job’s performance information on the executing machine. The example below is presented for a Windows machine (running a Process or Script Job) and will vary depending on the platform and operating system.
This operation allows you to see which constraints (dependencies) a Plan/Job instance is actually waiting for. This operation is only valid for a Plan/Job instance whose status is “Waiting Constraint”.
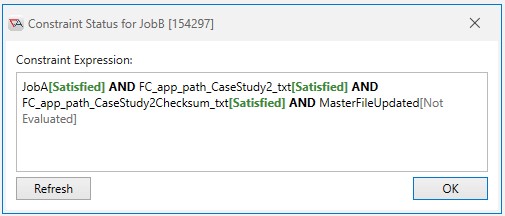
The Constraint Expression box shows the actual constraint logic the Plan/Job was defined with. Satisfied/Not Satisfied (or True/False) indications are shown in both text and color. Red or “Not Evaluated” means that the constraint could not be evaluated. This is typically a mistake in entering the variable name. Please note that this status is subject to change and that the constraint expression is a snapshot taken on your request. You may click the Refresh button to retrieve new constraint status information.
You may see two brackets [] with no intervening value. This typically means that the constraint is using Boolean logic and the first portion of the constraint failed so the additional constraints are not evaluated as part of this status operation.
This operation allows you to force a Job to execute even though it is waiting on resources or dependencies to become available. For example, a Job is waiting on a constraint and you would like to force the Job to continue execution despite the lack of satisfactory dependency conditions. This operation is valid for Plan/Job Instance’s only.
This operation, for completed Job Instance(s) only, allows you to change the actual completion status of a Job. Consider this example: Job A fails and is supposed to trigger several downstream Jobs on success. An engineer access the system and fixes the problem by performing those tasks which Job A was supposed to have done. By performing an “Override Completion Status” operation and setting the Job A instance which originally failed to success, any downstream Jobs are now triggered automatically.
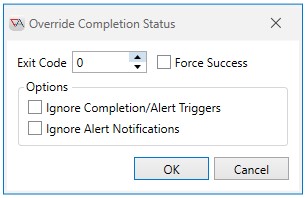
This operation is valid for Plan/Job Instance’s only. This operation allows you to set an exit code and/or simply force success. Optionally you can also avoid triggering downstream Jobs and/or alert notifications.
If Job A triggered downstream Jobs based on a failure status, those Jobs would still have been triggered. In other words, this operation does not “undo” the past.
Where Disable and Enable allow you to prevent/release a Plan/Job from/to executing, Pause and Resume are the counterpart commands you would use to suspend an object that is currently executing.
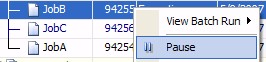
Like Disable and Enable, Pause and Resume are in-context operations. You may only Pause an executing object. Pause and Resume require “Manage” access permission for the Queue the Job is executing on as well as “Read” access permission on the selected Job object. To pause or resume a Job right click on the selected Job icon and choose Pause/Resume. You cannot pause a non-executing Job. This operation is valid for Plan/Job Instance’s only.
Note: The implementation of Pause differs based on O/S platform. For Windows systems, only the primary thread of execution associated with the process is suspended. For multi-threading applications this may not have the desired effect. For non-Windows systems, the Job process is suspended.
This operation allows you to respond to a User Interactive request (UserInput ActiveVariable, configured on a triggerable object's Constraints property sheet).
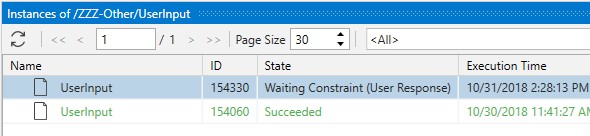
The figure above displays the state of a Job while it is waiting for a User Response. The menu selection appears when you right-click on the selected item:
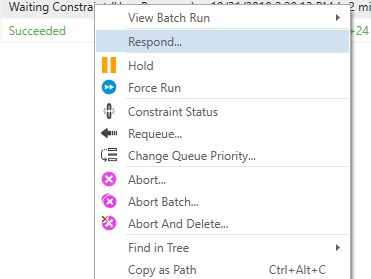
Selecting Respond will cause a message box to appear using the style, icon and message text as indicated by the Job author’s User Input action. Responding to this message cause the state of the Job to continue. You can also Respond to an interactive request via the Alerts view.
If your response doesn’t not match the constraint criteria for the Userinput action the constraint will continue to fail and wait until either a valid selection is entered or the timeout period expires. If you don’t want to wait you can “abort” the Job.
This operation allows you to restart a failed Plan/Job instance. The Plan/Job instance is restarted in its entirety. Restart should not be confused with Trigger. Trigger causes a new Plan/Job instance to be created. The Restart operation causes an existing instance to begin execution.
If you restart a Plan then all Job/Plan instances are restarted regardless of their previous execution. If you restart a Job then that Job instance will begin execution and any Completion and/or Alert triggers will be honored regardless of the previous Job instance state.
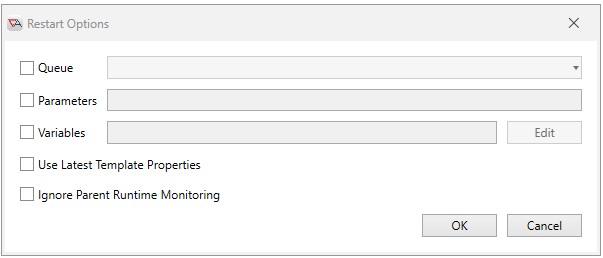
The Restart dialog above allows you to change certain properties for this selected instance as part of the restart operation. By default, any properties that were active within the instance are used as part of the restart. Sometimes it can be useful to restart an instance but change several instance properties. Each of the properties below pertains to the restarted instance. The object definition is never changed on a restart.
Queue: If enabled, you can change the Queue for the restarted instance. By default, the instance is restarted based on the original Queue associated with the instance.
Parameters: If enabled, you can change the command-line parameters for the restarted instance. By default, whatever parameters were associated with the instance are used.
Variables: If enabled, you can change the variables for the restarted instance. By default, whatever variables were associated with the instance are used.
Use Latest Template Properties: If enabled, the properties associated with the instance are refreshed from the current instance’s definition (template). This can be very useful if a mistake was noted in the original definition and you would like that new property value to be used as part of the restart. Variables are re-evaluated when this checkbox is enabled. By default, the instance definition properties at the time of instantiation are used and not the most current definition.
Note: Not all property changes support Use Latest Template Properties. For example, if you add an Alert, or a completion trigger, then attempt to refresh the instance using these changes, they will not be applied. Here are a few examples of changes that would be applied (this is not an exhaustive list):
-
Changing a Process or Script Job's Completion Status Rule “Success” property.
-
Changing the script contents of a Script Job. For example, adding new lines or modifying existing lines.
-
Adding a new Step to a Jobs Library Job
-
Adding/modifying a file constraint
Ignore Parent Runtime Monitoring: If enabled, a Plan’s Runtime Monitoring is ignored for this restarted instance. For example, if the Job’s Plan had a runtime monitoring of 60 seconds with an abort on overrun configured, and the Ignore... option is checked, the runtime monitoring and the abort would be ignored.
To move or re-queue Job instances(s) that are in a “Waiting” state, select one or more Job(s) and choose Requeue.
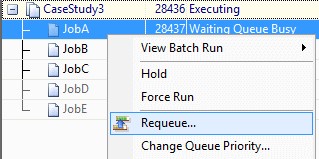
A list box appears listing all Queues. Select one to perform the move operation. This operation will move only instances.

This operation is useful when you need to prevent a Plan/Job/Reference object from executing its “payload” but you otherwise want the object to be considered as having run successfully from a workflow and completion triggering perspective.
Note: Soft Disable can be performed on an object definition, and it can also be applied to an instance in a "not run" state (a Job waiting on a completion trigger is in a "not run" state). Typically Soft Disable is used on the definition level, when you know in advance that you would like to essentially "skip" a Job in a larger workflow. However, in a last minute scenario, a workflow may have already begun when you realize a Job that hasn't triggered yet should not run. You can right click on the not run instance in an instances view and select Soft Disable. Click the refresh button to see the not run instance state change to soft disable (auto refresh does not work in this scenario). When you Soft Disable a not run instance, the object definition is not impacted or changed.
For example, consider three (3) Jobs; JobA, JobB and JobC. You don’t want JobB to actually run, but when JobA completes you do want JobC to run. That is the functionality of this operation. When you know this in advance, soft disable the Job in the Object Navigation pane.
Soft Disable is different than Disable in that Disable fully prevents both object from executing and any completion triggers on that object from also executing. So If JobB was disabled, when JobA completed, the workflow would stop at JobB. If JobB is Soft Disabled, JobB’s instance will be marked as “Completed (Success)” and JobB’s completion triggers for Success will be activated. In this manner, Soft Disable is very useful when you don’t want the actual object execution payload (i.e. script, Job library steps, etc) to execute but you do want the rest of the workflow to run.
When an object is marked as Soft Disabled in the Object Navigation pane, the following will occur with respect to that definition.
-
The instance will be instantiated (as opposed to Disable, when the instance will not be instantiated).
-
All pre-processing variables and constraints will be honored.
-
The payload will not execute.
-
The instance will be considered as “Completed (Success)”.
-
Only completion triggers that are marked as “Success” will be executed. Note: No assumption as to exit code should be made. In fact, completion triggers with a specific exit code will NOT be executed.
To Soft Disable an object(s) in the Object Navigation pane, select the object(s), then right-click and select Soft Disable.
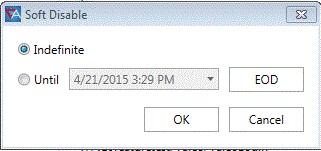
This dialog allows you to set the scope of the Soft Disable. By default, Indefinite is selected which means the Soft Disable will be set until manually reset with an Enable operation. The Until selection allows you to set a specific end time or End-of-Day (EOD) when the object is automatically enabled.
Performing an Enable operation will reset a Soft Disable (or Disabled) object.
You may abort a Plan/Job Instance regardless of state. Aborting a Plan/Job will mark the object as “Completed(Aborted)”. The Plan/Job will still be visible for query purposes.
Deleting a Plan/Job will cause the object to be removed from the database. So object deletion is a permanent and irreversible operation. By definition, when you delete an object you also delete the object’s instances (if any). Both Abort and Delete require confirmation since both operations are potentially destructive.
To abort a Plan/Job Instance you must have “Manage” access permission on the object. To delete an object you must have “Delete” access permission. To abort an instance right click on the selected object and choose the Abort menu operation.
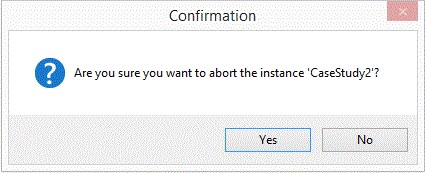
When you abort an instance, a confirmation dialog appears asking you to confirm the operation. Click OK to confirm or Cancel to cancel the operation.
When you want to delete an object, a confirmation dialog appears asking you to confirm the operation. Click OK to confirm or Cancel to cancel the operation. Deletion of an object in this manner actually causes the object to be moved to the Recycle Bin. You can always Restore the object back if the deletion was a mistake or inadvertent. Note: If you press and hold the Shift key when deleting an object, a confirmation message indicating that the deletion will be permanent will be displayed instead. This type of deletion is permanent and irreversible.

ActiveBatch also supports the Abort and Deletion of an Instance and its objects in a single operation. Simply right-click on the object and choose Abort & Delete.
The previous operation allowed you to abort a specific Job or Plan. Sometimes it is more convenient to abort an entire batch run regardless of which object happens to be executing at the time. To issue an Abort Batch operation, right click on any instance within the desired batch and select Abort Batch.
The following confirmation message will appear to confirm your selection.
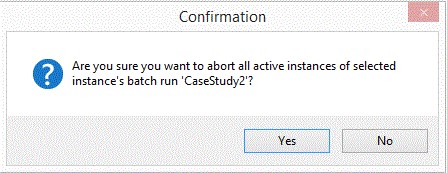
Click the Yes button to perform the Abort Batch operation.
Note: You must have Manage level access permission to perform this operation.
Sometimes it is useful to disable an object so it cannot be used. For a Job/Plan/Reference object disabling the object means the object cannot be instantiated (or executed).
Disable and Enable are in-context operations. That means that ActiveBatch Console will choose the proper operation for you to perform based on the state of the object. If the object is not disabled, you will be able to disable it. Conversely, if the object is disabled you will be able to enable it.
The above figure indicates the scope of the Disable period. Indefinite means that the object is disabled until a manual Enable is performed. The Until selection allows you to specify an end period when the object is automatically enabled.
The Enable operation is always performed immediately. Disable and Enable require “Manage” access permission. To Disable or Enable an object right click on the selected object icon and choose Enable/Disable.
Disabling/Enabling Jobs, Plans and Reference objects are straightforward but what about the other objects? You need to use caution when disabling any object. For example, disabling a User Account object means the object will no longer provide security credentials. This means a Job that begins to execute will fail with a logon error (if the Execution > User Account was disabled). Disabling a Schedule means the Schedule will no longer emit date/time triggers. This might result in Jobs or Plans no longer executing when expected.
Note: Do not confuse the Global Disable property with the Enable/Disable operation. Global Disable means that this object and all reference objects are disabled.
Note: Note: Disabling a Checked-out object does not disable the server-side object; only the checked-out version.
ActiveBatch provides the ability to Hold a Job/Plan or Reference object. Holding a Job means that when the Job instantiates it is placed in a “Waiting Hold” state. This state effectively holds the workflow until a Release operation is performed. The Hold operation provides a dialog in which you can indicate the scope of the intended hold.
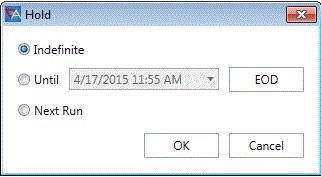
As the above figure shows, there are three (3) limits you can set for the scope of a Hold operation.
Indefinite means the Hold is maintained until an explicit Release is performed. This type of Hold is best used when an issue has been detected and you want to make sure the workflow does not proceed past a certain point.
Until indicates that the Hold is to be placed for a certain time period. You have two (2) choices for a Hold Until: you can specify a date/time for the hold to expire or, for convenience purposes, you can click on the EOD button and the hold will expire at 23:59 (11:59pm) of the same day. This type of Hold is best suited for an issue that pertains only to this processing day.
The last type of Hold is Next Run. This means the hold will occur on the next instantiated instance of this definition only. Once that occurs, future holds will no longer occur. This type of hold is the most typical. You found a problem and want to make sure it can be resolved before the next instance is run.
Note: If you Hold a “Wating Restart” instance and then release the instance, the Restart Interval is ignored.

The above figure shows the use of the Until (applicable to Disable, Soft Disable and Hold) qualification in an object’s General property sheet. This allows you to easily determine if the operation will be released based on time or not.
ActiveBatch allows the submission of Plans/Jobs that can execute one or more times based on a variety of date/time or event triggers. The “Trigger” command allows a user or script to generate an ActiveBatch trigger event that creates an instance and dispatches the Job for execution (providing there are no constraints set, the Queue is available, etc.). This trigger allows some interesting uses.
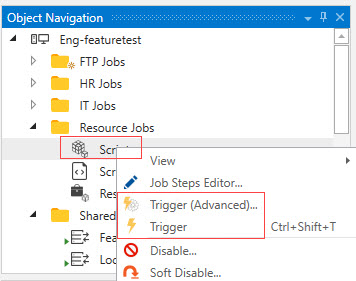
To trigger a Plan/Job, right-click on the selected icon and choose Trigger or Trigger (Advanced). The difference between the two Trigger operations is that advanced Trigger will display a dialog box providing more operations you can perform.
The basic Trigger operation triggers the object as-is for immediate execution.
Triggering a Plan/Job requires you to hold at least “Trigger” access permission for the selected object.
To manually trigger a Job, the object must have the Enable Manual Trigger property checked on the Triggers property sheet. If the Job is associated to the OnDemand Queue, then the Trigger menu item will not be present. You must use the Trigger (Advanced) option so you can select a Queue for the Job to run on.
The manual trigger operation is valid for Plan/Job and Reference object Definition’s (Template) only. When you select Trigger (Advanced), the Trigger dialog will appear as depicted in the image below. It allows you to set options that will apply to the instance that is being created as a result of the manual trigger.
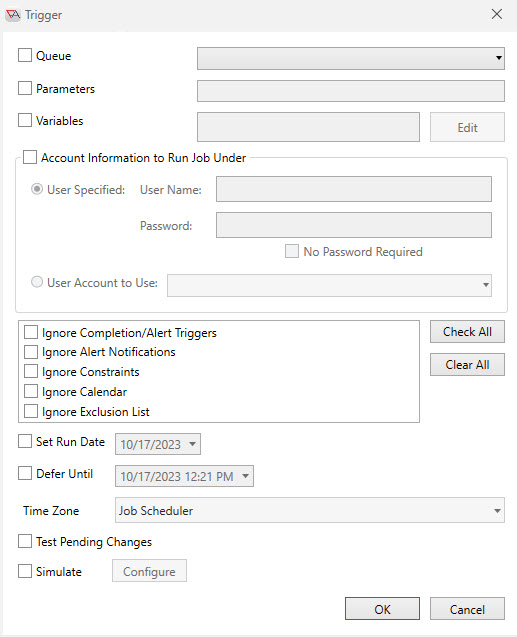
If the Job is associated to the OnDemand Queue, you must specify a Generic or Execution Queue for the triggered Job to execute on. Please note that the Job definition is not updated with the Queue you selected (it remains associated with the OnDemand Queue) - only the instance of the Job is created with the selected Queue. If the Job is not associated with the OnDemand Queue, you may trigger its execution in place (in other words, the Job will start execution on the Queue it is associated with).
Queue: You may specify a Queue that is to receive an instance of this Job for execution. For a Job that resides on the OnDemand Queue you must specify a different Queue. “Trigger and Trigger w/ Queue” access permissions for the selected Job is required. These permissions are set on the Job's Security property sheet. The Queue checkbox will not appear for a Plan, since Plans do not get dispatched to Agents to run.
Parameters: This optional field may be entered to provide new input parameters to the newly created instance of the triggered Job. Note that the Job template is not changed by this operation. You must have “Trigger and Trigger w/Parameter” access permission for this Job to enter new parameters. These permissions are set on the Job's Security property sheet.
Variables: This optional field may be entered to override any variable values that were specified with the object definition and/or to create new variables (and their values). Note that the object definition is not changed by this operation. Enabling this radio button will activate the “Edit” button allowing you access to the familiar Variable dialog page. You must have “Trigger and Trigger w/Parameter” access permission for this object to enter new variables. These permissions are set on the Job's Security property sheet
Note: The Trigger w/Parameter permission allows a user to override parameters and/or variables when using the Advanced Trigger feature. The name of the permission does not indicated variables, but it does include both parameters and variables.
Account Information to Run Job Under: You may specify alternate security credentials to be used when triggering this Job for execution. By default, any security credentials associated with the Job are used. This feature is particularly useful when you have multiple users who need to execute the same Job but in their own security context. You can specify the credentials through the familiar username/password fields as well as by specifying a User Account to use (a User Account object). To trigger and specify new credentials requires you have “Trigger and Trigger w/ Credential” access permissions on the selected Job object. These permissions are set on the Job's Security property sheet
Ignore Completion/Alert Triggers: If selected, ActiveBatch will ignore any Completion and Alert triggers associated with this Plan/Job. (Note: In previous versions this was referred to as “Ignore Batch Starts”).
Ignore Alert Notifications: If selected, ActiveBatch will not issue any Alert notifications.
Ignore Dependencies: If selected, you are indicating that ActiveBatch is to avoid dependency checking and treat the selected Plan/Job as though all dependency checks were successfully performed.
Ignore Calendar: If selected, ActiveBatch will ignore any Calendar restrictions and run the Job.
Ignore Exclusion List: If selected, ActiveBatch will ignore any date/time scheduling exclusions.
Set Run Date: If selected allows you to override the creation date of the instance. By default, the creation date is the date the instance is triggered for execution. This option is useful when you need to trigger an instance who may be the target of a Job Constraint that is employing “Exact Active Today Only” scope. The date you specify would be considered the Business Run Date.
Defer til: If selected, this useful function allows you to defer the actual trigger to a later date/time. By default, when a Trigger command is issued, the object instance is created immediately. You can also specify a time zone (by default, the Job Scheduler’s time zone is used). This feature is useful when an adhoc Job run is required off-hours. An operator can trigger the Job during business hours, but sent the run time until later, after they have gone for the day. The Job will wait until the deferred date and time has arrived to run the Job.
The last two items on the Advanced Trigger dialog - Test Pending Changes and Simulate, are features typically used by Job authors, to test changes they have made to objects they are currently working on, and to simulate their workflows before moving the Job into production.
A Resource Object that uses an active variable can be forced to re-evaluate.
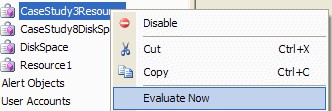
Resource - Evaluate Now
Selecting the “Evaluate Now” operation causes the Resource’s active variable data source to be immediately re-evaluated regardless of any timed or lack of timed base settings.