Dynamic Picklist
The value for an ActiveBatch constant variable can optionally be input by the person triggering the Plan/Job, if required. ActiveBatch supports both free-form text as well as picklists. The picklists can be static or dynamic. A static picklist, consisting of one or more valid values, is specified with the $Options property in the variable’s Description field, as indicated in the Job Object variable section - Static Picklist
A dynamic picklist allows you, at run-time, to retrieve or compose a list of pick list values, using a .NET Assembly provider, as well as verify the value that may be entered.
The Dynamic Picklist is a plugin that provides a list of possible values for an ActiveBatch variable, allowing operators who trigger the ActiveBatch Jobs to pick variable values from this list rather than having to know all possible values or look them up manually. Two (2) implementations are supported: PowerShell and .NET C#.
Dynamic Picklist – Powershell
Note: Powershell 5.1 (or higher) is required to be present on the Job Scheduler system to use the below specified functionality.
The "PowerShell" picklist is implemented as PowerShell modules. Every picklist will need its own PowerShell class, but you can have multiple classes (i.e. multiple picklists defined within one module), which will need to be placed inside <INSTALLPATH>\Plugins\Extensions. Each picklist module will need a GetValues function and a Validate function, and both functions must be exported as module members.
Note: Each Picklist Powershell module must be within its own folder by the same name. The Powershell module must have the extension of .psm1.
GetValues takes a dictionary input and Validate takes a string value to validate and a dictionary as input. The GetValues function is expected to return a list of strings. The Validate function is expected to throw an exception on failure. The names of these functions have been kept the same as what we came up with in the .NET/MEF implementation.
None of the usage in defining the use of PowerShell picklists (or .NET/MEF picklists) has been altered. The Variable definition syntax is the same. If no MEF picklist is found by a name, the backend plugin manager automatically falls back on and looks for a PowerShell module by a given name.
Example of a Dynamic Picklist coded in Powershell.
Set-PSDebug -Strict;
$ErrorActionPreference = "Stop";
# Note: Each picklist provider must be its own class.
# Example of variable syntax to expose CountryProvider:
# $CustomValueProvider=PowerShellProviderModule.CountryProvider;$Order=1 Class CountryProvider
{
# Note: A default constructor is required (ie, [CountryProvider]::new())
# GetValues is required
# Note: GetValues takes a hash table of arguments and returns an array of strings
[string[]] GetValues($params)
{
return @("United States", "United Kingdom", "Germany");
}
# Validate is required
# Note: Validate takes your value and the same hash table of arguments
# It can throw an error to indicate invalid input
Validate($value, $params)
{
# If you do not care to check the validity of the value, you can leave this method blank
}
}
# Example of variable syntax to expose CityProvider:
# $CustomValueProvider=PowerShellProviderModule.CityProvider;$Order=2;$Args={Country:"%(Var_Country)"}
Class CityProvider
{
[string[]] GetValues($params)
{
$country = $params["Country"];
if ($country -eq "United States")
{
return @("New York City", "Chicago", "Los Angeles");
} elseif ($country -eq "United Kingdom")
{
return @("London", "Glasgow", "Liverpool");
} elseif ($country -eq "Germany")
{
return @("Berlin", "Munich", "Hamburg");
} else
{
return @("New York City", "Chicago", "Los Angeles", "London", "Glasgow", "Liverpool", "Berlin", "Munich", "Hamburg");
}
}
Validate($value, $params)
{
$cityList = $this.GetValues($params);
if (-not $cityList.Contains($value))
{
$country = $params["Country"];
throw "Invalid country/city combo: $country/$value";
}
}
}
Dynamic Picklist – .Net C#
The plugin itself is a .NET assembly that will contain the logic to return the list of possible values. Logic for multiple different picklists can be created within the same assembly. This section will detail how to create a Dynamic Picklist plugin and use it within ActiveBatch.
Getting Started
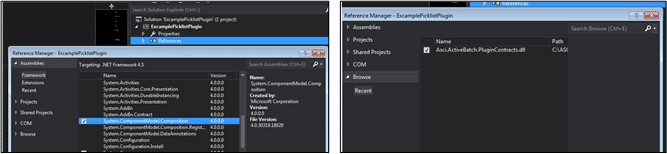
Start by creating a new Project that will contain your Plugin through the File > New > Project menu in Visual Studio. Choose .NET Framework 4.5 or above as the target framework, choose ‘Class Library’ as the template, and give your project a name (see figure below). Alternatively, you can add this project to an existing solution by right clicking on the solution in the Solution Explorer and selecting Add > New Project from the context menu.

Next, add References.
Two references will need to be added to support the development of this plugin:
-
System.ComponentModel.Composition
-
Asci.ActiveBatch.PluginContracts
To add these references, open the Solution Explorer, right click on the References node under the project, and select Add Reference from the context menu. From the Assemblies tab, check the box next to System.ComponentModel.Composition (see figure). Next select the Browse tab, click the Browse button, and browse to the location of the Asci.ActiveBatch.PluginContracts.dll assembly on the development machine (it can be copied from the
<ActiveBatch Installation Directory>\Plugins\Contracts directory on the Job Scheduler server).After both assemblies are selected, click OK and they will appear under the References node in the Solution Explorer.
Providing Interfaces and Methods
Now that the project is set up, we can begin creating the Picklist implementations. In this example we will create a simple Picklist that returns a set list of strings to show the minimum requirements for the plugin to work. Each Picklist is implemented as a separate class that implements the ICustomValueProvider interface from the Asci.ActiveBatch.PluginContracts assembly. In the plugin project, create a new class called SimplePicklistExample and have it implement the ICustomValueProvider interface.
using System.Collections.Generic;
using System.ComponentModel.Composition;
using Asci.ActiveBatch.PluginContracts;
namespace ExamplePicklistPlugin
{
public class SimplePicklistExample : ICustomValueProvider
{
}
}
ICustomValueProvider Interface
The ICustomValueProvider interface provides two methods that need to be implemented:
GetValues: Returns the list of values to display in the Picklist.
Parameters:
|
Name |
Type |
Description |
|---|---|---|
|
args |
Dictionary<string, string> |
This is a dictionary containing Name/Value pairs of arguments that can be used to retrieve the values. For the purpose of the Picklist plugin, these arguments are specified by the Job author inside the ActiveBatch Job. For each entry, the key is the argument name, and the Value is the argument value. If no arguments are specified, the dictionary will be empty.
|
Returns: object[]. This is the list of values that will be displayed in the Picklist in ActiveBatch. Note that even though the return type is an object array, for the
Picklist implementation, only strings should be returned in this array.
Validate: Check that the given value is valid. This method does not return anything. If the input value is not valid, the method should throw an exception with a message detailing why the value is not valid. This method is only called when the user clicks the OK button on the variables dialog after selecting/entering the variable values.
Parameters:
|
Name |
Type |
Description |
|---|---|---|
|
value |
string |
The value to validate. |
|
args |
Dictionary<string, string> |
The same arguments that were passed to the GetValues method. |
In the Validate method, we will perform a simple check to make sure that if the user entered their own value rather than picking one from the list that it contains a valid city name. In this case, we will check that the string is not empty and that it does not contain any numbers or symbols.
public void Validate(string value, Dictionary<string, string> args)
{
if (string.IsNullOrEmpty(value))
throw new Exception("Value cannot be empty.");
foreach (char c in value)
{
if (char.IsLetter(c) || char.IsWhiteSpace(c))
continue;
throw new Exception("Value must contain only letters or spaces.");
}
}
The final step in creating the Picklist is adding the Export attributes that will allow the Picklist to be discovered by ActiveBatch. On the SimplePickListExample class, add the following two attributes:
[Export(typeof(ICustomValueProvider))]
[ExportMetadata("Name", "CityList")]
public class SimplePicklistExample : ICustomValueProvider
{
...
The first attribute [Export(typeof(ICustomValueProvider))] will be the same on any picklist class you create. The second one, [ExportMetadata("Name", "CityList")] has a parameter called Name. This name must be unique to each Picklist. This name can be anything (it does not need to match the class or assembly name), but it should be something descriptive since this is how the picklist will be referenced by the Job author from ActiveBatch.
The completed class:
using System;
using System.Collections.Generic;
using System.ComponentModel.Composition;
using Asci.ActiveBatch.PluginContracts;
namespace ExcamplePicklistPlugin
{
[Export(typeof(ICustomValueProvider))]
[ExportMetadata("Name", "CityList")]
public class SimplePicklistExample : ICustomValueProvider
{
public object[] GetValues(Dictionary<string, string> args)
{
string[] cityList = new string[] { "London", "Los Angeles", "New York", "Paris", "Singapore" };
return (cityList);
}
public void Validate(string value, Dictionary<string, string> args)
{
if (string.IsNullOrEmpty(value))
throw new Exception("Value cannot be empty.");
foreach (char c in value)
{
if (char.IsLetter(c) || char.IsWhiteSpace(c))
continue;
throw new Exception
("Value must contain only letters or spaces.");
}
}
}
}
Installing the Plugin
The code for the simple Picklist is now complete. Right click on the project in the Solution Explorer and select Build. After the build completes successfully, a .dll file will be generated in the output location specified in the project settings. Copy this dll to the Plugins\Extensions folder inside the ActiveBatch Installation Directory on the Job Scheduler Server (e.g. C:\Program Files\ASCI\ActiveBatchVX\Plugins\Extensions). After the file is copied, the plugin needs to be loaded. Open the Extension Manager view inside ActiveBatch Console (on the Administrators Tab). In the Extension Manager, click on the ‘ActiveBatch Plugins’ package. In the tab on the right side of the view, check the ‘Refresh Plugins’ box and click ‘Apply’. The picklist plugin is now ready to use.
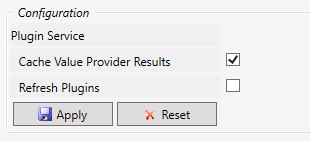
When the Refresh Plugins box is checked and applied, handles to all plugin files are released so the underlying files can be removed or replaced. This plugins are reloaded automatically the next time someone uses the picklist dropdown. This option is particularly useful when testing a plugin.
By default the Dynamic Picklist caches the results for a given provider/arg combination for two (2) minutes to avoid doing the same work (for example, querying a database). This can be problematic when testing since you’d have to wait 2 minutes for each iteration of testing a changed provider. To remedy this the Cache Value Provider Results property allows developers to disable the results cache. It is enabled to cache by default, but if un-checked and applied, the results cache is disabled. For Production use we highly recommend that the cache be enabled for better performance.
Dynamic Picklist – Usage
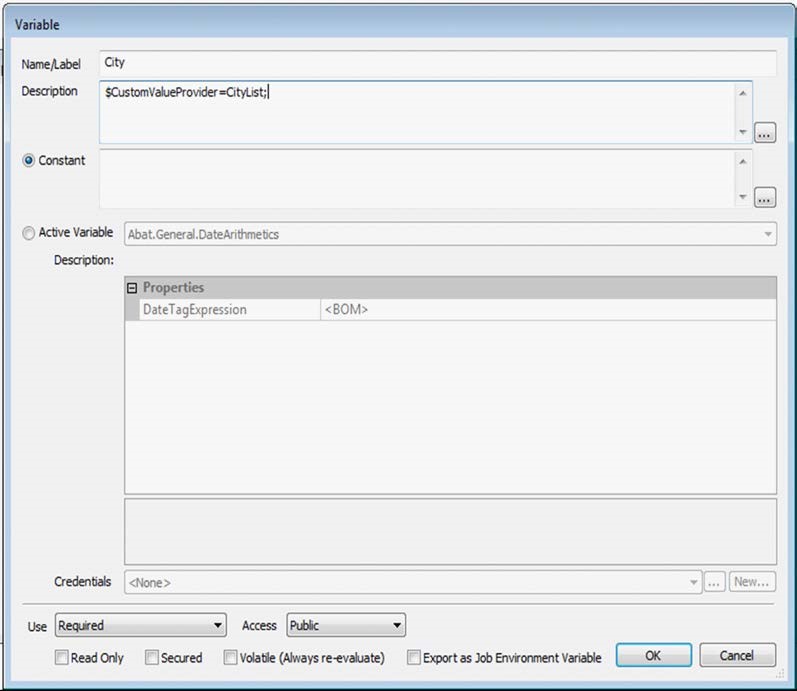
Open the Property Sheet of the Job or Plan that will be using this picklist, open the Variables tab, and add a new Variable. Give the variable a name, ensure the type is set to ‘Constant’, and mark the ‘Use’ field as either Required or Optional. Setting the ‘Use’ field is mandatory so that the variable appears in the dialog when a user triggers the Job. To tell this variable to use a specific picklist plugin, add the following syntax to the variable’s ‘Description’ field:
‘$CustomValueProvider=<ProviderName>;’, where <ProviderName> is replaced with the Export name given to the provider in the Plugin. For the example created above, the description text would be:
$CustomValueProvider=CityList;
After setting the properties as described, save the variable and the Job.
Note: Only the first line in the Description will be read and analyzed for this purpose. The line must end with a semi-colon (;).
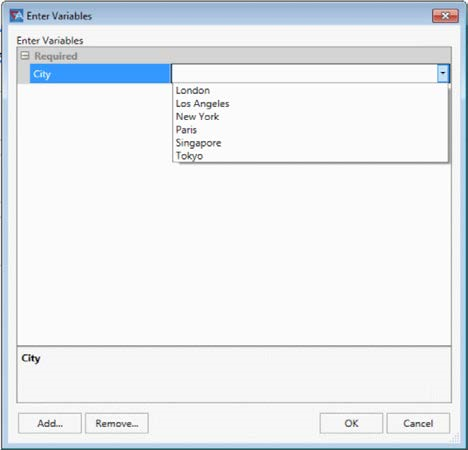
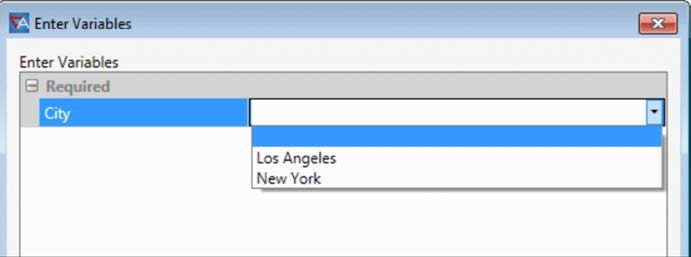
Once the variable is set up, right click on the Job and Trigger it. A dialog will appear showing any required/optional variables that need to be entered, and next the City variable that has the picklist defined, a drop-down list appears. When the arrow is clicked on the drop-down list, the GetValues method of the provider with the matching Export name (in this case, CityList) is called, and the values returned from that method populate the list for the user.
Dynamic Picklist – Validation
When the OK button is pressed on the variable dialog, the Validate method is called for each variable with a picklist. In this example, the Validate method is checking to see that the city name contains only letters or spaces. If we enter an invalid value and press OK, we see that an exception icon appears in the dialog next to the variable(s) that could not be validated. Clicking on the exception icon next to the variable will show the failure message, which was thrown from the code in the Plugin:

Editable Parameter
The Job author has the ability to choose whether or not the variable values should be able to be edited by the triggering user. By default, all variables in the dialog are editable. To specify that a variable should not be able to be edited by the user at trigger-time, the syntax ‘$Editable=false;’ should be added to the variable description. Building on the previous example, the variable description will now read: ‘$CustomValueProvider=CityList;$Editable=false;’. Save the Job and trigger again, and notice that now the user must select a value from the provided list and cannot enter their own or edit the value. An empty value is added to the list should the user choose to not enter a value for this variable (note that the empty option is only able to be used for optional variables. Required variables must have a nonempty value).
Using Arguments in the Picklist Code
The GetValues and Validate methods of the ICustomValueProvider provide a parameter called args of type Dictionary<string, string>. This allows the Job author to pass parameters to the Plugin so different output can be generated.
The key of each entry in the args dictionary is the argument name, and the value of the entry is the argument value. To use the arguments, we can simply check to see if the dictionary contains an expected value, and if so, generate some different output based on that. To update the simple example to use arguments, change the content of the GetValues method to return different cities based on a ‘Region’ argument.
public object[] GetValues(Dictionary<string, string> args)
{
string region = "";
if (args.ContainsKey("Region"))
region = args["Region"];
if (string.Equals(region, "North America"))
return (new string[] { "Los Angeles", "New York" });
else if(string.Equals(region, "Asia"))
return (new string[] { "Singapore", "Tokyo" });
else if (string.Equals(region, "Europe"))
return (new string[] { "London", "Paris" });
else
return (new string[]
{ "London", "Los Angeles", "New York", "Paris", "Singapore", "Tokyo" });
}
Now that the method has been changed to use arguments, build the project, replace the plugin assembly in the Job Scheduler installation directory’s Plugins\Extensions folder, then either use the Extension Manager to refresh the plugins or restart the Job Scheduler service as discussed previously.
Passing Arguments to the Picklist Methods
I. Automatic Arguments
By default, the picklist will automatically receive the Name and Value of any other optional or required variables from the same Job as arguments to both the GetValues and Validate methods. This is useful because retrieving the values for some lists may depend on the values from other choices. In this example, retrieving the city may depend on the value of a region that has been defined in another variable in the Job.
No additional setup in the ActiveBatch Job is required to receive the variable names and values as arguments, however the Job author may choose to define specific arguments in the Job. To specify additional arguments to pass to the GetValues method (or to override the automatic variable value arguments), we will add the $Args parameter to the current syntax in the variable description (described below).
II. Static Valued Arguments
Suppose we don’t want the triggering user to pick the region, and it will just be a static value for this Job. This can be done using the $Args syntax. The value of Args uses standard JSON syntax to define the Name:Value pairs of arguments. A Region argument with a constant value can be added to the description of the existing City variable, with the result looking like this:
‘$CustomValueProvider=CityList;$Args={Region:”North America”};’.
Note that the Editable parameter can still be used if desired, so in that case the syntax would be:
‘$CustomValueProvider=CityList;$Args={Region:”North America”};$Editable=false;’.
Please note that double-quotation marks are required for the values; do not copy and paste the above since Word substitutes smart quotes which will not work properly. Now when we trigger this Job, we can see that only the cities from the ‘North America’ region appear in the list because of the region argument that was defined on the variable. Try changing the value of this argument to ‘Asia’ or ‘Europe’, or leave it out entirely and note the difference in results.
In this example, only one argument is passed to the GetValues method, but if multiple arguments are needed, they can be added to the JSON string with a comma as a separator. For example: $Args={Arg1:”Arg1Value”, Arg2:”Arg2Value”, Arg3:”Arg 3 Value” };
Note: Note that explicitly defined arguments will override the automatic variable arguments if their names are the same. For example, if the Job contains a variable called ‘Region’, but the Job author chooses to pass an argument with the name ‘Region’, then the value defined in the $Args string will be the value that is passed to the GetValues and Validate methods – not the Region Variable value.
III. Using variable values in explicitly defined arguments
If need be, values of other optional or required variables within the same Job can be passed as values of arguments. An example of where this may be useful is if the argument name the picklist code is expecting is different from the ActiveBatch variable name, but the value is the same. (e.g. there is a Variable named ‘Region’ defined on the ActiveBatch Job but the picklist code is expecting an argument called ‘Area’. In that case, %() syntax can be used to pass the variable value: $Args={Area:”%(Region)”}. Here we are passing an argument called ‘Area’ whose value will be the value of a Region variable that is defined on the Job.
Note that only the constant values of another optional or required variable defined within the same Job as the value of an argument. In simpler terms – if the variable has a constant value (i.e. not an active variable) and the user can see it in the variables dialog at trigger time, then it can be used as the value of an argument.
Other notes on Arguments
In the GetValues example code, we allow the user to pass an empty argument if they chose and we still returned some values (the whole list). In the case where the correct arguments are not passed or anything in general goes wrong in the GetValues method, an exception can be thrown the same way as in the Validate method, and that exception message will appear next to the variable in the dialog.
Also note that all arguments that are passed with the $Args parameter are also passed to the Validate method, so if any specific validation needs to be done with the arguments, they will be available there. Remember though that Validate is only called when the user presses OK on the dialog, so should not be used to check the validity of the arguments, as they will have already been used in GetValues by that point. Validation of the arguments themselves should be done in GetValues – the Validate method is for validation of the Value that the user enters/chooses and the arguments are simply provided here to aid in the value validation if need be.
Expanding the example
To expand the example, let’s create another picklist implementation in the example plugin project. This second picklist will return the list of valid Region names, so the user can choose one from the list then use that as an argument to return the cities in that region as options for the City variable. Set the Export name on the new class to “RegionList”, then in the GetValues method, return the possible region values that the CityList picklist is set up to handle. The validate method in this case does not need to do anything.
[Export(typeof(ICustomValueProvider))]
[ExportMetadata("Name", "RegionList")]
public class SimplePicklistExample2 : ICustomValueProvider
{
public object[] GetValues(Dictionary<string, string> args)
{
return (new string[] { "Asia", "Europe", "North America" });
}
public void Validate(string value, Dictionary<string, string> args)
{
return;
}
}
As always when changing the Plugin, build the project and copy the dll to the Plugins\Extensions folder in the Job Scheduler installation directory, then either use the Extension Manager to refresh the plugins or restart the Job Scheduler service.
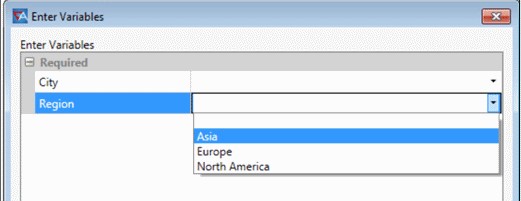
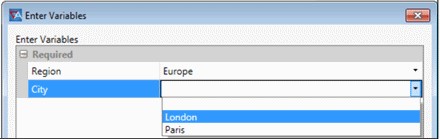
In ActiveBatch Console, open the Job where the City variable is defined and add a new variable called Region. Set its ‘Use’ field to Required and enter the picklist syntax in the description field to use the new RegionList picklist: $CustomValueProvider=RegionList;$Editable=false;. The City variable does not need to change since the values of other variables (in this case Region) are passed as arguments automatically. Save the Job and trigger it. Select a value from the list for the Region variable, then click the drop-down menu for the City variable. The options in the list for the City variable now change based on which value is specified for the Region variable.
In this case we did not need to explicitly pass any arguments to the City provider because Region was defined as a variable, but try experimenting with the $Args override– Define an argument called ‘Region’ in the City variable and try giving it constant values, and see how that changes the values provided in the drop-down menu.
Ordering Variables
In some cases, the user may want control over the order that the variables appear in the variables dialog at trigger time. Since the possible values of the City variable in the example now depend on the value of the Region variable, it would make more sense for the Region variable to appear first. To do this, the $Order parameter can be used. In the description of the variables, the syntax $Order=<any number>; can be used, and this will rank the variables for placement in the trigger dialog. For example, a variable with $Order=1; will come before a variable with $Order=2; Variables that have no order specified have a default value of 999, so they are placed below any variables that have any order value below 999 (e.g. Variable with no order specified would appear below a variable with $Order=100;).
To illustrate this, open the variable properties sheet of the example Job and modify the City and Region variables to use the $Order property. The description of the City variable should now be
$CustomValueProvider=CityList;$Args={Region:"%(Region)"};$Editable=false;$Order=2; and the description of the Region variable should now be
$CustomValueProvider=RegionList;$Editable=false;$Order=1;.
Save the Job and trigger it, and now the Region variable will appear first in the variables dialog.
Syntax Glossary
The following table is a summary of the parameters that are available for use in the Variable Description field. Parameters can be chained together, separated by semi-colons (;).
| Syntax | Example | Description |
|---|---|---|
|
$CustomValueProvider=< Name> |
$CustomValueProvider=CityList; |
Defines which Picklist provider to use from the available plugin assemblies. The name specified here must exactly match the name given in the Export parameter on one of the Picklist classes. |
|
$Args={Arg1Name:”Value ”, Arg2Name:”Value”}; |
$Args={Domain:”myCompany.com”, ServerName:”myServer”}; |
Defines the arguments that are passed to the GetValues and Validate methods defined in the picklist class using JSON syntax to provide Name:”Value” pairs of arguments. Multiple argument pairs within the JSON string are comma (,) separated. Values of other variables can be passed as arguments using %(variableName) syntax. By default, all required and optional variables are passed as arguments automatically to all GetValues and Validate calls. |
|
$Editable=<true/false>; |
$Editable=false; |
Specifies whether the triggering user should be able to edit the selected value or enter a custom value. The default value if not specified is true. |
|
$Order=<number>; |
$Order=1; |
Specifies the order in which the variable should appear in the list in the variables dialog when the Job is triggered. Order is separate for each group (required variables/optional variables). Variable with the lowest order number will appear on top. If no order is specified, the default is 999. |