Definitions
The Definitions View allows you to obtain counts for each object type by container (Job Scheduler Root, Folder and Plan). This view lets you see where the greatest number of objects are stored, by object type.
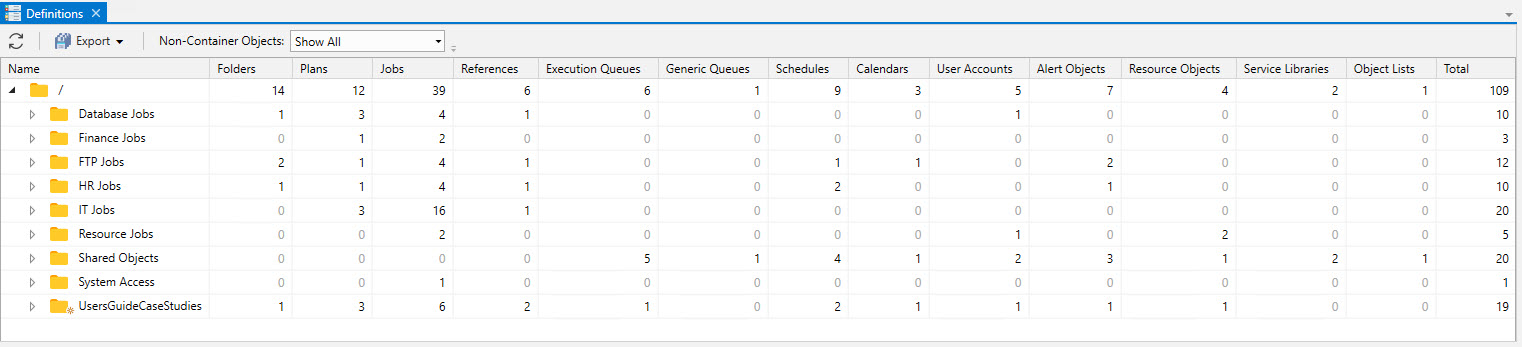
You can access the Definitions view via the Views pane. By default, the view is stored the Views > Developers Folder. When accessed there, the Definitions view displays counts for all the objects, system-wide (unless you are connected via a Virtual Root, whereby your scope is limited). In the image below, all objects are listed, system-wide. Notice the total on the top line (that represents the Scheduler root, denoted with a forward slash "/" in the Name column) is 109. This means that there are 109 user-defined objects created, system-wide. As you scan the top line, you can see how may Jobs are created system-wide (39), Folders (14), and so on.
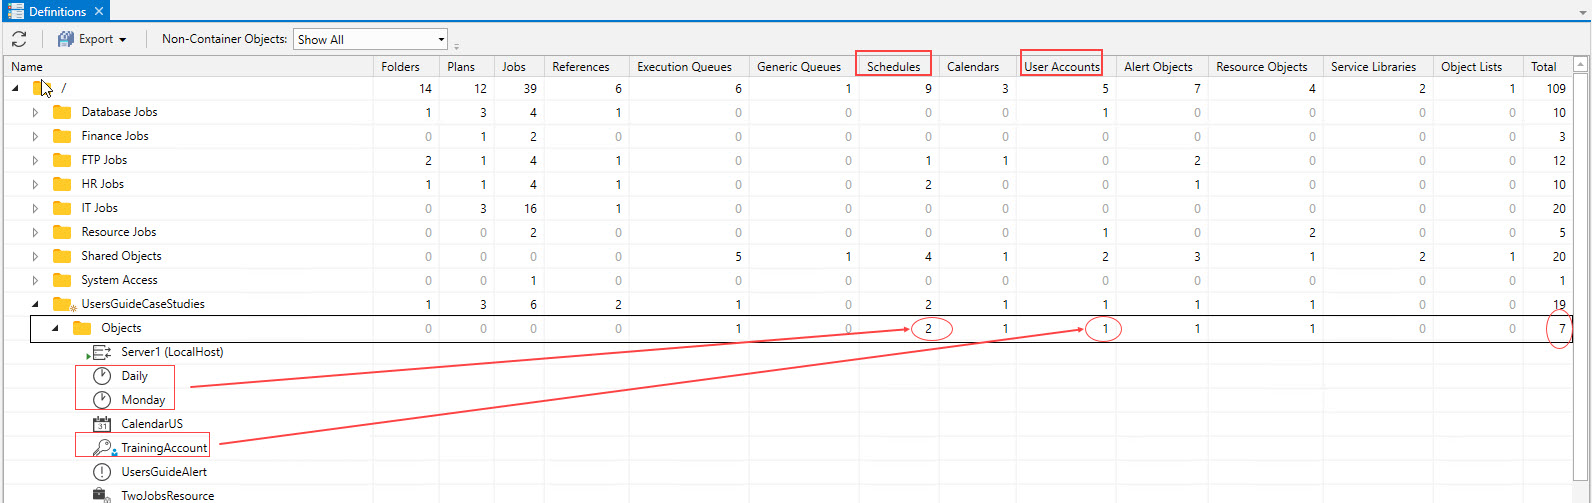
As you expand each Plan or Folder, you can see how many of each object type is stored at that level, and the object name. In the image below, the expanded Objects Folder (outlined in black) consists of 7 objects. The total is circled in red on the far right. Additionally, this view displays the total per object type in the appropriate column. Two examples are depicted in red, where there are 2 Schedule objects and 1 User Account object.
You can also access the Definitions view for any Folder or Plan by right-clicking on it in the Object Navigation pane, then selecting View > Definitions. When this action is performed for the above Objects Folder, the Definitions view only returns data for that Folder, as depicted in the image below.

Next, you can select the sorting sequence for a particular object type by clicking on its column heading. This allows you to see, in ascending or descending the order, the counts for the selected object type. For example, if you wanted to see from high-to-low how many Jobs are stored, level-wise, click on the Jobs column heading.
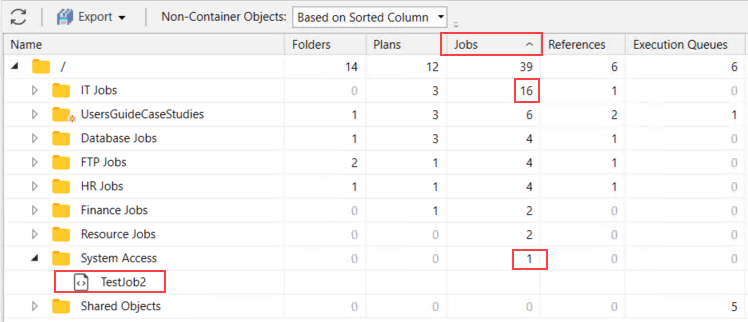
In the image below, the Jobs column heading has been selected, and the number of Jobs are sorted in descending order. If you click on the Jobs heading again, the sort order will change from descending to ascending. Observe the Folder named IT Jobs is where the greatest number of Jobs are stored. The Folder with the lowest number of Jobs is System Access, which has been expanded to display the single Job.
If you right-click on any object name, the standard menu options associated with the selected object will appear, allowing you to make a selection.
Toolbar buttons
The buttons on the Definitions view toolbar consist of a Refresh icon, an Export button with 2 dropdown options, and a Non-Container Objects dropdown that offers filter selections.
The Refresh button refreshes the view since this view is not dynamically refreshed.
The Export button allows you to create a CSV or HTML file of the object totals. Using the CSV file, you can import the data into a spreadsheet where you can graph and/or report on the totals for the entire system and/or on a level basis. When exporting to an HTML file, you can view the file in a web browser.
The Non-Container Objects dropdown functions as a filter - to show or hide non-container objects. Before we describe the filter, let's clarify a few things. First, non-container objects are all the user-defined ActiveBatch object types excluding Folders and Plans. Non-container objects include Jobs, Queues, User Accounts, Schedules, Alerts, etc. Next, container objects are the Scheduler root, Folders and Plans. They cannot be hidden. That said, the "Non-Container Objects" dropdown allows you to limit the non-container objects you see in the view.
By default, when you first access the view, all containers appear at the top of the list in alphabetical order, followed by each object class category in alphabetical order. Without selecting any other column heading, the only two options in the Non-Container Objects dropdown is Show All (the default) or Hide All. Show All means that all non-container objects types, as you expand the various containers, will be visible. If you select Hide All, you will be left with only the containers in the view. That is, all non-container objects will be hidden. If you expand any of the containers, you won't see anything (only other Folders/Plans, if any are nested). The object totals will remain the same since Show All and Hide All applies to object visibility and not the counts.
Next, if you click on a column heading for any of the non-container object types, the sort order changes from the Name column, to the column you selected. You can toggle the sort order from descending to ascending and vice versa when clicking on the same column heading. In addition, you will see one more option in the Non-Container Objects dropdown, in addition to Show All and Hide All - and it will be the default option and therefore the currently set filter. The additional option is "Show Based on Column". What this means is whatever non-container object column you clicked on, you will only see that object type as you expand the various containers. All other non-container object types will be hidden. The other filter options, Show All or Hide All, will display all non-container object types - or hide them.
As a Show Based on Column example, if you click on the Execution Queues column heading, only Execution Queue objects will be displayed (in whatever containers they are stored in) - in alphabetical order. The other non-container types are not displayed. This filter option lets you focus on the non-container object type you wish to locate and/or see counts for. The object totals remain the same, since this option (like Show All and Hide All) applies to object visibility and not the counts.