Creating and Managing Objects
The operations which follow are meant to be used primarily by job authors - those individuals who will be creating and managing (updating, removing, etc.) ActiveBatch objects. They are limited only by the security access they are granted to the source and target (where applicable) objects. Most of the features discussed in this section are right-click menu options.
Using the Navigation Pane, right-click on the desired container - the root of the Job Scheduler, or any existing plan or folder, and then select New. From there, select the object type you wish to create. The property sheets for the new object will be tabbed in the Main view. When done entering properties, click Save or Save and Close. The object will be added to the Navigation pane.
In the image below, a new Folder object is being created at the root of the Job Scheduler.
/wc281.png)
Using the Navigation Pane, right-click on the desired object, then select Properties. The property sheets for the selected object will be tabbed in the Main view, and the General tab will have focus. Make your desired changes, then click Save or Save and Close. As an edit shortcut, you can double-click on object in the Navigation pane. This will tab the object's property sheets in the Main view, allowing you to make your changes.
In the image below, the Download File job has been selected, depicting the right-click menu options (see Properties outlined in red).
/wc282.png)
Drag and Drop operations are supported by ActiveBatch and are applicable only for object definitions (specifically instances are not supported). The actual operation performed depends on the source and destination. For example, if you select several Jobs and Plans and then drag and drop the selection to a Plan, the selected objects are moved to the Plan. If you select one or more Jobs and then drag them to a Queue, the Jobs are associated with the Queue.
You can perform drag and drop operations using the Navigation views as well as any list-oriented view.
The table below indicates what source objects may be dragged to a destination object. Typically any selected source objects must be of the same type, a major exception to this are Jobs and Plans (called JobPlan in the table). ActiveBatch also supports use of special keys when performing drag and drop operations to modify the drop into another operation. For example, the ALT key performs a Reference operation, the CTRL key performs a Copy operation, the SHIFT key performs a MOVE operation and no key pressed performs the default operation (as per the table below).
| Source | Queue | Schedule | Calendar | Plan | User Account | Alert | Resource | Job |
|---|---|---|---|---|---|---|---|---|
|
Queue |
xxxA |
n/a |
n/a |
xxMx |
n/a |
xxxA |
n/a |
xxxA |
|
Schedule |
n/a |
n/a |
n/a |
xxMA |
n/a |
n/a |
n/a |
xxxA |
|
Calendar |
n/a |
n/a |
n/a |
xxMA |
n/a |
n/a |
n/a |
xxxA |
|
Plan |
xxMx |
xxMA |
xxMA |
RCMM |
xxMA |
xxMA |
xxMA |
n/a |
|
UserAcc |
n/a |
n/a |
n/a |
xxMA |
n/a |
n/a |
n/a |
xxxA |
|
Alert |
xxxA |
n/a |
n/a |
xxMA |
n/a |
n/a |
n/a |
xxxA |
|
Resource |
n/a |
n/a |
n/a |
xxMA |
n/a |
n/a |
n/a |
xxxA |
|
Job |
xxxA |
xxxA |
xxxA |
RCMM |
xxxA |
xxxA |
xxxA |
n/a |
|
JobRef |
n/a |
xxxA |
xxxA |
xCMM |
n/a |
xxxA |
xxxA |
n/a |
|
PlanRef |
n/a |
n/a |
n/a |
xCMM |
n/a |
n/a |
n/a |
n/a |
|
JobPlan |
n/a |
xxxA |
xxxA |
xCMM |
xxxA |
xxxA |
xxxA |
n/a |
The first column represents the source object(s) selected. The second through eight columns represent possible destinations (i.e. drop). A value of “n/a” in the table means “not allowed”. Any other value represents a possible operation. Each value shown depicts four (4) possible drag and drop operations. The first position is with the ALT key, the second is with the CTRL key, the third SHIFT key and the fourth is with no keys depressed. The individual values are as follows:
|
A |
Associate. Dragged objects are associated with the dropped object. |
|
C |
Copy. Dragged objects are copied to the dropped object. |
|
R |
Reference. A reference object is created on the dropped object. |
|
M |
Move. Dragged objects are moved to the dropped object. |
|
x |
Not allowed. Operation is not allowed. |
This operation allows you to view any objects that depend on the currently select object. For example, if you right-click on a queue, then select Show > Dependent Objects, you will see every object that depends on the queue.
/wc283.png)
Note that a Generic Queue (Generic Q) as well as several jobs are associated (or dependent) on this queue. This operation is particularly useful for User Accounts, Alerts and other objects when determining the overall usage of the objects you’ve created.
This operation is the opposite of Show Dependent objects. It lists objects that the currently selected object is using (i.e. is associated with). The Generic Queue in the image below is associated with (e.g. using) Feature_Queue and LocalQueue.
/wc284.png)
Sometimes you want to create a Plan or Job using most of the information found in an existing Plan or Job. ActiveBatch Web Console lets you do just that.
To copy an object, right -click on the selected object and choose Copy. You must have Read access to the object (for a UserAccount object you must have Use level permission as well).
To paste the copied object, select the container (Scheduler root, folder or plan) you want the new object to be pasted into, then right-click to select Paste. The object will be created within the selected container. If the object’s label value is already present, ActiveBatch will append the word “Copy” to the object as many times as needed until unique.
When pasting an object (in particular a Plan or Job), a complete copy of the object is made including its relationships (for example, Completion Triggers and Constraints). Sometimes you want to paste an object but leave behind relationships that are specific to its usage in another workflow. To that end, you can also employ SHIFT+PASTE. SHIFT+PASTE copies the original object to the new object with the following exceptions: 1. All Triggers are removed (except Date-Time and its associated properties), 2. Constraint List and Expression and 3. All Completion Triggers.
Sometimes you need to move an object from one container to another. With Cut and Paste you can select the object and choose Cut. You must have Read and Delete access to the object.
To paste the cut object, select the Job Scheduler icon or a plan or folder you want the object to be pasted into, then right-click to select Paste. The original object will be pasted in
The delete operation is applicable to Folder definitions and to both Plan and Job instances and definitions. Object deletions are not permanent and can be reversed. By default, deleting an object moves the object to the Recycle Bin. Deleting objects from the Recycle Bin or pressing the Shift button during a Delete operation will cause the object to be permanently removed from the ActiveBatch database. In that case, the delete is irreversible. Delete requires Delete permission.
If you delete a Plan/Job definition you will be asked to confirm the implicit abort of all of the related instances.
When you delete a plan, folder or job definition you will be prompted to confirm the deletion.
ActiveBatch allows you to export an ActiveBatch object to an XML file and also provides the ability to import the object using the same XML file. This mechanism provides several features:
-
A simple method to backup/restore your ActiveBatch system.
-
Versioning control of your ActiveBatch objects (especially when combined with a source control system).
-
The ability to edit an XML file to create variants of ActiveBatch objects. Note, do not check “Sign this export”, a topic discussed in the next section, if you plan on manually modifying XML export files.
-
A simple method of transferring completed (and tested) objects from your development system to QA and/or Production ActiveBatch Job Scheduling systems.
You can export or import objects at any level. For example, exporting objects at the Job Scheduler level means you can save the Job Scheduler object and all the child objects recursively. Exporting objects at the Plan or Folder level means you can save the Plan or Folder object and all the child objects recursively.
To perform an export on the Scheduler object, or any Folder or Plan, right-click on the desired object, then select Import/Export, then Export. To perform an export on all other object types, right-click on the desired object then select Export.
/wc289.png)
The Export dialog above is what you will see when exporting the Job Scheduler object, or any Plan or Folder object. There are variations of the Export dialog, depending on the object selected to export. The variations do not include any additional checkbox options (as depicted above), but rather, some checkbox options will not be present because they do not apply to the object being exported.
Let’s go over all the Export dialog checkbox options.
Export this container recursively (this container and all its child objects) - checked by default.
-
You will see this Export option when you select the following object types to export: Scheduler object, Folder or Plan (which are referred to as the three ActiveBatch “containers”).
-
When checked, the container object and all its nested child objects will be included in the export.
-
When not checked, only the single container object is exported.
Please note that when exporting a container recursively, some of the export security options discussed next may be applicable to the container itself, and/or the container’s child objects. For example, if a Plan and one of its jobs both have secured variables defined, and the Plan is exported recursively, checking “Remove secured variable values on export” would remove the secured variable values from both the Plan and the nested Job.
SecuredExport - not checked by default
-
This Export option provides you with a way to quickly select/deselect all the security-related subitem checkboxes.
-
When any or all of the SecuredExport subitems in the image below (the 3 “remove” options) are present in the Export dialog, it means the object(s) the user has chosen to export could possibly include some or all of the items that can optionally be removed. If any “remove” option is checked, and it is not applicable to any object(s) in the export (e.g. there are no secured variables), then the removal is simply ignored.
/wc290_345x101.png)
Remove encrypted passwords on export
This option is not checked by default. This action enhances password security.
-
You will see this Export option when you select the following object types to export: Scheduler object, Folder, Plan, and User Account object.
-
When checked, an encrypted password configured in the User Account object will have its value removed (cleared out). If encrypted passwords are removed on export, the user performing the import will be prompted to provide a new password after object(s) are successfully imported. They can opt to skip this and update the User Account password later, if desired.
Depending on the User Account object’s “Credential Type” that has been configured, the field that is encrypted and therefore removed may vary. For example, the “Username/Password” Credential Type will have the encrypted password removed on export. As another example, when the Credential Type is “REST API Connection” the following fields will be removed, based on the REST API Connection type selected:
API Key: Value field
OAuth2.0 - all 3 grant types: Client ID and Client Secret fields AWS Signature:
Access Key ID and Secret Access Key fields
Remove secured variable values on export - not checked by default. This action enhances the security of sensitive variables.
Note about secured variables: For almost all the object types that support the creation of variables, securing (hiding) the variable value is accomplished by enabling the “Secured” property checkbox, located on each individual variable’s property sheet. Securing a variable in the Service Library object, when using the REST Adapter (V2) is done a bit differently. Local or Global REST Adapter (V2) variables are secured by selecting a variable in the Variables grid, then clicking on the lock icon.
-
You will see this Export option when you select the following object types to export: Scheduler object, Folder, Plan/Plan Reference, Job/Job Reference, Queue (Execution and Generic), User Account, and Service Library. These are all the objects that support the creation of secured variables.
-
When checked, any variable marked “Secured” will have its value removed (cleared out) upon export. After the objects have been successfully imported, the user will be prompted to enter the secured variable’s value. They can opt to skip this and update the variable(s) later, if desired.
-
Remove dependency identifiers on export - not checked by default. This action allows for object sharing (e.g. a REST Adapter) with other people within or outside your organization without exposing internal paths to dependency objects.
To clarify what a dependency is, a dependency is any object that another object depends on (is using). For example, a Job object always has at least 2 required dependencies, a Queue and User Account object. Dependency objects are not part of an export unless a container is exported that includes the dependencies. By default, when a single Job is exported, the ID and full path of the Job’s dependencies are included in the XML file, but not the actual dependencies themselves.
-
The “Remove dependency identifiers on export” is an Export option you will see when you select any object type to export.
-
When the “Remove dependency identifiers on export” option is checked, the identifiers of the dependency(s) are removed (cleared out) from the object(s) that are being exported. This is true when the dependency(s) are not part of the current export. As an example, if you export a single Job, it is not possible for dependencies to be included in the current export. Therefore, in this example, removing the dependency identifiers would apply. If a container is exported that includes some but not all the dependencies, then the dependency identifiers would only be cleared out for the dependency objects not included in the export.
-
Upon import, the user will be prompted to select dependency(s) in the target environment for the objects where the dependency identifiers have been removed. They must select dependency(s) before the import can proceed.
-
-
When “Remove dependency identifiers on export” is not checked, the dependency paths are not removed. If the dependency paths do not resolve upon import, meaning the dependency cannot be found on the target system, and they are not part of the current export, then the user performing the import will be prompted to resolve the missing the dependency(s).
See below the “Export Dependency Mappings” heading for more information related to this topic.
Sign this export - checked by default. This action enhances the security of the XML export file.
-
“Sign this export” is an Export option you will see when you select any object type to export.
-
When checked, a signature tag is included in the XML file. This prevents the import of an XML file that has been modified outside of ActiveBatch. Do not check this option if it is your intent to make changes to the XML file manually outside of ActiveBatch.
-
When “Sign this export” is not checked, a user will not be prevented from importing a file that may have been modified outside of ActiveBatch (they will be warned that the file was not signed).
This ends the discussion of the Export dialog options. After configuring them, click OK when you are ready to proceed with the export.
Next, an “Export Dependency Mappings” window will pop up if the export includes any dependencies that are not part of the export.
Export Dependency Mappings
This window displays a list of one or more dependencies that are not part of the current export. In the list are 3 columns: ID, Path and Description. The ID and Path are read-only columns that identify the dependency’s object ID and full path.
-
The Description column is user-editable and initially empty.
-
The purpose of entering a Description is to provide some context for the user performing an import if they need to resolve missing dependencies. If the import user is presented with a “Resolve Dependencies” window, that means they must map dependencies to objects on the target system. The Description property should offer information that will help the user identify what objects they should select to resolve the dependencies.
-
The Description is required when the Export option “Remove dependency identifiers on export” is checked, because the dependency identifiers are being intentionally removed, therefore resolving dependencies will be a required task upon import.
-
The Description is not required when the Export option “Remove dependency identifiers on export” is not checked, because the dependency may very well resolve upon import, and therefore the user will not be prompted to resolve any missing dependencies. But, if for some reason any dependency(s) fail to resolve upon import, the Description field would be useful to aid the user in mapping the dependency object.
-
-
The Description field can be entered manually, or the user can click on the “Import Object Description” button. This will import the dependency’s “Description” property (if set), located on the dependency’s General property sheet. This can be quite useful if you will be repeatedly mapping objects when importing.
After all the Export-related dialog is complete, you will be prompted to save the file. Navigate to a directory to save the
file in, then enter the file name. Click Save. The XML export file will be created.
To import an XML export file, right-click on the target container (Scheduler object, Plan or Folder) that you would like the object(s) to be imported into. Select Import/Export from the menu, then select Import. An Import window will appear. Click on the Select File button, then navigate to the desired XML export file, select it, then click on Open.
/wc291.png)
Let’s discuss the options you see in the Import dialog.
Conflict Resolution - Conflict resolution refers to what to do if an existing object is already present in the system where the import is taking place. Your choices are: Ignore (the default), Copy, Update, Force Update.
-
Ignore – Objects in the import file will not be imported.
-
Copy – Objects in the import file will be added to the target Job Scheduler with the words “Copy of” inserted as part of the Name/Label of the object.
-
Update - Objects in the import file will replace the matching objects in the target Scheduler only if the target Scheduler's object revision ID is lower than the revision ID of the object in the import file. Higher revision IDs in the target imply a more recent modification (and typically you do not want a lower revision to replace a higher revision).
-
Force Update - Objects in the import file will replace the matching objects in the target Job Scheduler in any situation, regardless of the revision ID.
Restore original owner – When checked, the imported objects will retain their original owner as they were set when exported. If this box is not checked, the user performing the import will be the new owner.
Restore original security – checked by default. When checked, the imported objects will retain their original security settings as set when exported. If this box is not checked, the Scheduler will obtain its security from target Scheduler default policies set and/or - if any imported objects had "inherit security checked", the objects will inherit their security from the parent container.
In general, you will typically want to select the “Restore” options when importing to the same system you exported from. If you are importing from a different Job Scheduler, like a QA system, you will probably not want to restore either the original owner or security settings because they are likely to be different in the new environment (for example, Production).
Import Tags – When checked, the system will import Tags that were associated with the exported objects.
Disable Objects on Import – When checked, objects that support the basic disable feature will be disabled upon import. This provides you with an opportunity to decide what to enable in a controlled manner on the target system.
Verbose – When checked, an informational Audits window will pop-up after the import, as depicted in the image below. This will provide you with information on what objects were imported.
The audits table will include 3 columns, the Date and Time the import occurred, the imported object’s name and full path and ID, and the Description (what happened during the import).
/wc292.png)
Let’s look at the different values you may see in the Audit’s Description column.
Description column values when the object(s) are newly added to the target environment
In the above image, the description value is “Created”, which you will see when the objects did not already exist in the target environment, and therefore were added. You will also see “Created” if the objects already existed in the target, but the Confliction Resolution property was set to “Copy” (so a copy of the object was created). When a copy is created, the object copied will have _Copy in the object name.
Description column values when the object(s) already exist in the target environment
The “Object has not been updated” description would indicate the Confliction Resolution property was set to “Ignore”.
The “Modified” description would indicate the Conflict Resolution property was set to “Update” and the imported object had a revision that was higher than the one that already existed in the target. It could also mean the Conflict Resolution property was set to “Force Update”, where revisions are not considered, and the updates always take place.
The “Object has a newer revision” description would indicate the Conflict Resolution was set to “Update” and the existing target object is newer (the target object will not be updated).
Check in Comment – This property allows you to enter a check-in comment, to describe what is being imported. Objects that are added or updated (in any way, not just via an import), result in the automatic creation of a Changeset, under-the-hood. You can see the comment when you view the changeset history, accessible by right-clicking on the imported object, then selecting View, then Changeset History.
Let’s now look at what to expect upon import when the following Export options are checked.
Remove encrypted passwords on export
When the Export option “Remove encrypted passwords on export” is checked, you will be prompted to provide the password (or value for any field in the User Account object that is encrypted) during an import. This is depicted in the image below, where the User Account object’s Credential Type property is Username/Password. You can enter the password, then click OK. Or, you can check “Ignore item”, then click OK. Note, if there is more than one User Account object being imported, they will all be in a list, and each account will need its password entered.
/wc293.png)
If “Ignore item” is checked, you will be prompted to confirm your choice. Later, you can modify the User Account object and enter the password. One possible reason for ignoring an update on import is another user may need to update the password, not the user performing the import. Until the password or other encrypted User Account property value (e.g. REST API Connection API Key) is updated, any job depending on it will fail.
Remove secured variable values on export:
When the Export option “Remove secured variable values on export” is checked, you will be prompted to provide the secured variable value during the import, as depicted in the image below. Note, if there is more than one secured variable, they will be in a list, each requiring a value. You can opt to enter a value, then click OK. You could also check “Ignore item”, then click OK.
In the image below, JobZ has a secured variable configured named VarA. Its value was removed upon export. The user is prompted to enter the variable value for VarA. It will be saved as a secured variable.
/wc294.png)
If “Ignore item” is checked, you will be prompted to confirm your choice. One reason it may be ignored upon import is another user needs to update the variable value, not the user performing the import. Or, perhaps the value was not readily available at the time the import took place.
Let’s assume the variable was not updated upon import or after, and the job runs. The payload of the job echoes out the variable value to the job log file. You will see ABAT_SECURE_VARIABLE_VALUE_REMOVED in the job log file, which is what happens when a variable’s value is removed upon export and not updated during or after the import. The variable can be modified with the correct value at any time.
Remove dependency identifiers on export (Resolve Dependencies)
When the Export option “Remove dependency identifiers on export” is checked, dependency identifiers are removed from exported objects only when the dependency objects are not included in the export file. In addition, any dependencies that are missing that did not have this Export option checked, will also need to be resolved before the import can be performed. This is accomplished using the Resolve Dependencies window, which will only pop up during an import when dependencies must be resolved.
In the Resolve Dependencies window, one or more missing dependencies will appear in a grid format. If the reason for the missing dependencies is because the “Remove dependency identifiers on export” option is checked, then the grid will have 3 columns - Type, Description and Mapping. If the reason for the missing dependencies is not due to the “Remove dependency identifiers on export” option being checked, then the grid will consist of the same 3 columns, plus a fourth column named “Path”, which is the full path of the dependency object that is not present on the target Scheduler.
Type: The type of object (e.g. Queue, User Account, etc.)
Description: Its purpose is to offer information to help resolve the missing dependency. The user performing the export was required to enter a description when they selected “Remove dependency identifiers on export”. It was optional to enter a description when the remove dependency identifiers feature was not checked, but it can be helpful if dependencies do not resolve for unexpected reasons.
Mapping: A dropdown list that displays a picklist of ActiveBatch objects, filtered by the “type” of object you need to select for the mapping.
Path: The full path of the missing Dependency object – this column is only present when the “Remove dependency identifiers on export” option is not checked.
New button: If you need to create a new object to resolve the dependency, click the New button and configure the properties for the new object.
Let’s look at an example. In the image below, a job was exported with its dependency identifiers removed on export. Upon import, the Resolve Dependencies window pops up. The user who performed the export entered the information you see in the Description column. The Mapping column is initially empty, but based on the helpful description entered during the export, the user performing the import was able to select the User Account and Queue objects by clicking on the dropdown arrow in the Mapping column and navigating to the object for selection.
/wc295.png)
After mapping dependencies or creating new dependency objects, then clicking OK, the object(s) will be imported.
If any secured variables or User Account object encrypted values were removed during the export, the user will be prompted to enter that information, as described above. This occurs after the objects are imported.
Signed Export
Just before the import is about to take place, the system checks to see if the export file was signed or not. If the export file was not exported with a signature (“Sign this export” was not checked) a warning message will pop up, as depicted below. Whether to proceed or not is up to the user.
/wc297.png)
If the file selected for import did have the Export option “Sign this export” property checked when the export was performed, the signature is validated to ensure it matches. If the signature does not match, an error is thrown, as per the image below, and the import fails. If this happens, you must create a new export and perform the import again. If the signature does match, then no popup window relating to a signature will appear, and the import will proceed.
/wc298.png)
Create Trigger Script is an operation in which either a PowerShell or VBscript is generated that can be used to externally trigger the selected object. Note: If PowerShell is selected, the ActiveBatch PowerShell UI must be installed and the Execution Policy must be set to enable execution.
Take Ownership is a security operation in which an authorized user is allowed to become the owner of an object through the action of taking ownership. Normally you would take ownership of an object through the object's security property sheet. However, if you are denied object access (either explicitly or implicitly), you won't be able to access the security property sheet through the object properties selection. In this case, you would Take Ownership through the right-click menu operation (right-click on the object, select Advanced > Take Ownership).
A user can take ownership of an object by either having the Take Ownership access permission allowed or through the Take Ownership privilege. A user who has such privilege cannot be prevented from taking ownership if the access is explicitly specified. The owner of an object is always granted full control access to the object.
Revision History allows you to compare revisions of a single object. Revision History is an Advanced menu operation as well as a clickable button on the Audit dialog of many objects. Audits are located on an object's Analytics property sheet.
/wc285.png)
Starting with the top of dialog display, the Refresh icon lets you refresh the display after the filter date is changed.
The filter lets you narrow down the revisions you wish to see to a specific date range.
The View button allows you to retrieve a specific object revision (read-only) using the standard object property sheets. The object revision is tabbed in the Main view, where the tab indicates the object name and Revision ID.
By default, the latest revision is marked for comparison in the Revision History dialog. This can be changed through the Clear Mark and Mark Selection buttons. With the Auto-Compare on Selection checkbox enabled, clicking on another revision level automatically produces a “difference” between the revisions, as depicted in the image below. To manually request a comparison, disable the Auto-Compare checkbox, make a selection and then click the Compare button.
The buttons on the bottom of the dialog allow you to print or save the revision comparison.
/wc286.png)
The above image displays a comparison of revisions 31 and 28. As you can see from the differences report, the type of script and its contents were changed.
Object Comparer Restrictions
The following modifications will not be picked up as differences between revisions of an object. These restrictions may be removed or extended in future ActiveBatch releases.
-
Alert object associations.
-
Associating an Execution Queue to a Generic queue.
-
Changing a Resource object to use an ActiveVariable. The change is noted but the specific variable used is not.
Revision Restore
Revision Restore lets you select a previous revision of an object and then select that revision to become the most current version. This operation is very handy as a rollback facility when updating an environment with a ChangeSet or new objects. If you encounter a problem you can simply restore the previous version. Note that the previous version does not overwrite the latest revision. Instead it becomes the latest revision (meaning a new revision is created). To restore a revision press the Restore button in the top right corner of the Revision History dialog.
Revision Purge is an operation which allows you to remove previous object changes (or revisions) from the system. The Revision Purge operation can be found by right-clicking on the desired object and then selecting Advanced > Revision Purge.
/wc287.png)
Once selected, Revision Purge will display a small dialog asking for how many revisions should be kept or purged.
/wc288.png)
Two (2) types of revision purges are available. The first asking you how many to keep by quantity. The “Last ‘n’ number of revisions includes the current version as well. The second asks how many revisions by date and time. This implies that any revisions prior to (and not including) the date/time are deleted. Note: Revisions are permanently deleted. In addition, an audit is added to the object where the purge took place. The audit will state "Object purged by <User Name>". This is located on object's Analytics property sheet, in the Audits list.
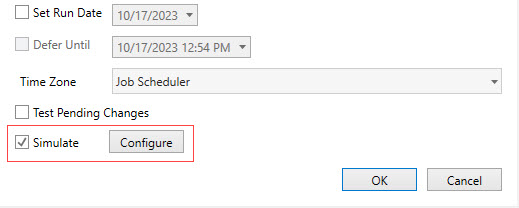
Test Pending Changes: If selected, this indicates that the checked-out object (or local copy) is to be used for the Trigger operation. If not selected, the normal Job Scheduler server copy is used. Please note that this operation is applicable to the entire batch run. This means that even though you may trigger a Plan that isn’t checked out but other nested objects are, those objects will use their “pending changes” versions. Please note that the entire batch run will be marked as “Test”.
Simulation: If selected, a simulation run is to be performed.
Sometimes it’s useful to simulate a workflow execution run to test ActiveBatch constraints and completion triggers. That’s the purpose of Simulation. Simulation is achieved through the Trigger operation by selecting Simulation and then, optionally, configuring the simulated run.
When you trigger a Plan or Job for simulation, the job/plan(s) will execute however the job’s payload will not execute. This allows you to test the overall workflow without actually executing the workflow. You can also configure the simulation to simulate failure, errors and success conditions.
/wc299.png)
The above figure shows a sample simulation. You can configure each job/plan that is expected to execute. The columns Exit Code, Runtime and Variables allows for configuration. To configure a specific object, double-click on the desired object. When you do, the following dialog is displayed for that object.
/wc300.png)
For Job objects, all simulatable columns may be configured. For a Plan object, only variables may be configured since the Exit Code and Runtime are determined by the underlying objects.
Note: Instances that have been created with simulation cannot be the target of many ActiveBatch operations such as Restart, Enable/Disable, Force Completion Status, etc. This makes sense since no actual payload is being executed.
This operation allows you to validate some configuration aspects of a plan/job, without running the plan or job(s). For example, security credentials are validated (the execution credentials). If the job is a process job, the system checks to see if the File Name property specified is accessible to the Agent where the job will run. If a job's Working Directory property is specified, that is validated as well.
The test run operation is valid only for Plan/Job definitions (Templates). When a single job is selected and tested, a message box appears if the test run is a failure. If the test run is successful, a temporary pop-up message will appear in the upper right-hand corner of the UI indicating success.
When a plan is selected for a test run, the entire plan is tested. The contents of the plan are displayed in a pop-up window with a status indication for each nested job. A real-time display shows each object as it is tested and its result. Make sure to focus on the “Result” column. That column will display “Processing….” while a job is under the test, and when the test is complete, change to either “Succeeded” or “Failed”.
Note: Test Run is currently restricted to jobs that are assigned to an Execution Queue. If you issue a Test Run with a job assigned to a Generic Queue, RuntimeQueue, or OnDemand Queue the result will be failure even though the job may very well be able to run on any of the above stated queues.