Generic Queue Object
This section describes the purpose of the Generic Queue object and its properties. Below you will find a general overview, followed by a detailed description of Generic Queue Properties, as they appear in the various Generic Queue categories (tabs).
A Generic Queue consists of one or more Execution Queues. When jobs that are associated with a Generic Queue trigger, they are dispatched to a member Execution Queue. The member Execution Queue points to a system where the job will run. That system must have an ActiveBatch Execution Agent installed on it.
A Generic Queue is a shared object that can be associated with Jobs.
The Generic Queue is ActiveBatch's active-active high availability solution for the Execution Agent. For example, assume you have a job that can run on any three Execution Agent machines. If you associated the job directly to an Execution Queue, the job will only execute on that machine. If the machine isn’t available (perhaps its reached its executing job limit, or the queue is stopped for maintenance purposes), the job will wait if triggered (unless the queue is closed - see Managing Queues). But if you associate the job to a Generic Queue that includes the three machines the job can run on, and one of those machines goes offline, there are still two machines left that can run the job when triggered. If you have a job that can only run on one specific Execution Agent (e.g., it is the only system with the job's required software installed), then it would make sense to associate that job to the appropriate Execution Queue. The Generic Queue should be associated to jobs that can run on more than one system. This would be considered a best practice.
A Generic Queue is similar to a virtual machine. The actual machine selected can be deferred to the last moment. This means the job can execute on the most appropriate machine available. An Execution Queue can be a member of one or more Generic Queues. The membership of an Execution Queue to a specific Generic Queue can be as static or dynamic as you wish. You can specify selection criteria as well as match machine/user characteristics of the job to the machine/user characteristics of the Execution Queue. For example, if you need to run a job on a system with a CPU of at least 3 Ghz, you can specify that. Only Execution Queues within the Generic Queue that satisfy this criteria will be able to run the job. User Characteristics can be both static and dynamic. The dynamic aspects of a User Characteristic provides the job or operational workflow author quite a bit of power as to influencing which Execution Queue (machine) should be selected.
To add a new generic queue, right-click on the desired container (Scheduler root, existing folder or plan) in the Navigation pane, select New, then select Queue, then Generic Queue. The label of the new queue must be unique to the container where it is being added. When you’ve completed the Generic Queue property settings, you must click the Save or the Save and Close button to save the Queue. Click the X on the tab of the New Generic Queue if you wish to cancel the creation of the queue. When you save the queue, it will instantly appear in the Navigation pane (if auto refresh is enabled) and should be ready for operations. To modify an existing queue, right-click on the queue in the Navigation pane, then select Properties.
The image below depicts the General category for Generic Queues. These fields describe the common aspects shared by all Queues (including Execution Queues).
/wc159.jpg)
Name: This mandatory property represents the name of the object. The name is limited to 128 characters. The object’s name should be unique to avoid confusion. We recommend that it also be somewhat descriptive so it’s easy to find. The name is used to identify the object in the Navigation pane and other places in the UI.
Label: Every object must be uniquely labeled within the scope of the namespace. The label is limited to sixty-four (64) characters. The label is typically the same value as the name (it is auto-filled to match the name you enter); however, uniqueness is always enforced for an object’s label. The label is recorded in the ActiveBatch namespace. The characters that may be used for the label property are restricted to alphanumeric (A-Z, a-z, 0-9), space, period (.), dash (-) and underscore (_). The label itself must begin with an alphabetic character. The label is typically used when scripting. All searches are case-insensitive. ActiveBatch does allow you to search for objects using either the label or the name properties.
ID: This is a unique read-only number that can be used to retrieve the object. Is it assigned by the system when a new object is saved.
Full Path: This read-only property provides the full namespace specification of the object. It consists of the container(s) the object has been placed in, with the object’s label appended to the end. For example, the fullpath: /IT Jobs/Nightly Run/<object label>, is such that IT Jobs is a root-level folder, Nightly Run is a plan, followed by the label of the object you are creating.
Description: This free form property is provided so you can document and describe the object to others. The description is limited to 512 characters. Clicking on the pencil icon will pull up a mini text editor where you can more easily enter your description.
State: This read-only field indicates the current state of the Queue. See below the States of a Queue. See also Managing Queues.
| State | Description |
|---|---|
|
Started |
Queue is started and can dispatch jobs. Note: Member Execution Queue states will determine what systems can accept jobs. |
|
Stopped |
Queue is stopped. Jobs cannot be dispatched to a stopped Queue. However, they will queue up when triggered and wait for the Queue to be started again. After the Queue is started, any waiting jobs will start to be dispatched to member Execution Queues. Note: Member Execution Queue states will determine what systems can accept jobs when the Generic Queue is started. |
|
Closed |
Queue is closed. Jobs cannot be dispatched to a closed Queue.They will not queue up if a trigger occurs. It is considered a "missed trigger" should a trigger occur for Job(s) associated with a closed Queue. |
Read Only: This checkbox, when enabled, means the Queue's properties cannot be changed. You must have “Modify” access permission to the Queue object to set this feature. To clear the read-only attribute, uncheck the box.
The image below depicts the Properties pane for a Generic Queue.
/wc160.jpg)
The top half of the Properties pane consists managing queues and optionally setting the Priority Fence.
Auto Close/Stop: These options allow you to automate the stopping or closing of a queue.
Close from… to…: This “from” and “to” time range indicates when a Queue is closed, during which time Job instances may not be submitted to a closed queue (Job definitions may still be associated with a closed queue). If jobs are triggered and the queue is closed, it will be considered a "missed" trigger, where nothing will happen. The job will not run, and the job will not wait until the queue is opened again. To enable this feature, click the checkbox and then enter a “from” and “to” time range. When configured, the queue actions will occur every day of the week.
Stop from… to…: This “from” and “to” time range indicates when a Queue is to be stopped. Jobs that trigger when a queue is stopped will queue up and wait until the queue is started again. To enable this feature, click the checkbox and then enter a “from” and “to” time range. When configured, the queue actions will occur every day of the week.
Note: Stopping or closing a queue does not impact jobs that are currently executing on the queue. They will continue to run to completion.
Note: A more powerful facility to Stop and Start an ActiveBatch Queue exists within the Jobs Library (see the ActiveBatch category of Job Steps). You could associate the Jobs Library Job to a Schedule, therefore allowing more granular control of the days of the week the Queue actions should occur.
See also Managing Queues
Priority Fence: This property indicates a Job’s queue priority (not the OS priority) that must be greater than that specified in the priority fence for the job to be eligible for initial dispatch. For example, a Priority Fence of 100 means that only Job’s whose queue priority is 101 or greater are initially eligible for dispatch. This property may be dynamically changed as required when processing a Job marked as “SLA” when the deadline appears to be in danger of being breached. The default value of zero (0) means that every job’s queue priority will allow passage through the fence.
The bottom half of the Properties pane (depicted in the above image) consists of two (2) lists: Execution Queue and its related machine. For a new Generic Queue, this list will be empty.
Associate: To add members to this Generic Queue, click the Associate button. A new dialog window will appear displaying the Navigation tree (see image below), requiring that you navigate to the Execution Queue you wish to add. Only containers - Plans and Folders, and Execution Queues will be displayed in the tree. Select an Execution Queue, then click the OK button. The selected queue will be added to the list.
Disassociate: To remove existing members from the Generic Queue, select the member(s) and click the Disassociate button.
To associate/disassociate member Execution Queues, you must have “Read/Write/Modify” access permissions on the Generic Queue object and “Use” permission on the Execution Queue object(s).
Note: While “Use” permission is required to associate a job to a Generic Queue, the underlying Execution Queues associated with the Generic Queue do not require this same permission when used through a Generic Queue.
/wc161.jpg)
Heuristic Queue Allocation:
Heuristic Queue Allocation (or HQA for short) is an algorithm for Generic Queues that analyzes the workloads across the set of member Execution Queues and, using Machine Learning and AI, pre-allocates jobs to the various queues in order to reduce dispatch latency and elapsed job run-time. Unlike the other algorithms for Generic Queue which fall in the just-in-time(JIT) category, HQA performs a predictive analysis of all the workloads that are statically assigned to Execution Queues and then pre-allocates available job dispatch bandwidth to all the jobs assigned to a Generic Queue. The Heuristic Queue Allocation View serves two (2) purposes:
1. To let you know which Execution Queue has been assigned to a job that falls under the above HQA criteria
2. To allow you the management capability of overriding that queue preallocation and substitute one of your own choosing.
First, HQA must be enabled system-wide and properly configured (this requires ActiveBatch Administrator access). HQA is configured through the Administrator Extension Manager view.
/wc162.jpg)
Three (3) properties control HQA system-wide.
Disable HQA Processing - This Boolean field controls whether HQA is used. If checked, HQA is disabled. HQA is enabled by default.
Evaluation Execution Time - This time field indicates when the HQA Predictive Analysis process executes. Typically it should begin one (1) hour before the start-of-day.
Run HQA Process - This Boolean field forces a run of the HQA process. Warning: Running this process will remove all current HQA queue allocations and any currently scheduled processes will use the fall-back “Scheduling Algorithm” methods until the HQA process completes. Depending on your use of HQA, this process can be both CPU and database intensive.
Assuming HQA is enabled system-wide. HQA must then be enabled on each Generic Queue you’re want this type of processing to occur on.
/wc163.jpg)
With the HQA property enabled, HQA processing will occur (assuming the HQA system parameters above are enabled). HQA is best used when workloads have been set and have executed at least once. Assuming a start time of 11pm the night before, HQA will analyze the workload for the next day. If you make lots of scheduling modifications after the HQA process has executed, the algorithm will not run optimally. This is why the “Scheduling Algorithm” (which is JIT based) is still important. If HQA determines that it’s not effective due to those changes, the JIT-based one will be used as a fallback.
Scheduling Algorithm: This field indicates what algorithm should be used to dispatch jobs to eligible Execution Queues. An eligible queue is one that meets all requirements for the job and is available for execution at the moment the job is actually dispatched to an Execution Queue.
Possible choices are: Sequential, Round Robin and Workload Balancing.
-
Sequential means that the first Execution Queue is used for all job execution dispatches until the Queue has reached its maximum job limit and then the next queue is selected.
-
Round Robin causes jobs to be dispatched to each Queue in turn.
-
Workload Balancing causes ActiveBatch to analyze the run-time aspects of the execution machine and uses the best (least used) execution machine available. CPU and Memory are among the criteria used in workload balancing.
Regardless of Scheduling Algorithm, jobs are kept queued to the generic queue until an eligible Execution Queue is available to run the job. The job is then re-queued to the Execution Queue.
Variables are one of the most important and powerful aspects of ActiveBatch. Below you will find an image of the Queue's Variables category.
/wc164.jpg)
With variables you can pass data to other related jobs as well as form constraints for proper execution of related jobs. ActiveBatch variables represent data that can be passed to jobs, plans, programs or used anywhere variable substitution may be used within ActiveBatch. A variable can be exported to a job by enabling it as an environment variable. The image above displays any variables associated with the queue. The image depicts a simple constant variable named log_path that is being used to specify the location of log files.
Variables have the following order of precedence: Queue, User Account, Job, and Plan. This means that the value of a variable associated with a Queue will have the final say as to that variable’s value. This is true because the system checks the Queue's variables first, to see if a referenced variable has been defined on the Queue. If it finds it there, the system stops searching for the variable definition and substitutes the variable with the value defined on the Queue. For example, suppose I wanted to assign a special directory to a variable when a job is to run on a particular machine (or queue). The above image shows such a variable. Log_path might have been defined to a user’s profile directory within a Job or Plan. This facility (defining variables on a Queue) allows you to override on a machine or queue basis.
Note: The variable resolution precedence, as described above, can be overridden by using special variable syntax that directs the Scheduler to go to a specific location to find the variable definition. See Variables for more information.
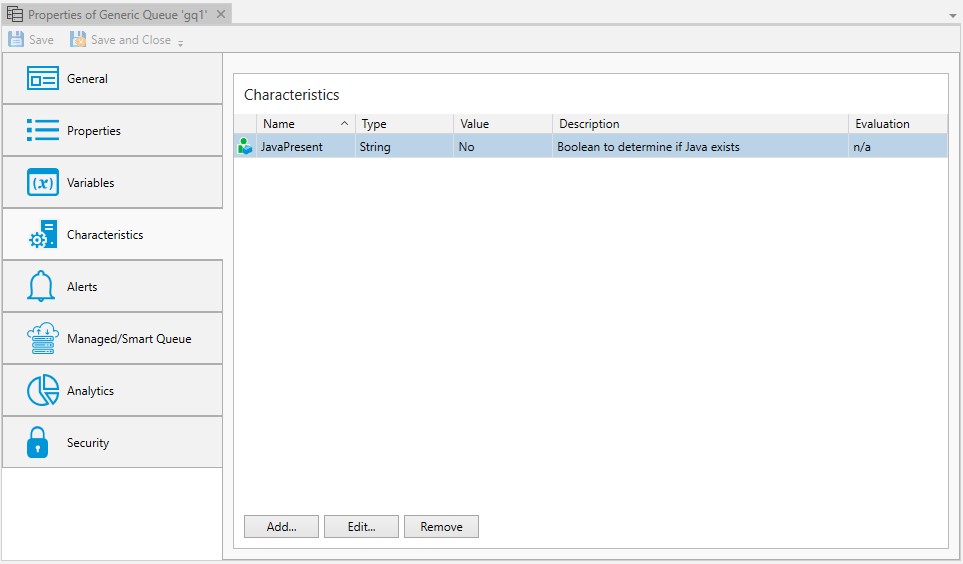
Characteristics, as noted in the Execution Queue Object section, has an order of precedence. When a characteristic is defined at both the Execution Queue and Generic Queue, the Execution Queue wins (meaning its value overrides the Execution Queue value). This capability is particularly useful for dynamic characteristics where the Generic Queue version of the characteristic value can be defaulted and then, when possible, overridden by an Execution Queue.
Best Practice: Declare your dynamic User Characteristics at the Generic Queue level. Your characteristic will the be applied to every member of the Generic Queue automatically. Use the Execution Queue when you need to provide an override. For example, if you had a mix of Windows and Linux systems and your characteristic involved some windows data. You would declare that common characteristic at the Generic Queue and then specify an override value on those Linux Execution Queues. Use Show Values in the Execution Queues to see values for characteristics regardless of whether they were made at the Generic Queue or Execution Queue object level.
You can associate alerts with a Queue. The purpose is to potentially alert you or others in the event of a queue status change. You can embed the alert on a per-queue basis, or share alerts among multiple queues by creating an Alert object and associating the alert object to the desired Generic Queues (using the Alert object is recommended, when possible).
/wc165.jpg)
The alerts for Generic queues are:
| Alert | Description |
|---|---|
|
Object Modified |
Object Definition has been modified. |
|
Queue Started |
Queue has started (and is operational). |
|
Queue Stopped |
Queue has stopped. |
|
Queue Closed |
Queue is closed. |
|
Queue Opened |
Queue is opened. |
Using this feature you can generate an e-mail, or any other supported action, if a queue goes into one of the above states.
The Managed Queue supports various cloud and virtual systems, listed below. The Smart Queue (see Smart Queue Settings) builds on the Managed Queues by increasing or decreasing systems based on real-time and historical demand. The Managed Queue is classed as a type of Generic Queue. In the previous sections, the assignment of Execution Queues (and their underlying machines) was performed manually. Managed Queue provides an alternative approach where the creation of Execution Machines and their respective Execution Queues are performed through the use of virtualization and/or cloud instances.
Note: To use Managed Queues, you must be licensed to at least one of the Machine Providers. If you are evaluating a Machine Provider license and the license expires, the Generic Queue will enter a Stopped state that will not be resolvable except by either deleting the queue or entering a valid license.
Machine Providers supported include:
-
Microsoft Azure (Classic)
-
Microsoft Azure
-
VMWare
-
Microsoft SC-VMM
-
Amazon EC2
First, to configure a Managed Queue, check the Managed Queue Settings checkbox, depicted in the image below.
Next, the Request Machines and Retention Period properties apply to all the Machine Providers. These properties are described below.
Requested Machines: This property indicates the number of machines you would like instantiated (or created based on your provider). Based on earlier settings, the number can go up or down. If your change reflects additional machines; they will be instantiated. If your change reflects fewer machines; those machines will be powered down and are then subject to the Retention Period. Machines and their Execution Queues are paired. An instantiated machine will result in a queue that is started and open. A powered down machine will result in a queue that is stopped and closed.
Retention Period: This time period (by default, machines are retained indefinitely) indicates how long powered down machines are retained. If you click the checkbox you can enter a time span (ddd-hh:mm) where “ddd” is days and hh:mm reflects hours and minutes. This time period once exhausted means the machine will now be terminated and the respective execution queue will be disassociated and deleted.
Machine Provider: This property is the Machine Provider you will be using, which includes: Microsoft Azure, Microsoft Azure Classic, VMWare, Microsoft SC-VMM and Amazon EC2.
Below you will find a description of the Managed Queue Settings when using Microsoft SC-VMM.
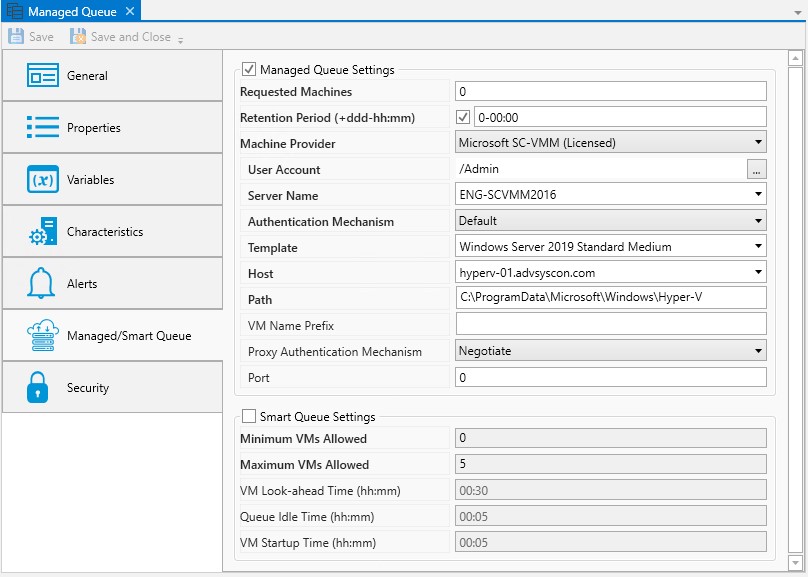
User Account: This property represents a User Account object that contains the proper security credentials and access to clone a virtual machine.
Server Name: This property represents the SC-VMM Server system. You may specify a hostname, IP address or FQDN.
Authentication Mechanism: This dropdown property indicates the authentication mechanism used to connect to the “Server Name”.
Template: This dropdown property represents the template of the virtual machine you wish to clone.
Host: This dropdown property indicates the host you wish to instantiate the virtual machine on.
Path: This optional property represents the location where the virtual machine’s files will be stored.
VM Name Prefix: This optional but recommended property represents a suffix that you can use to identify the instantiation of machines with this Generic Queue. Whatever is specified here will have an underscore (_) appended to it. This improves readability.
Proxy Authentication Mechanism: This optional property indicates the authentication mechanism to be used when a proxy is also to be used.
Port: This optional property indicates the port to be used with a proxy.
Below you will find a description of the Managed Queue Settings when using VMWare:
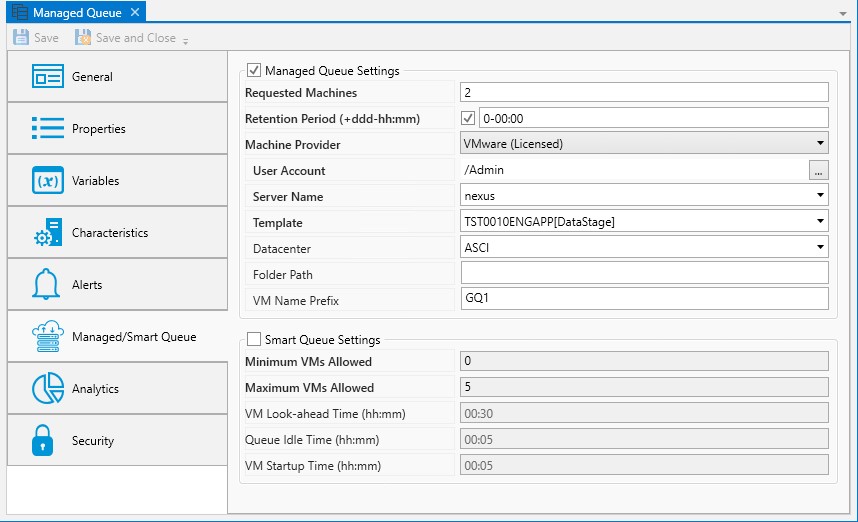
User Account: This property represents a User Account object with security credentials suitable for accessing a vCenter or vSphere system.
Server Name: This property represents the vCenter or vSphere system. The property can be a hostname, IP address or FQDN specification.
Template: This dropdown represents a template on the vCenter or vSphere system that you want to use for cloning of the virtual machine.
Datacenter: This dropdown represents the Datacenter.
Folder Path: This optional property indicates the location of the newly cloned virtual machine on the vCenter or vSphere system.
VM Name Prefix: This optional but recommended property represents a suffix that you can use to identify the instantiation of machines with this Generic Queue. Whatever is specified here will have an underscore (_) appended to it. This improves readability.
Below you will find a description of the Managed Queue Settings when using Amazon EC2.
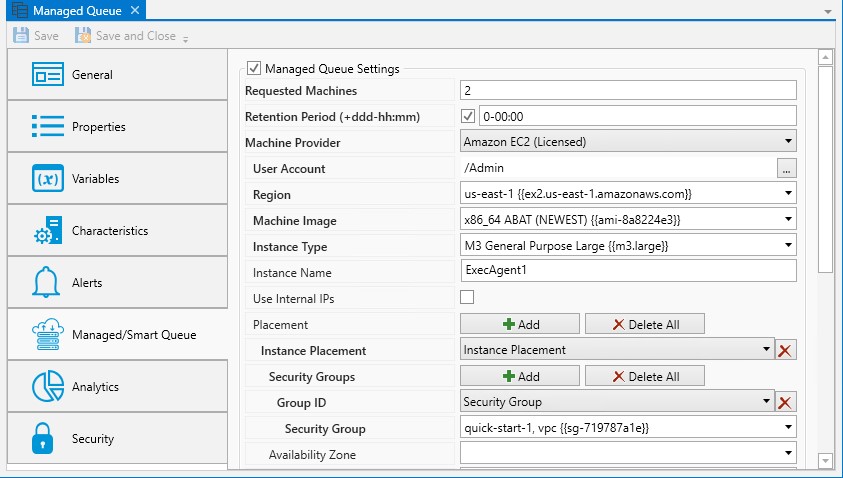
User Account: This property represents a User Account object with security credentials suitable for accessing the Amazon EC2 facility.
Region: This dropdown property indicates the availability region that this machine will be deployed in.
Instance Type: This dropdown property indicates the type of machine (CPUs, memory, etc) to be deployed for the EC2 instance.
Machine Image: This dropdown property indicates the list of AMIs (Amazon Machine Instances) that may be used as a template for the EC2 instance.
Use Internal IPs: This checkbox indicates whether an Elastic IP should be allocated to this instance. If the checkbox is enabled, a private IP address is provided (not an Elastic IP).
Instance Name: This property represents the unique name of the machine.
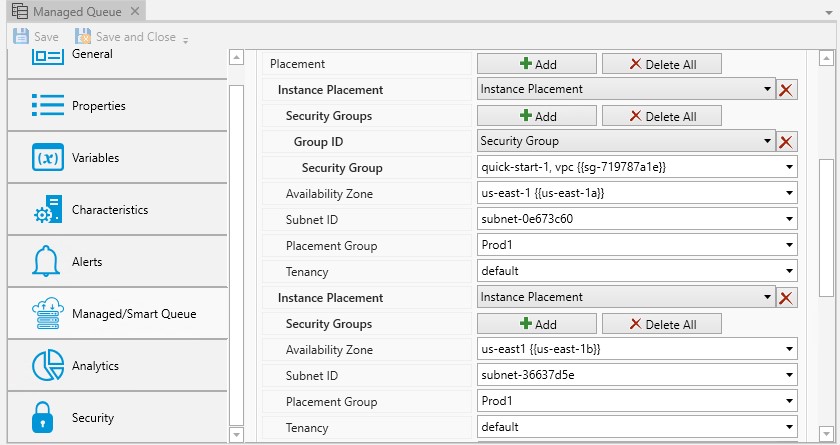
Placement: One or more placement groups that govern the location, subnet, etc of the created instance. Click the Add button to create a new placement group. Click the Delete All button to delete all placement information. Individual placements can be deleted by clicking on the stylized “x”.
Security Groups: This collection of properties indicates one or more security groups to be associated with this machine.
Availability Zone: This dropdown property indicates the Availability Zone within the Region your instance will be created.
Subnet ID: This dropdown property indicates the subnet to be used when deploying this machine.
Placement Group: This dropdown property indicates the Placement Group for this instance.
Tenancy: This dropdown property indicates the Tenancy for the instance.
User Data: This property has several meanings for use by Amazon EC2. It’s primary use is to run when the system has been provisioned and allows you to personalize the system at that time.
Key Pair: This dropdown property indicates an existing key pair to be used.
Tags: This collection of properties allow you to create one or more Tags that can be used for reference and lookup purposes apart from ActiveBatch. Click the Add button to create a new placement group. Click the Delete All button to delete all placement information. Individual placements can be deleted by clicking on the stylized “x”. Each Tag consists of a Key and a Value.
-
Key: This property is the Tag’s Key. The Key is user-created and any meaning is also user created.
-
Value: This property is the value associated with the Tag’s Key.
Note: ABAT$xxxx tags are created to help determine which Job Scheduler has created any Amazon EC2 instances. Never create your own ABAT$ prefix tags since they can be overwritten.
The image below demonstrates the use of Placement in which one or more availability zones can be specified. By deploying instances from more than one zone, you significantly improve high availability for these Managed Queues.
Below you will find a description of the Managed Queue Settings when using Microsoft Azure (Classic).
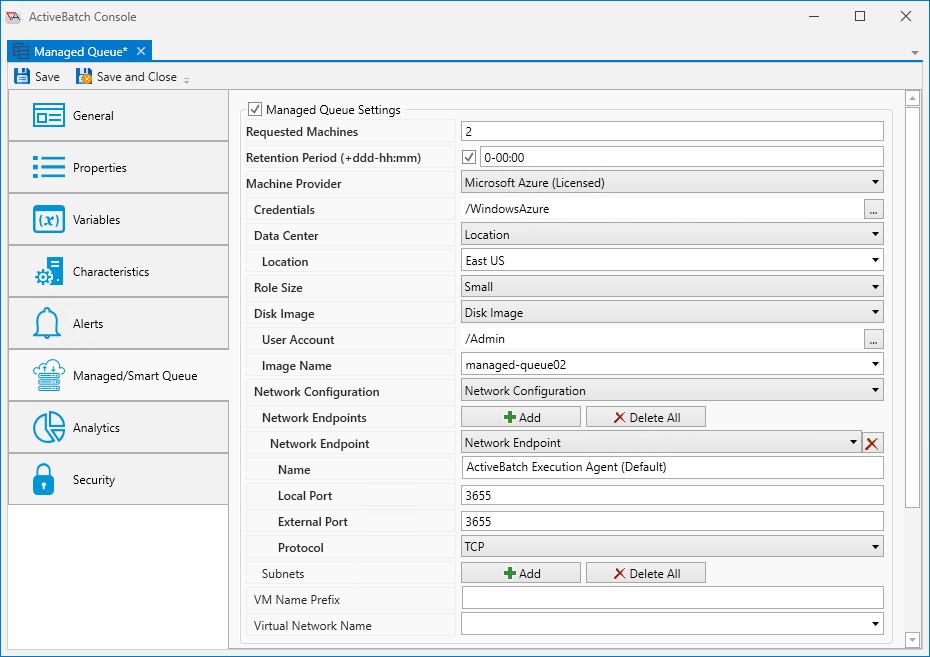
Credentials: This property represents a User Account object with security credentials suitable for accessing the Microsoft Windows Azure facility.
Data Center: This property indicates either a location or an Affinity Group.
Role Size: This dropdown property indicates the type of machine (CPUs, memory, etc) to be deployed for the instance.
Disk Image: This collection of properties concerns the image or template to be used for the virtual disk.
-
A User Account object must be specified with proper access to the template disk image.
-
The Image Name property indicates the named disk image to use.
Network Configuration: This collection of properties concerns the metadata that will be used to form the network configuration. A required endpoint is the ActiveBatch Execution Agent port itself (which has a default of TCP 3655). You may also, optionally, specify one or more subnets.
VM Name Prefix: This property allows you to uniquely prefix the name of your virtual machine. Please note that Windows Azure will name your system and that machine names are limited to 15 characters. For that reason we recommend your prefix be 8 characters or less.
Virtual Network Name: This optional property allows you to associate related systems within the same network.
Smart Queue Settings
Smart Queue is a facility that uses Managed Queues to determine when execution machines (and queues) are needed based on real-time and historical analysis of past scheduling periods. This means that instead of you changing the number of active instances (up or down based on demand); ActiveBatch will.
The Smart Queue Settings allow you to refine and other influence the scheduling and virtual machine creation algorithms. They are the same for each Machine Provider, as described below.
Minimum VMs Allowed: This property indicates the minimum number of VMs for this queue. In other words, the number of available machine will not drop below this value.
Maximum VMs Allowed: This property indicates the maximum number of VMs that can be instantiated for this queue. For Cloud-based systems this would be a method for limiting cost.
VM Look-ahead Time: This property is used to determine the amount of time for the Smart Queue algorithm to lookahead in terms of jobs that are scheduled for execute on this queue. The default time is 30 minutes. The syntax is hh:mm (hours and minutes).
Queue Idle Time: This property is used to determine when VMs should be decreased by determining when the Queue is idle (no jobs waiting or dispatched). VM Look-ahead will always have precedence over Queue Idle Time. The default is 5 minutes. The syntax is hh:mm (hours and minutes).
VM Startup Time: This property is used to help influence when a VM is to be substantiated. The VM Startup Time is considered when a VM is determined to be needed. For example, if a Job is scheduled to run at 1200 (noon) and the current time is 1130 (11:30 am). A VM Startup Time indicates that the VM will be instantiated at 1155.
The Analytics properties are noted by two (2) sections: Counters and Audits, as depicted in the image below.
/wc166.jpg)
Operational counts are those that accurately describe the current state of the queue. Historical counts are those that are accumulated while the product has been actively running. As the counters are statically displayed, clicking the Refresh icon (upper right-hand corner) allows you to retrieve the latest data. Reset Averages is disabled for Generic Queues (it is only applicable to Execution Queues). Clicking the Reset Counters button allows you to zero the historical counters.
You can examine the audit trail for a queue. The audit trail contains all state changes or modifying operations made to a queue.
The Audits panel includes controls that allow you to filter the audits based on start and end dates. You can also limit the audits retrieved to a maximum number. The Refresh icon allows you to retrieve any audits that were generated after this dialog was initially displayed.
Each audit is contained in a single line in date and time sequence. Audits are read-only and cannot be modified. An icon appears at the beginning of each audit to help visually signal the severity of the audit. If an audit policy![]() has been established, you will see an additional comment icon to the right of the severity icon. If you mouse over the comment icon, the system will display the audit information as a tooltip.
has been established, you will see an additional comment icon to the right of the severity icon. If you mouse over the comment icon, the system will display the audit information as a tooltip.
Opening an audit item (by double-clicking on the item), depending on the nature of the audit, will sometimes reveal additional information concerning the audit.
The View Plain Text button launches a small window with a list of the audits, You can copy the list and paste it into another document or program.
The Print button allows you to print the retrieved audits.
The Revision History button allows you to select one or more audits concerning changes made to an object and perform a difference operation between the selected revised objects.
This tab is where object security is configured. Security in ActiveBatch mirrors how security is granted using Windows security. That is, permissions applicable to the object (Read, Write, Modify, Delete, etc.) are Allowed or Denied for the Active Directory users and/or groups assigned to the object.
/wc167.jpg)
When new objects are created, they will either be assigned factory default![]() security, or the factory default security will be overridden by a default policy
security, or the factory default security will be overridden by a default policy![]()
When a default policy has been used to preset object security, the new object will either have:
-
The Inherit Security from Parent Object property checked (it is not checked by default). When checked, the listed users and/or groups along with their permissions granted will be read-only. The Add and Remove buttons will be disabled because security is being inherited from the object's parent container. When Inherit Security from Parent Object is checked, it is likely the ActiveBatch Administrator will be setting up security on parent container(s), and the job author will not have to modify anything about security. This would require a larger discussion with an ActiveBatch Administrator who it typically tasked to manage object security, since there are options.
-
The Inherit security from Parent Object property is not checked. The users and/or groups are listed along with their permissions granted, but there is likely some differences when compared to the factory default security, since the purpose of setting a default policy for security is to add Active Directory groups and/or users (and their access permissions) that are specific to your organization. Since Inherit Security is not checked, the Add and Remove buttons will be enabled. When this is the case, job authors will need to be advised if there needs to be any changes made to security when they create new objects.
As a best practice, it is best for an ActiveBatch Administrator to preset security using a default policy (for all object types) so job authors do not have to manage security, which can be time consuming and error-prone. See the ActiveBatch Installation and Administrator's Guide for more best practice information regarding object security.
Below is a list of permissions related to this object.
| Access | Description |
|---|---|
|
Read |
Account is allowed to view all properties of the queue (properties and variables) |
|
Read Properties |
Account is allowed to view properties of the queue |
|
Read Variables |
Account is allowed to view variables of the queue |
|
Write |
Account is allowed to write to the queue |
|
Modify |
Account is allowed to read/write any properties of the queue (Read + Write) |
|
Delete |
Account is allowed to delete the queue |
|
Take Ownership |
Account is allowed to take ownership of the queue |
|
Use |
Account is allowed to submit jobs to the queue |
|
Manage |
Account is allowed to perform operations on the queue (Enable/Disable or Start/Stop, Open/Close) |
|
Change Permissions |
Account is allowed to change permissions (set security) on the queue |
|
Full Control |
Account may issue all of the operations mentioned above |
The owner of an object is always granted Full Control by the system, and their permissions cannot be changed or reduced. If another user takes ownership, then the original owner's access will depend on how security is set up (if they are a user or group that has been given access). The new owner will automatically be granted Full Control, and once again, their permissions cannot be changed or reduced.
To take ownership, you will need to be granted the Take Ownership permission. Click the Take Ownership button and confirm the action. Another way to take ownership is to right-click on the object in the Object Navigation pane, then select Advanced > Take Ownership.
To modify security, you need "Change Permissions" security granted.
The Deny permission is generally used for users who have been granted access based on a group membership, but there is a need to override this for a particular user. Deny takes precedence over Allow.
Below you will find the instructions on how to modify security when Inherit Security from Parent Object is not checked.
-
To edit an existing account, select the listed user or group, then change the permission using the Permissions list box (Allow or Deny access).
-
To remove an existing account name, select the listed user or group and click the Remove button.
-
To add a new user or group, click the Add button and follow the dialog as depicted in the image below.
/WC100.jpg)
The dialog prompts you to enter a valid Active Directory user or group. After entering a user account or group, click the OK button. The user or group will be added to the list of users and groups displayed in the top panel.