Job Scheduler Failover
One of the most critical components within ActiveBatch is the Job Scheduler service. This service is critical since this component performs all the job scheduling. The Job Scheduler also requires high availability access to its underlying database. All major database vendors provide High Availability options to ensure 100% accessibility to the database. If you do not implement a High Availability database solution, we strongly recommend that you take regular backups of the ActiveBatch database. A host of database vendors and third-party products are available for this purpose.
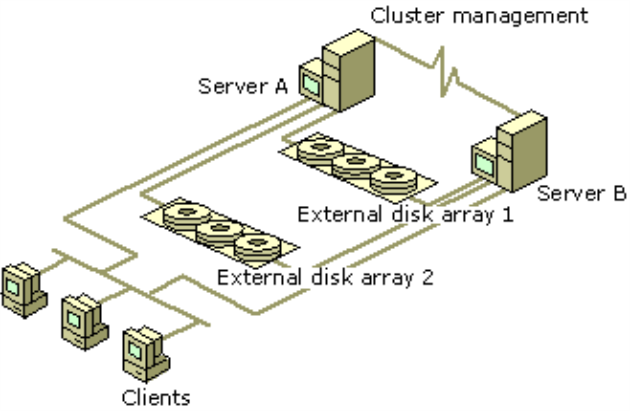
ActiveBatch provides two (2) methods of high availability protection for the Job Scheduler. Cluster Failover and Non-cluster Failover. These methods are mutually exclusive; they can’t be deployed together. Below is an illustration depicting Microsoft Cluster Server (2 node).
ActiveBatch Job Scheduler Cluster Failover is only available on the Enterprise and Datacenter product editions of ActiveBatch. The reason for this is that Microsoft Cluster features are only available on those Server product editions. To configure the Job Scheduler and/or Execution Agent for cluster failover, you need to use the Generic Cluster Service Wizard. This will allow you to designate that the Job Scheduler should be failed over to the surviving system(s) in the event the active machine fails. The same can be done with the Execution Agent (although that is less of an issue since you can run multiple active Execution Agent instances. If you have Active Directory deployed see Section Windows Directory Services for more information on improving high availability).
This is a sample display of the Generic Cluster Service Wizard for the Job Scheduler service.
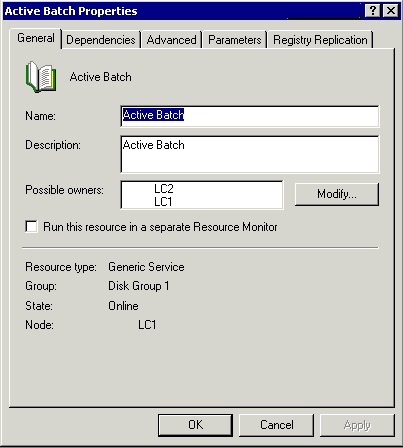
The image above displays the “General” tab of the Generic Cluster Service Wizard. The information gathered will allow the cluster service to determine what resources are required for this service and what resources must be available for this service to execute on a surviving cluster member. The node names LC1 and LC2 represent two nodes in the cluster. “Disk Group 1” also represents the shared disk storage that must be present for the ActiveBatch Job Scheduler service to properly operate in the event of a cluster member failure.
Note: If the ActiveBatch database is on the same cluster then you will also want to configure your database service to also be cluster aware.
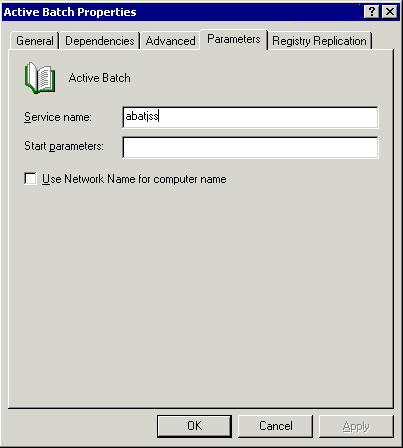
The dialog above requires that you enter the service name (which is “AbatJss” for the Job Scheduler service).
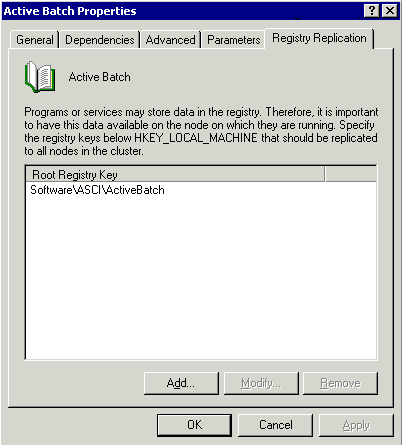
The dialog above indicates what registry locations must be replicated for ActiveBatch use throughout the cluster.
ActiveBatch Job Scheduler Non-cluster Failover is a product add-in. It is an active-passive high availability solution.
Non-cluster Failover entails the running of one or more Job Schedulers with each Job Scheduler on its own machine. Each Job Scheduler in the failover set requires concurrent access to the same database. ActiveBatch currently uses an active-standby scheme similar to Microsoft’s Cluster facility. Only one Job Scheduler is in active mode and dispatching jobs. The other Job Scheduler(s) enter a standby mode waiting for the preferred Job Scheduler to fail. By default, the first Job Scheduler machine to ever start is marked as the preferred Job Scheduler machine. This can be changed through either the High Availability Manager accessed via AbatConsole's Tools > Availability Manager pane or by running the abatavlmgr command-line utility.
Once an active Job Scheduler machine has been designated and started, other Job Scheduler machines that start-up enter a standby mode. When an active Job Scheduler fails or is deemed unresponsive, one of the standby Job Schedulers will attempt to go active and take over the scheduling load. You can designate a preferred Job Scheduler machine order or simply allow Job Schedulers at the same preference level to compete. By default, the first machine to connect to a new ActiveBatch database is deemed the preferred scheduler machine.
Deployment Instructions
You will need to have at least one (1) base Job Scheduler serial number license and one (1) failover or standby serial number license (Base Job Scheduler and Non-Cluster Failover serial numbers should be considered paired for this discussion).
Install a complete ActiveBatch installation, including Job Scheduler and Execution Agent as outlined in Installation section of this manual. See Windows Installation
When prompted for serial numbers, please enter the Base Job Scheduler, Failover, Execution Agent and other appropriate add-in serial numbers.
After installation, the Job Scheduler should be in the Started state and be normally accessible.
For the second (Non-Cluster Failover) Job Scheduler machine, install the complete ActiveBatch kit, just as you did for the first installation. However, for the Database Operation dialog (that appears during the Schedulers configuration process), select the “Join” operation (and not the New or Existing database options). This machine will be joining the existing Job Scheduler database for the purpose of Non-Cluster Failover.
When prompted for serial numbers, enter your Non-Cluster Failover serial number, the Standby Job Scheduler serial number, Execution Agent and add-in serial numbers as appropriate.
Once the installation completes successfully, the standby Job Scheduler service state should be “Paused”.
All Job Schedulers in the same Non-Cluster Failover set must have the same “Name” registry value (HKLM\Software\ASCI\ActiveBatch\Vxx\JobSched). This is REQUIRED as it will affect the operation of the Scheduler during a failover operation. Please restart the Job Scheduler service on each machine after updating this registry value. Failure to ensure the “Name” registry value is the set for all machines in the same Non-Failover set can result in Event Trigger and Job Status failures. SeeActiveBatch Parameter Configuration that discusses how to update the Name registry using the Configuration page.
Remember, in both a Non-Cluster failover scenario and a Windows Cluster, the application uses the same backend database. This means it needs to be able to properly decrypt encrypted data using the same Encryption and Transfer keys.
The value of the keys in the Registry is encrypted using the account that is configuring the keys in the Management Console, and it is using the machine's hash. Since we are talking about 2 different machines, the value of the key in Node A will work only when Node A is active. The same value of the Registry will be wrong when Node B is active.
So, once Node A has been configured, you would need to manually configure Node B using the unencrypted values from Node A to make it work.
Note: The Job Scheduler service enters a “Paused” state when the service is in stand-by. That is a normal state unless you intended the service to be the active Job Scheduler. You can use the Availability Manager, described later in this chapter, to change the service state from stand-by to active (and thus the Windows service state from “Paused” to “Started”).