Windows Installation
This section describes installation kit options (.msi vs. .exe), and provides additional facts regarding installation requirements (including UAC). In addition, please review the Prerequisites, Licensing and Sizing section if you have not done so already.
At the ASCI website, you have a choice to either download:
-
A Windows Installer MSI file
-
A single self-extracting executable
Note: The .EXE was designed to allow for an easy upgrade of ActiveBatch service packs. Therefore, it is recommended you use the .EXE for service pack upgrades. For a major release upgrade or new installation, you can use either the .EXE or .MSI
For your protection, all our download images are digitally signed.
.msi
-
ActiveBatch.msi is the x64 based version of the ActiveBatch product.
-
ActiveBatchx86.msi is the x86 version. The x86 version may be installed on x86 platforms.
.exe
-
ActiveBatch.exe is the x64 version of the ActiveBatch product.
-
ActiveBatchx86.exe is the x86 version.
Note: DO NOT rename the MSI file from its assigned name. This is a Microsoft Windows Installer restriction. You can, however, rename the _Setup.exe files since they contain an embedded MSI file.
Additional installation information
-
ActiveBatch requires that you perform this installation using the Administrator account or a similar account with administrative rights. You must have administrative rights in order to install the Job Scheduler and/or Execution Agent components.
-
The ActiveBatch Installation file verifies that certain software prerequisites are already installed on the target machine.
-
If a prerequisite is missing, the installation will fail at the beginning with a message explaining what required software was missing.
-
-
The installation process allows you to install all Windows components (the default) or selected ActiveBatch components.
Note: ActiveBatch is a cross-platform product that supports many releases of Microsoft Windows products. For ease of reference the following conventions apply (unless otherwise noted). When Windows is specified that means ActiveBatch supports all editions of Windows Server and Windows (Desktop) as noted in the Prerequisites sections.
Windows UAC
ActiveBatch does support installations on systems that have Windows User Access Control (UAC) enabled. However, certain considerations must be adhered to since Administrator level access is required. ASCI highly recommends that you either; start the installation by right-clicking on the Microsoft CMD program and select “Run as Administrator”. This will cause a UAC prompt confirming you want the CMD command-line program to use Admin level access. Click Yes, set your directory with the CD command to where the appropriate MSI file is located and run the msiexec program to begin the installation using the following syntax:
msiexec /i activebatch.msi
Alternatively, you can right-click on the EXE version of the installation file and select “Run as Administrator” to also perform the same type of action.
ASCI highly recommends that you perform an uninstall (particularly when one or more services have been installed) using the same approach. Note: An uninstall of the Scheduler and Windows Agent services is required before you can upgrade to 2023 or higher. The syntax for an uninstall would be:
msiexec /uninstall activebatch.msi
This section describes the installation process.
The installation strategy for ActiveBatch version 2023 and higher varies depending on whether you are a new or existing user of the product.
A new user is defined as one who has not installed the product before. An existing user is defined as one who is upgrading a previous installation and may also have migration issues concerning a previous database.
For a new user, (or an existing user setting up a test environment on a non ActiveBatch machine) you can perform an installation of the product as described in the ActiveBatch Installation Process below.
In general:
-
Do a complete installation (which will include 1 Client, 1 Job Scheduler and 1 Execution Agent) - and optionally install Reporting Services and the REST API.
-
Identify systems that will only run jobs, and install the Execution Agent only on those systems.
-
Identify users who need to connect to the Job Scheduler to create, manage and monitor the system. Install the Client Interface options on their desktop. This will include AbatConsole, which is a windows-based user interface that comes with a basic subscription of ActiveBatch.
For all users (new and existing) you will need to ensure that you have installed any prerequisite software required.
For an existing user, you will want to upgrade your existing ActiveBatch V12 environment as described in Upgrading from V12. For Execution Agents, you can continue to use V12 SP9 Execution Agents and then upgrade to 2025.x as soon as possible. There may be new features that require 2025.x Execution Agent support so keep that in mind.
Note: None of the 3 key components – the Client, Job Scheduler or Execution Agent supports two different versions of the same component installed on the same system.
An ActiveBatch installation consists of two (2) separate but related parts.
-
Installation: The installation consists of copying the various files to their proper locations depending on the features you decide to install. You do not have a working environment after the installation.
-
Configuration: After the Installation, you must configure the Job Scheduler and Execution Agent using the ActiveBatch Management Console application.
Separation of these operations means you can easily configure or re-configure features without having to remove or re-install them.
ActiveBatch Installation Process
Note: The installation which follows, except as noted, uses a 64-bit kit installed on a 64-bit operating system.
You can begin the installation process by either double-clicking on the MSI installation file or you can execute the msiexec command on an MSI file. The latter command is especially useful for silent installations or installations where a log file needs to be produced for troubleshooting purposes. You can also install ActiveBatch using the .exe file (the .MSI and .exe are available for download at the ASCI website).
After you start the installer, you will be presented with the Welcome window. Click Next. The next window is the license agreement. Please read it, then click the “I accept the terms in the License Agreement” checkbox. Click Next. You will be presented with the feature selection window, as depicted in the image below.
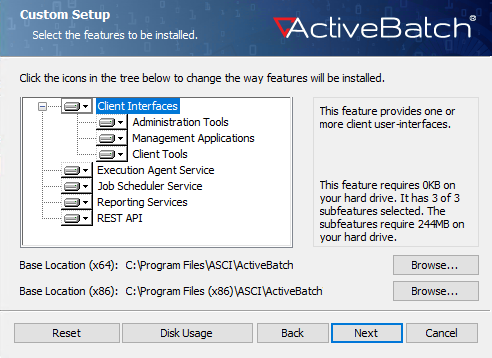
This step is the Feature Selection screen. Features are arranged in tree form so you can visually see each feature and any related sub-features.
Note: By default, all features are enabled for local installation.
-
The Client Interfaces are further sub-divided into Administration Tools, Management Applications and Client Tools.
-
The Administration Tools feature consists of the Availability Manager, Service Manager and Update Service.
-
The Management Applications consists of the ActiveBatch Console, Dashboard and Management Utilities.
-
The Client Tools feature consists of the DateTest, DateAdmin, DateSub and various command-line interfaces.
-
-
The Execution Agent Service is installed on the Windows systems where you run jobs. There is a separate installer for non-Windows Agents.
The Job Scheduler Service is the core of the system, scheduling and triggering jobs.
-
The Reporting Services feature consists of a series of packaged reports supporting both SQL Server Reporting Services as well as Crystal Reports that allow for Template (ActiveBatch object definitions) and instance (runtime job activity) reporting. The deployment and use of these reports are explained in the ActiveBatch Reporting Services manual. Installing Reporting Services is optional. It depends on whether you wish to generate reports for object definitions and instances.
-
The REST API is referring to the ActiveBatch Public RESTful programmatic interface. Installing the REST API is optional. It depends on whether you wish to programmatically interact with ActiveBatch objects using the REST API.
On a feature-by-feature basis you can choose to install or not install the specific feature.
Note: Selecting the Job Scheduler feature will also result in installation of the Execution Agent on the Scheduler server (even if you attempt to deselect it). This is required due to various internal jobs that ActiveBatch itself requires.
To deselect a feature, click on the down arrow to the left of the feature name and select "Entire feature will be unavailable". This will place a red X next to the feature you do not wish to install.
To reset the features back to their installation defaults, click the Reset button.
The Disk Usage button allows you to retrieve a list of all available drives and their free space.
The Base Location is the installation folder.
-
The default installation location for 64-bit files is \Program Files\ASCI\ActiveBatchVX.
-
The default installation location for 32-bit files is \Program Files\(x86)\ASCI\ActiveBatchVX
-
The installation folder will be created if it does not already exist. To select a different drive and/or folder name, click on the Browse button and select a different location.
After completing the feature selections, click Next. A new window will appear titled Ready to Install.
Click the Install button to start the installation process. A progress dialog will appear that allows you to watch the progress of the installation.
If you are installing the Client or Execution Agent components, the system PATH variable will be updated with the ActiveBatch installation directory.
After the software has been installed, click the Finish button. If all went well, an updated window will indicate the installation completed successfully. Click the Close button.
You are now ready to start configuring the software you installed.
Note: You must go through the configuration process for the Job Scheduler and Execution Agent component, to have a working 2023 or higher Scheduler environment.
Configure the Execution Agent first, then the Job Scheduler. See Configuring the Windows Execution Agent
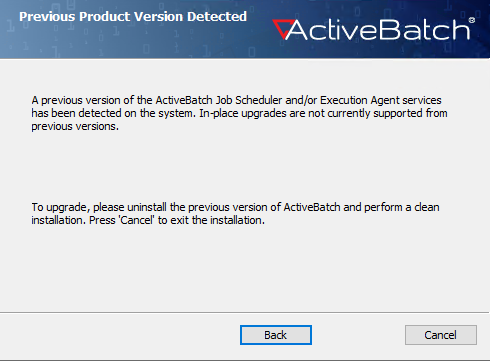
Previous Product Version Detected
If you have ActiveBatch Version V12 installed and either the Job Scheduler or Execution Agent feature(s) are present AND you have selected to install a 2023 or higher Job Scheduler or Execution Agent; the below dialog will appear. You must cancel the installation, uninstall V12, then proceed with the 2023 or higher installation. Please note this was discussed in Upgrading from V12 which describes the upgrade process.