Service Packs and Installation Maintenance Operations
Service Pack Upgrade - Windows
Service packs are considered software upgrades. A service pack is an accumulation of corrections and enhancements that have been added to a release. Service Packs are always cumulative, meaning earlier service pack software changes are always part of the latest service pack. This means you don’t need to apply successive service pack upgrades - but rather just the latest one.
Download the Service Pack
Go to the ASCI website (www.advsyscon.com) and log in. Navigate to the Product Downloads section. Choose ActiveBatch 2025 from the Select Product dropdown list. The setup kits available at the ASCI website always include the latest service pack for the version selected. You will see MSI and EXE download options. The EXE package (for Client, Scheduler and Windows Agent components) is recommended for most customers. When executed, it will determine whether the product is already installed, and if so, it performs a service pack upgrade. If the product is not installed, a normal Windows Installation will be performed, which is not discussed in this section.
You can run the .MSI instead of the .EXE, but you must issue a specific command to run the MSI, which is described later in this section. If users are unsure as to whether to download the EXE or MSI images, ASCI recommends that users download the EXE.
-
For a 64-bit system, please install ActiveBatch x64 Installation for the OS that is currently on the machine.
-
For a 32-bit system, please install ActiveBatch x86 Installation for the OS that is currently on the machine.
The install kit should be run on all machines that contain ActiveBatch components (Client, Scheduler and Windows Execution Agents).
Note: A reboot may be required after performing the upgrade.
Prepare for the installation
1. Backup the ActiveBatch database before upgrading the Job Scheduler machine. If the database is not backed up, and there is a need to roll back to a prior version (a rare event), the user will not be able to do so without a database backup. When upgrading the Job Scheduler machine, any changes to the database will be done at this time. The upgrade uses the Job Scheduler's registry key (DBConnstr) to obtain the name/location of the ActiveBatch database.
2. When upgrading to the latest service pack in a Non-Cluster failover environment, shut down the Job Scheduler Service on both nodes, and then apply the Service Pack to both nodes. After doing so, start the production Job Scheduler first so it will access the database and begin job processing. After that, start the secondary Job Scheduler. It will go into a Paused state.
3. Typically, as with past service packs, the order that the ActiveBatch components are upgraded does not matter. However, a "best practice" approach would be to update the Job Scheduler first, then the GUI'(s) and Agent(s) on a rolling basis, but in a timely fashion, as it is best to be on the same build for all components.
4. When running the service pack on the Job Scheduler server, the following is true, with regards to database access:
-
If users are using NT (Windows) authentication, the user running the service pack must have access rights to the database so the changes can be made (i.e., updating stored procedures, etc.)
-
If users are using Database authentication, the Username (DBUser) and Password (DBPassword) stored in the Scheduler registry will be used to access the ActiveBatch database.
-
A service pack installation will use the same database and other choices already configured during the original 2025 installation. It will not present any additional configuration choices.
Start the installation
Run the installer as an administrator.
If you are using the .MSI, enter the following command on the target system:
msiexec.exe /i ActiveBatch.msi REINSTALL=ALL REINSTALLMODE=vomus
The example above assumes your current directory contains the activebatch.msi installation file. If you do not use the above command and its associated switches, a pop-up will appear when you run the MSI, stating another version of the product is already installed and the installation cannot continue.
Note: For this reason, you may find it easier to execute the appropriate ActiveBatch.exe file to apply a service pack rather than executing the above command line.
After issuing the above command, click the Install button to proceed with the upgrade, or click Cancel to exit the installer.
If you are using the .EXE, start the installer, then click the Start button to proceed with the upgrade, or click Cancel to exit the installer.
The next window will prompt you to Install the upgrade. Click the Install button to start the installation, or click the Cancel button to exit the installer.
After clicking Install, an “Installing Product” window will appear, which includes a status bar, indicating the progress of the installation.
When the upgrade is complete, click the Finish button, then click the Close button.
Notes
After the above process is complete, your ActiveBatch environment will be fully upgraded to the latest installed service pack.
Please note that the above is intended as a guide ONLY for the process of upgrading an existing 2023.x ActiveBatch binaries to the latest 2025 service pack release.
Service Pack Upgrade - Unix/Linux Execution Agents
At the ASCI website, non-Windows Agents are available to download on the Product Downloads page. See the "Execution Agent (Non-Windows)" section to access the software required to upgrade a non-Windows Agent.
Stop the existing Execution Agent by issuing an abatkill command.
FTP the tar file to the Unix machine in Binary mode.
Untar the file using the following command: tar xvf abat**_****.tar (where abat**_****.tar is the name of the file.
The filename will be slightly different, depending on the flavor of UNIX and version).
cd into the directory where the files are untarred cd abat**_****.tar
Run abatinstall by issuing the following command: ./abatinstall
Once the installation is complete, start the execution agent by issuing the abatstartup command.
Note: Trying to invoke the install in RHEL7 and its derivatives without specifying the shell or "./" will cause the following issue: Checking Distribution Files ...Error ! ActiveBatch Execution Agent file './abatuninstall' missing.
Maintenance Installation Operations
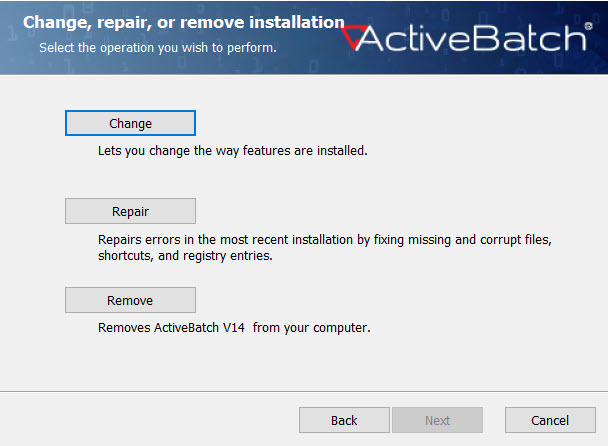
Once the software has been installed and configured, you may perform product maintenance operations. The ActiveBatch product maintenance operations are accessible through the Windows “Add/Remove Programs” after selecting ActiveBatch V14. Or, you can double click on the ActiveBatch installer. You will be presented with the 3 options below.
ActiveBatch supports three (3) maintenance operations; Change, Repair and Remove.
Change allows you to install or remove ActiveBatch features. The features are the same that were presented during the initial installation (see Feature Selection). If you select a feature/component it will be installed. If you deselect a feature/component it will be removed.
Repair allows you to refresh the registry and product code of those features/components that are already installed. Repair is typically used when you’ve accidentally deleted an image or suffered some type of disk or virus corruption in which the software no longer operates properly due to “bad” images. Repair neither adds nor removes features. Please note that Repair will not correct issues concerning corrupted or missing registry entries. If that should occur, please remove and then re-install the software. Remember that since the database is separate from the software product itself, no loss of data should occur when you need to remove the software.
Remove uninstalls the entire ActiveBatch product.