Calendar Object
This section describes the purpose of a Calender object and its properties. Below you will find a general overview, followed by a detailed description of Calendar Properties, as they appear in the various Calendar categories (tabs).
A Calendar object provides you with a way to specify non-business days (typically weekends) and holidays. The Calendar is then used (primarily) to prevent triggerable objects from running on the days specified in the Calendar object. However, the Calendar can also be used to trigger objects on the holiday(s) specified in the Calendar (using the Inclusion Calendar mentioned below.
The Calendar object is a shared object. It can be associated with:
-
All Triggerable objects (Jobs, Plans and References) - where Calendar object(s) are specified on the triggerable object's Constraints property sheet. When used this way, the Calendar's non-business days and holidays are days that the triggerable objects should not run. You do have the option to skip a holiday run, or run it on the next or previous business day.
-
A Schedule Object - where the Calendar object is specified on the Schedule object's Day Specification property sheet, in one of the following Calendar lists:
-
Exclusion Calendars - When placed here, the Calendar's non-business days and holidays are days that the triggerable objects should not run. When added to this location, you do not have the option to run the triggerable object on the next or previous business day when a holiday occurs. The run is always skipped.
-
Inclusion Calendars - When placed here, the Calendar's configured holidays are days that the triggerable objects should run. Non business days (if configured) are days the triggerable object should not run (if the non-business day falls on a holiday).
-
By default, a trigger will cause a Plan/Job to be eligible for execution (subject to other limitations and constraints). Sometimes, however, it is important to run Jobs based on business days. A Calendar object consists of specifications for how to determine business day(s). In other words, a Calendar acts as a filter or constraint on when a Job may run. If a Job or Plan doesn’t have a Calendar associated with it, then the Job or Plan isn’t using business day processing.
While Calendars are great for defining holidays, you don’t have to. You can just define non-business days without also defining any holidays.
To create a Calendar object, right-click on the desired container (Scheduler root, existing Folder or Plan) in the Object Navigation Pane, select New, then select Calendar. When you’ve completed the Calendar property settings, you must click the Save or the Save and Close button to save the Calendar. Click the X on the tab of the New Calendar if you wish to cancel the creation of the Calendar. When you save the Calendar, it will instantly appear in the Object Navigation pane (if auto refresh is enabled). To modify an existing Calendar, right-click on the Calendar in the Object Navigation pane, then select Properties.
General
This tab allows you to name the Calendar as well as describe it.
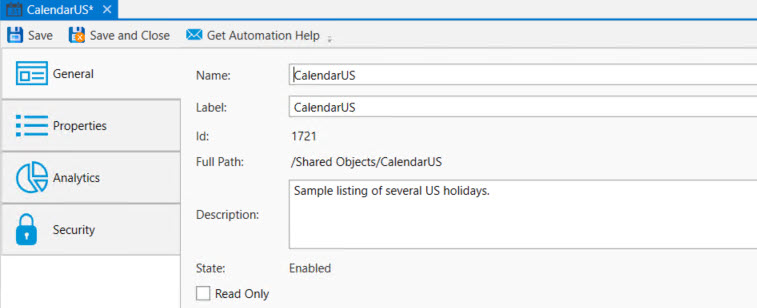
Name: This mandatory property represents the name of the object. The name is limited to 128 characters. The object’s name should be unique to avoid confusion. We recommend that it also be somewhat descriptive so it’s easy to find. The name is used (by default) to identify the object in the Object Navigation pane and other places in the UI. This can be changed to the label, if desired. See "Display Mode" in the General Settings
Label: Every object must be uniquely labeled within the scope of the namespace. The label is limited to sixty-four (64) characters. The label is typically the same value as the name (it is auto-filled to match the name you enter); however, uniqueness is always enforced for an object’s label. The label is recorded in the ActiveBatch namespace. The characters that may be used for the label property are restricted to alphanumeric (A-Z, a-z, 0-9), space, period (.), dash (-) and underscore (_). The label itself must begin with an alphabetic character. The label is typically used when scripting. All searches are case-insensitive. ActiveBatch does allow you to search for objects using either the label or the name properties.
ID: This is a unique read-only number that can be used to retrieve the object. Is it assigned by the system when a new object is saved.
Full Path: This read-only property provides the full namespace specification of the object. It consists of the container(s) the object has been placed in, with the object’s label appended to the end. For example, the fullpath: /IT Jobs/Nightly Run/<object label>, is such that IT Jobs is a root-level Folder, Nightly Run is a Plan, followed by the label of the object you are creating.
Description: This free form property is provided so you can document and describe the object to others. The description is limited to 512 characters. Clicking on the pencil icon will pull up a mini text editor where you can more easily enter your description.
State: This field indicates whether the object is enabled or disabled for use.
Read Only: This checkbox, when enabled, means the Calendar's properties cannot be changed. You must have “Modify” access permission to the calender object to set this feature. To clear the read-only attribute, uncheck the box.
The properties tab is where you set the non-business days and/or the relative and fixed holidays.
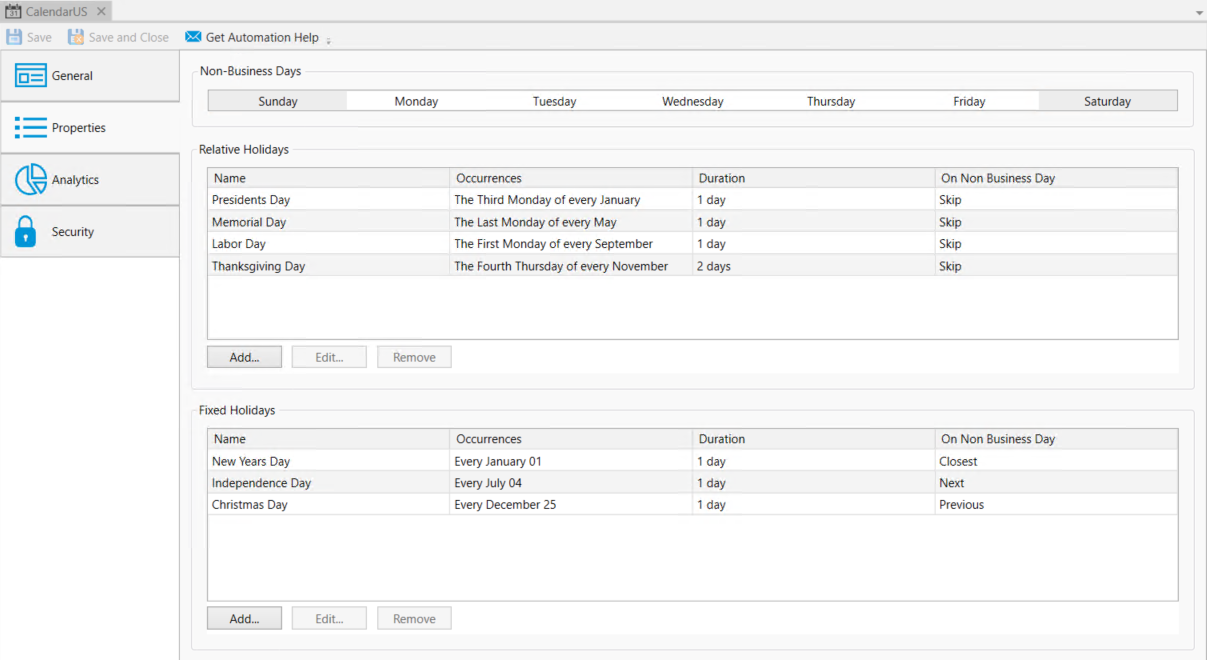
Non-Business Days: This top area allows you to indicate which days are non-business days. Non-Business Days are specified by day-of-the-week. So, for North America, Saturday and Sunday would likely be selected to indicate non-business days (for many businesses). Different parts of the world determine their own non-business days and ActiveBatch can respect those as well. Click on the day to select it (when selected, the day's background color changes). Alternatively, click on a selected day to deselect it.
A holiday is defined as a day in which the company is normally open for business, but isn’t due to a holiday. A holiday is not considered a holiday if it falls on a non-business day (e.g. Saturday). A holiday can be defined in a self-relative manner (like the last Thursday in November is Thanksgiving Day - an American holiday) or via a fixed date without year (like January 1 is always New Year’s Day) or with a fixed date and year. The first two specifications are used regardless of year while the last is only used for the applicable year.
Relative Holidays: This area allows you to indicate holidays based on a relative specification rather than a fixed date. For example, Thanksgiving Day in the United States is the “Fourth Thursday in November”.
To add a Relative Holiday, click the Add… button under the Relative Holidays panel. To edit a Relative Holiday, select the holiday from the list and click the Edit… button. The following dialog will appear.
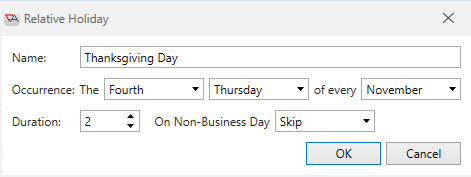
Each holiday must be uniquely named (20 chars maximum). Enter the name of the holiday in the Name field.
Relative Holidays use an Occurrence clause which indicates when the holiday occurs. The above example shows the Fourth Thursday of every November. Each portion of the clause includes an intuitive dropdown selection.
Next you indicate the Duration of the Holiday. While many holidays are for (1) day, some are not. For example, many companies also extend the Thanksgiving Day holiday to Friday. So a duration of 2, as seen above, indicates that the length of the holiday is 2 consecutive days (Thursday and Friday).
The last part of the holiday specification is the On Non-Business Day property. As Relative Holidays never conflict with non-business days (which is why they are relative to begin with), we’ll explain this property in the Fixed Holidays discussion next.
Finally, to delete a relative holiday, simply select the holiday from the list and click the Remove button.
Fixed Holidays: This area allows you to indicate holidays that are based on a fixed date. For example, New Year’s Day is January 1.
To add a Fixed Holiday, click the Add… button. To edit a Fixed Holiday, select the holiday from the list and click the Edit… button. The following dialog will appear.
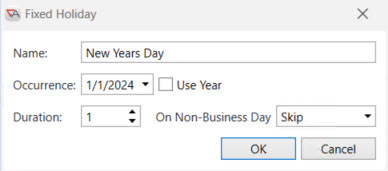
Each holiday must be uniquely named (20 chars maximum). Enter the name of the holiday in the Name field.
The Occurrence clause which indicates when the holiday occurs date-wise. The above example shows January 1. The dropdown arrow pulls up a Calendar, allowing you to navigate to the desired date and select it. You can also specify a year by clicking the Use Year checkbox. When doing so, the fixed holiday will be applied to that year only.
While most holidays are 1 day long, you can specify a longer holiday if that is appropriate in the Duration field.
The last part of the holiday specification is the On Non-Business Day property. Unlike Relative Holidays, Fixed Holidays can fall on non-business days (like a Saturday or Sunday) and create a conflict. This introduces the concept of the “observed” holiday from a business perspective. If January 1 falls on a Saturday, the observed day is most likely a Friday. Or, if January 1 falls on a Sunday, the most likely day to observe the holiday is Monday. But, you have choices. One of four possible selections may be specified when a holiday occurs on a non-business day: Skip, Use Closest, Use Previous and Use Next. Skip indicates that the holiday will be observed on the non-business day. Use Closest indicates that the holiday should be observed on the closest business day. For example, a holiday on Saturday would be observed on Friday and a holiday on Sunday would be observed on Monday. Use Previous/Use Next indicates the direction to proceed to find the last/next business day.
Finally, to delete a relative holiday, simply select the holiday from the list and click the Remove button.
The Analytics properties are depicted in the image below. This section details any changes made to the Calendar object, and provides you access to the object's revision history.
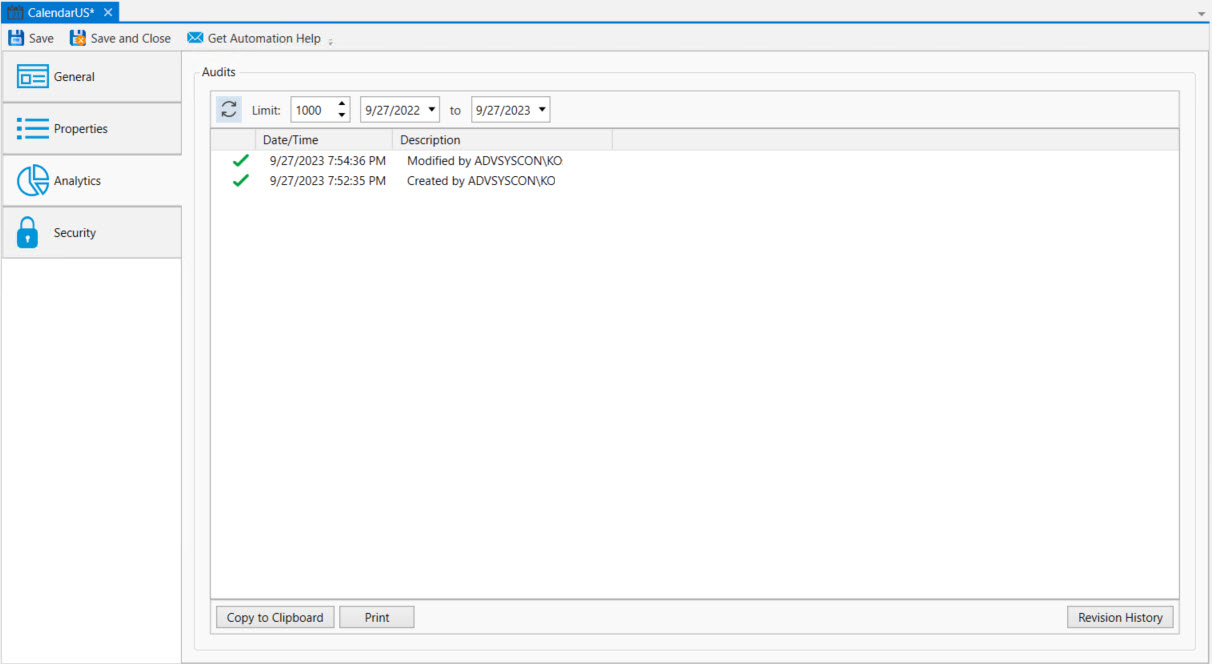
You can examine the audit trail for the Calendar object. The audit trail contains information such as when the Calendar was created, when it was modified, etc.
The Audits panel includes controls that allow you to filter the audits based on start and end dates. You can also limit the audits retrieved to a maximum number. The refresh button allows you to retrieve any audits that were generated after this dialog was initially displayed.
Each audit is contained in a single line in date and time sequence. Audits are read-only and cannot be modified. An icon appears at the beginning of each audit to help visually signal the severity of the audit. If an audit policy
Opening an audit item (by double-clicking on the item), depending on the nature of the audit, will sometimes reveal additional information concerning the audit.
The Copy to Clipboard button copies the contents of the retrieved audits into a copy buffer that you can later paste into a document or other program.
The Print button allows you to print the retrieved audits.
The Revision History button allows you to select one or more audits concerning changes made to an object and perform a difference operation between the selected revised objects.
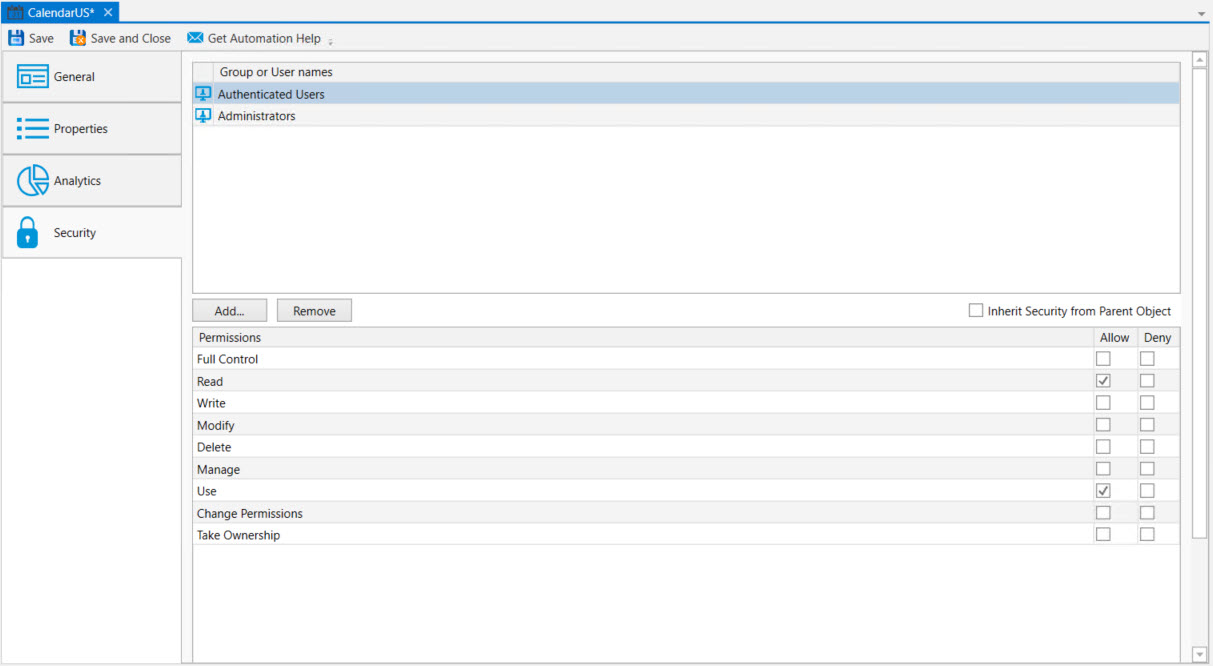
This tab is where object security is configured. Security in ActiveBatch mirrors how security is granted using Windows security. That is, permissions applicable to the object (Read, Write, Modify, Delete, etc.) are Allowed or Denied for the Active Directory users and/or groups assigned to the object.
When new objects are created, they will either be assigned factory default
When a default policy has been used to preset object security, the new object will either have:
The Inherit Security from Parent Object property checked (it is not checked by default). When checked, the listed users and/or groups along with their permissions granted will be read-only. The Add and Remove buttons will be disabled because security is being inherited from the object's parent container. When Inherit Security from Parent Object is checked, it is likely the ActiveBatch Administrator will be setting up security on parent container(s), and the Job author will not have to modify anything about security. This would require a larger discussion with an ActiveBatch Administrator who it typically tasked to manage object security, since there are options.
The Inherit security from Parent Object property is not checked. The users and/or groups are listed along with their permissions granted, but there is likely some differences when compared to the factory default security, since the purpose of setting a default policy for security is to add Active Directory groups and/or users (and their access permissions) that are specific to your organization. Since Inherit Security is not checked, the Add and Remove buttons will be enabled. When this is the case, Job authors will need to be advised if there needs to be any changes made to security when they create new objects.
As a best practice, it is best for an ActiveBatch Administrator to preset security using a default policy (for all object types) so Job authors do not have to manage security, which can be time consuming and error-prone. See the ActiveBatch Installation and Administrator's Guide for more best practice information regarding object security.
Below is a list of permissions related to this object.
Access Description Read
User is allowed to read the object.
Write
User is allowed to write the object.
Modify
User is allowed to modify the object (Read + Write)
Delete
User is allowed to delete the object.
Use
Account is allowed to use the object.
Manage
Account is allowed to perform Enable/Disable operations.
Take Ownership
User is allowed to take ownership.
Change Permissions
User is allowed to change permissions for the object.
Full Control
All of the above access is enabled.
The owner of an object is always granted Full Control by the system, and their permissions cannot be changed or reduced. If another user takes ownership, then the original owner's access will depend on how security is set up (if they are a user or group that has been given access). The new owner will automatically be granted Full Control, and once again, their permissions cannot be changed or reduced.
To take ownership, you will need to be granted the Take Ownership permission. Click the Take Ownership button and confirm the action. Another way to take ownership is to right-click on the object in the Object Navigation pane, then select Advanced > Take Ownership.
To modify security, you need "Change Permissions" security granted.
The Deny permission is generally used for users who have been granted access based on a group membership, but there is a need to override this for a particular user. Deny takes precedence over Allow.
Below you will find the instructions on how to modify security when Inherit Security from Parent Object is not checked.
To edit an existing account, select the listed user or group, then change the permission using the Permissions list box (Allow or Deny access).
To remove an existing account name, select the listed user or group and click the Remove button.
To add a new user or group, click the Add button and follow the dialog as depicted in the image below.
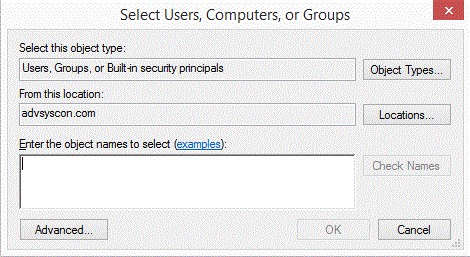
The dialog is similar to that of other Windows objects, and leverages Active Directory services. The Locations button allows you to select either the Job Scheduler machine or any applicable domain. Clicking the Advanced button allows you to search for specific users and/or groups. Alternatively, you may enter object names (a user or group) in the large edit box. Clicking the Check Names button allows you to validate the accounts. Click the OK button to add the selected Account to the object’s security list.