User Account Object
This section describes the purpose of the User Account object and its properties. Below you will find a general overview, followed by a detailed description of User Account Properties, as they appear in the various User Account categories (tabs).
There are several types of User Account objects you can choose from. A frequently used Credential Type is Username/Password, which is why it is the default type. Every ActiveBatch Job runs under the security credentials of a specific user, configured using the Username/Password Credential Type. Rather than embed these credentials within a Job, ActiveBatch provides the reusable User Account object for you to store the credentials.
The reusable aspect of the object is very important because it is likely that many Jobs will share the same credentials. If you change the password of a User Account object, all Jobs that are associated with the object pick up the changed password. Also, while a username and password remain a popular set of credentials, today's security conscious environments provide many different varieties of credentials, for example, security certificates. Therefore, the User Account object supports security certificates.
To create a User Account object, right-click on the desired container (Scheduler root, existing Folder or Plan) in the Object Navigation Pane, select New, then select User Account. When you’ve completed the User Account property settings, you must click the Save or the Save and Close button to save the User Account. Click the X on the tab of the New User Account if you wish to cancel the creation of the User Account. When you save the User Account, it will instantly appear in the Object Navigation pane (if auto refresh is enabled). To modify an existing User Account, right-click on the User Account in the Object Navigation pane, then select Properties.
General
The image below depicts the General category of a User Account.
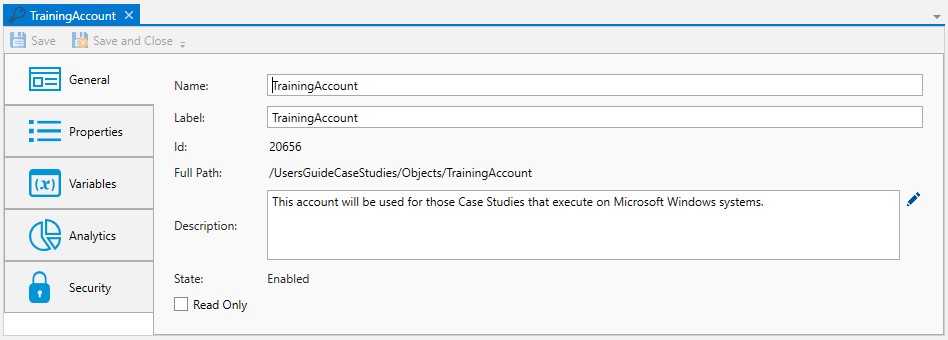
Name: This mandatory property represents the name of the object. The name is limited to 128 characters. The object’s name should be unique to avoid confusion. We recommend that it also be somewhat descriptive so it’s easy to find. The name is used (by default) to identify the object in the Object Navigation pane and other places in the UI. This can be changed to the label, if desired. See "Display Mode" in the General Settings
Label: Every object must be uniquely labeled within the scope of the namespace. The label is limited to sixty-four (64) characters. The label is typically the same value as the name (it is auto-filled to match the name you enter); however, uniqueness is always enforced for an object’s label. The label is recorded in the ActiveBatch namespace. The characters that may be used for the label property are restricted to alphanumeric (A-Z, a-z, 0-9), space, period (.), dash (-) and underscore (_). The label itself must begin with an alphabetic character. The label is typically used when scripting. All searches are case-insensitive. ActiveBatch does allow you to search for objects using either the label or the name properties.
ID: This is a unique read-only number that can be used to retrieve the object. Is it assigned by the system when a new object is saved.
Full Path: This read-only property provides the full namespace specification of the object. It consists of the container(s) the object has been placed in, with the object’s label appended to the end. For example, the fullpath: /IT Jobs/Nightly Run/<object label>, is such that IT Jobs is a root-level Folder, Nightly Run is a Plan, followed by the label of the object you are creating.
Description: This free form property is provided so you can document and describe the object to others. The description is limited to 512 characters. Clicking on the pencil icon will pull up a mini text editor where you can more easily enter your description.
State: This read-only field displays the state of the User Account. States include: enabled and disabled.
Read Only: This checkbox, when enabled, means the User Account's properties cannot be changed. You must have “Modify” access permission to the User Account object to set this feature. To clear the read-only attribute, uncheck the box.
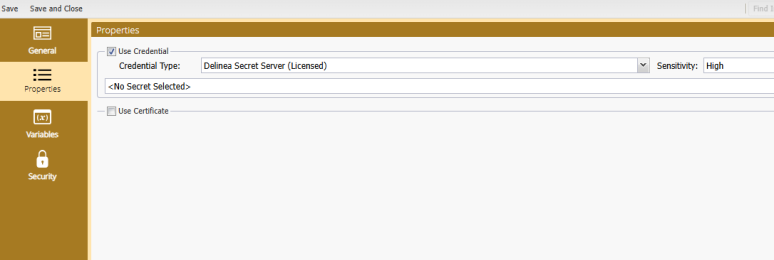
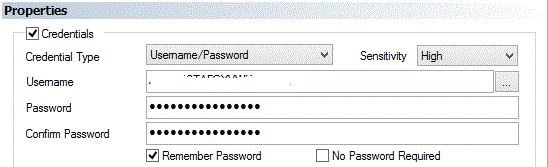
The Properties tab is the key property sheet where you configure the User Account object. First, the Credentials checkbox must be checked (it is by default). Next, select a Credential Type. After doing so, the properties that follow will depend on the type you selected.
In the image below, the properties associated with creating a Username/Password Credential Type is what you see.
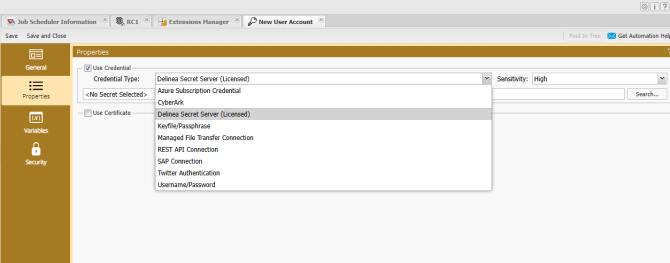
The Properties selection allows you to specify nine (9) types of credentials:
Username/Password
Managed File Transfer Connection
CyberArk
Delinea Secret Server (Licensed)
SAP Connection
Keyfile/Passphrase
Azure Subscription Connection
Twitter Authentication
REST API Connection
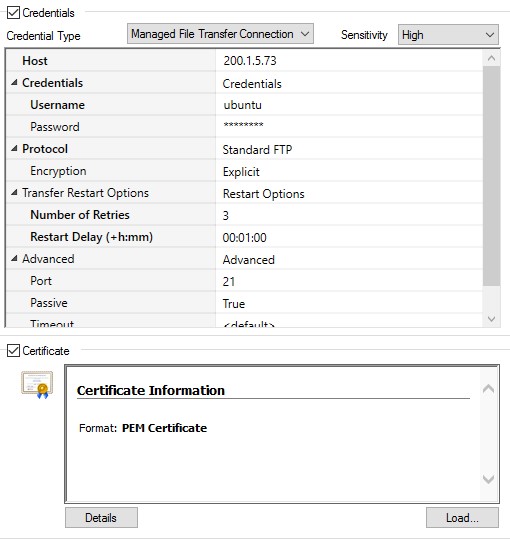
Additionally, you can specify an SSL type Certificate. This section of the User Account object is devoted to those security credentials that require a certificate (for example, Web Services and FTPS Job steps). If the Certificate checkbox is checked, you can click the Load button to request a file that contains an x.509 certificate (typically a .cer or .crt file), a Personal Information Exchange (.pfx, .p12) or a Portable E-Mail certificate (.pem). Many certificates also require a private key file. The key file will either be encapsulated within the certificate file or may be a separate file. Also, a certificate file may require a passphrase (or password) to decode the encrypted nature of the certificate. If the certificate can be successfully loaded, simple details concerning the certificate will be displayed.
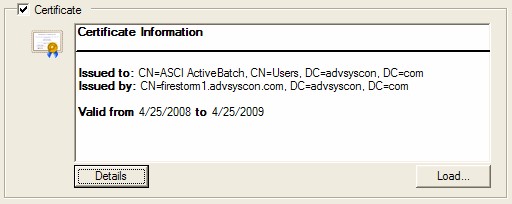
In the above example, the certificate was locally generated for ASCI use. Clicking the Details button would provide more specific information on the certificate itself.
Each Credential Type has a Sensitivity property. This property indicates the sensitivity to possible disclosure of password information. By default, the sensitivity is High. This means that the password cannot be disclosed under any purposes. Currently, this means that this credential cannot be used as part of a REST service. To allow REST services access to the credential you must lower the sensitivity to Low.
Each Credential Type is described below. Select the one you wish to learn more about.
This selection is for credentials that require a username and password. This Credential Type is used by every Job that runs in ActiveBatch, regardless of the Agent operating system type. Other areas in the product also require a username and password.
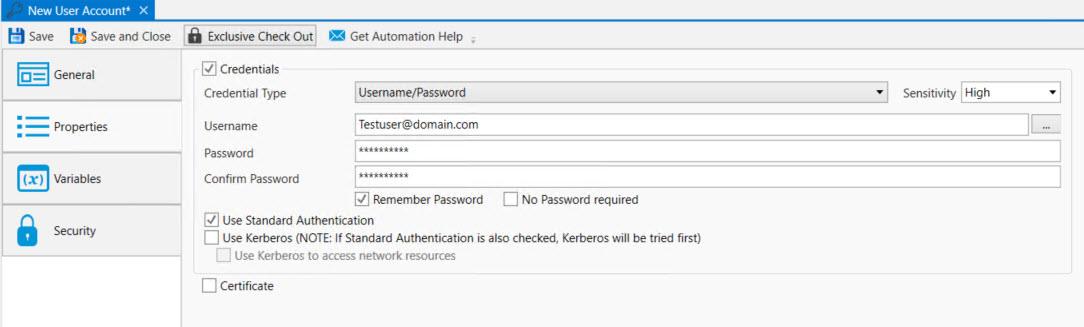
Username: This is the user name of the account. The ellipsis to the far right allows you to lookup the account using Active Directory, which is useful when selecting a Windows account.
Password: This is the account's password. Enter it here, then enter it again to confirm it was typed correctly.
Authentication Type: This option allows you to specify whether to use standard and/or Kerberos authentication. When a User Account Name object supports both Kerberos and Password authentication, Kerberos is used first and then the Username/Password combination. This ensures that should Kerberos not be supported on the target execution platform your Job will still run successfully.
By default, when Kerberos is selected, the authentication token can only be used for the local machine (this specifically means that network resources cannot be accessed). If you select Kerberos to access network resources, you must specify and ensure the username/password properties are specified and correct. A primary Kerberos token will then be used on the Execution Machine and network resources can be accessed.
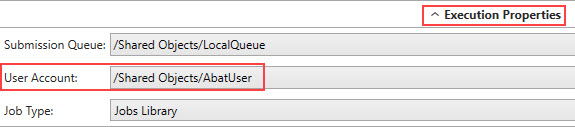
The image below depicts the Execution Properties of a Job. This is one example of where a User Account object, created with the Credential Type of Username/Password, is used.

The Managed File Transfer Connection is used with the Managed File Transfer Jobs Library Job steps. Rather than placing server, security credential information and other aspects of the server connection (e.g. the protocol being used) within the Job step(s) itself, this object allows for both reusability and easy modification.
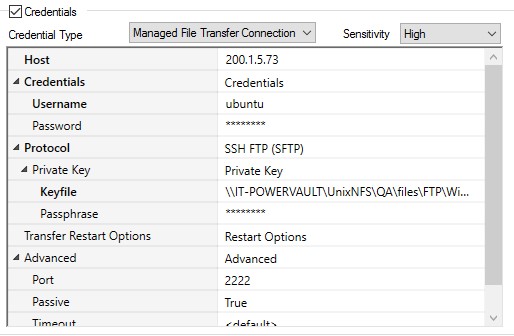
The example above illustrates FTP connection and security information for a SSH type connection. The host, credentials and other security and network information is placed within the User Account object. This allows for the information to be reused for any SFTP connection to this specific machine.
Parameters
Host: The host name, FQDN or IP address of the server.
Credentials: Security credentials to be used when accessing the server. Specify the username and password.
Protocol: The FTP protocol to be used. Standard FTP and SSH FTP. If Standard FTP is selected with Encryption checked (Explicit or Implicit), an SSL or SFTP connection is performed. The above example illustrates an FTPS (SSH) type connection.
Encryption: For Standard FTP. None is the default but if SSL is to be used, Implicit or Explicit encryption may be specified as mentioned above.
Private Key: For SSH FTP. If specified, a private key file to be used as part of the SSH connection. A passphrase is usually required but is not mandatory for the private key.
Transfer Restart Options: If an FTP connection fails, you may specify restart options which will attempt to recover the
connection and restart the operation. Two parameters may be specified: Number of Retries and Restart Delay. The Number of Retries represents the number of times the connection and operation will be retried before failing. The Restart Delay is a time period ActiveBatch will wait before re-attempting the connection and operation.
Advanced Parameters
Port: This is the Port number to be used for the transfer. When omitted, the default, ActiveBatch will determine the port to use based on the protocol selected.
Passive: This Boolean parameter indicates whether the FTP session will run in Passive mode (True and the default) or Active mode (False).
Timeout: This parameter controls the time period (in seconds) to make a successful connection.
Max Parallel Transfers: This optional parameter controls the number of simultaneous connections. You can specify a number from 1 (default) to 10 that will create one or more concurrent connections for the transfer.
Web Tunneling: This optional set of properties controls whether the connection is to be established via proxy.
The above example illustrates an SFTP (SSL) type connection.
CyberArk uses the CyberArk Security and Identity Management product and allows you to retrieve passwords from the CyberArk vault. This approach can reduce or eliminate the necessity for ActiveBatch storing passwords. This type of User Account does require that you have the CyberArk Security and Identity products deployed

When selecting CyberArk you must first authenticate your access to the CyberArk system and any account/security credentials you want to use. Clicking the Search… button causes the following dialog to appear.
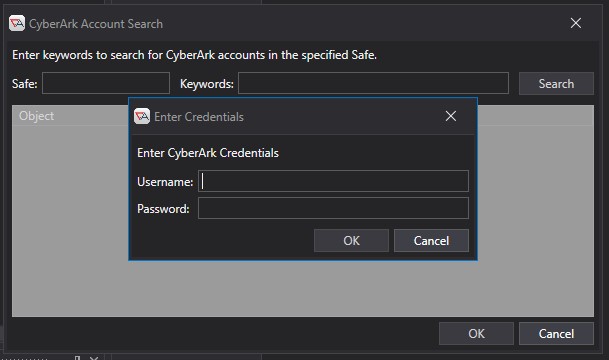
The prompt to enter your CyberArk Credentials requires that you first authenticate yourself and your access to the Safe(s) within CyberArk. This ensures that at Design Time, when you’re creating the User Account object that you have already proven your ability to gain access to the underlying credentials within the vault and safe. You must have List and Retrieve permissions at the CyberArk level for this account to properly search the safe. Once you have gained proper access the following dialog is shown:
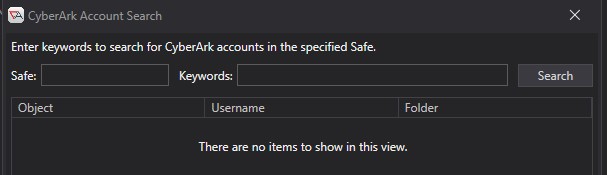
You must then enter the Safe to search and any associated keywords (i.e. username, address, etc).

In the example above, entering “test” for the Safe, with a keyword of “linux” produced a match. Selecting that match and clicking OK causes….

The CyberArk security credential to be filled in. This User Account object will now retrieve the specified security credential from the appropriate CyberArk resource.
Note: Authentication and validation of the specififed CyberArk credential only occurs once at Design Time. Continued use of the credential will occur as part of the ActiveBatch Application (“ASCI_ActiveBatch”) authorization (as noted in the ActiveBatch Installation Manual under CyberArk). This means you must ensure proper access at the ActiveBatch object level OR you must modify the CyberArk linkage by modifying the User Account credential in order to re-authenticate with CyberArk.
You can source credential secrets from Delinea Secret Server with the Delinea Secret Server credential type option.
When selecting Delinea you must first authenticate your access to the Delinea Secret Server to access the account/security credentials you want to use. Clicking the Search… button causes the following dialog to appear:
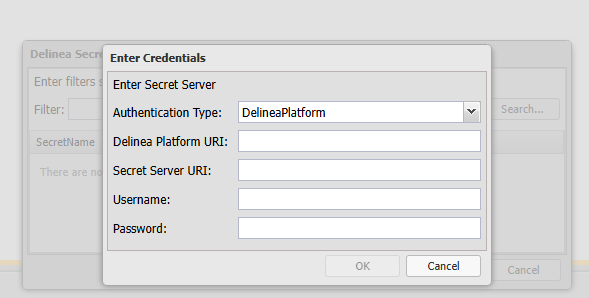
Authentication Type (Delinea Platform and OAuth2)
Delinea Platform URI (Only for Delinea Platform)
Secret Server URI
Username
Password - This will NOT be stored by ActiveBatch, they are only used to validate the user creating the ActiveBatch object has the appropriate permissions within Delinea.
Select OK
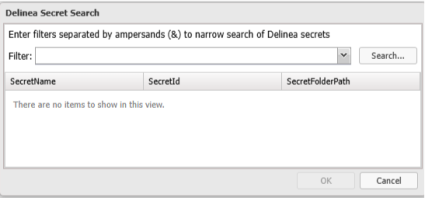
Leaving the filter blank will populate the search with all found secrets.
Window will populate with the following information for a secret: Secret Name
The SAP Connection is used with SAP Job steps and supports both the connection requirements to access an SAP system, as well as security credentials necessary for obtaining proper access.
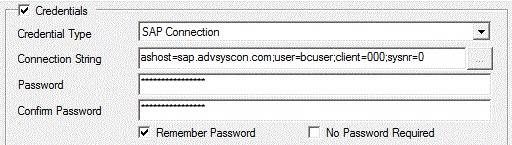
The connection string information include the host (ashost) the SAP server software resides on, the user (SAP username), and the client number. The password for the (client) user must also be provided.
The following parameters are required:
ASHOST: This parameter refers to the FQDN of an SAP Application Server. This syntax is used if you are logging directly into this application server.
USER: This parameter is the SAP user account.
CLIENT: This parameter is the SAP Client ID to connect with.
SYSNR: This parameter is the SAP system id.
XBPVER: This parameter indicates the XBP (eXternal Background Processing) version of SAP you are using. For example, if you are using version 3.0, then set this parameter as follows:
xbpver=3.0.
If this parameter is omitted, it will default to 2.0.
MSHOST: This parameter refers to the host name of the SAP Message Server. It is used when you are logging in to a logon group using load balancing.
GROUP: This parameter refers to the group name of the application servers. It is used when you are logging in to a logon group using load balancing.
R3NAME: This parameter specifies the name of the SAP system. It is used when logging into a logon group using
load balancing
The ASHOST parameter is mutually exclusive from the MSHOST, GROUP, and R3NAME parameters.
The syntax for specifying a parameter and value is “parameter=value”. Multiple parameters are delimited with a semicolon (;).
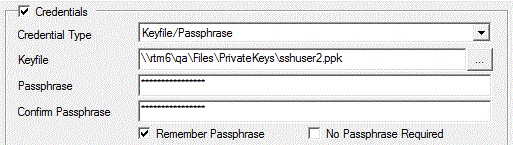
The keyfile/passphrase allows you to specify an SSH public or private keyfile. The keyfile is entered using a complete Windows file specification. If the keyfile was encrypted (as is usually the case with a private key) you would specify a passphrase. The User Account object is used with Jobs Library Job steps that require a private key for authentication purposes. For example, SFTP (FTP with SSH). The keyfile is a private key that may or may not require a passphrase for proper usage.
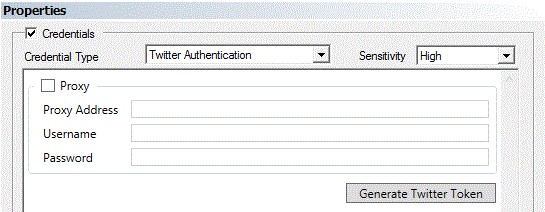
Twitter Authentication supports the generation and usage of a security token for Twitter. It is used with Twitter actions (Job steps, Alert and event). To use Twitter you must register a pre-existing Twitter account with ActiveBatch and obtain a security token that will be used by ActiveBatch on your behalf.
To generate a security token, click the “Generate Twitter Token” button.
The figure below is the application used to generate a Twitter security token (note that the page is branded for ActiveBatch as part of Twitter’s authorization). You would enter your username and password for your Twitter account and click the “Authorize App” button to allow ActiveBatch to use your Twitter account through the security token. If you’ve logged in successfully, Twitter will provide a PIN number that needs to be entered into the textbox at the bottom of the screen.
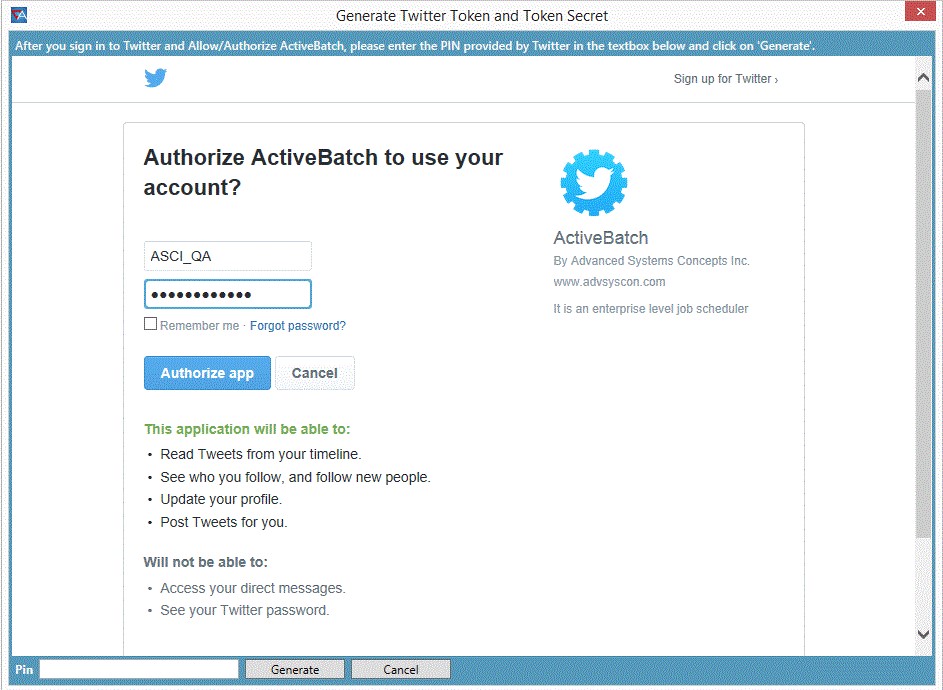
Clicking on the Generate button will cause a security token and secret to be generated on your behalf and inserted into the User Account object. You can then save and use the User Account object.
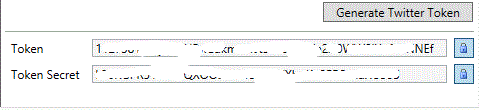
In the above image, the contents for both the Token and Token Secret properties have been obscured.
The REST API Connection concerns the use of ActiveBatch Service Library REST Adapter (V2) when configuring REST authentication for Api Key, OAuth 2.0 and AWS credentials. It is not supported using the original REST adapter named REST Adapter.
The REST Adapter’s Authentication Wizard offers Built-in or Custom authentication options. Depending on which option is selected, authentication types supported include API Key, OAuth 2.0 and AWS Credentials. When one of these options is selected using the Authentication Wizard, the details of the authentication type will come from the properties set in the REST API Connection, described here.
Note: If a User Account object configured with the REST API Connection is exported, the export user has the option to "Remove encrypted passwords on export". See the Remove encrypted passwords on export section for a list of REST API Connection fields that are removed on export.
The Sensitivity property is set to High, by default. This means that the password cannot be disclosed under any purposes. When set to High, the credential cannot be used as part of a REST service. To allow REST services access to the credential, you must lower the sensitivity to Low.
To configure one of the 3 REST API Authentication types, select REST API Connection from the User Account object’s topmost Credential Type property. Next, select Credential Type: Api Key, OAuth 2.0 or AWS Credentials. These three credential types are discussed next.
API Key
Enter (or copy/paste) your API Key in the Credential Type’s Value property. This field is always masked (hidden). Set the Sensitivity property to Low.

OAUTH 2.0
The Access Token is generated for OAuth 2.0. Set the Sensitivity property to low.
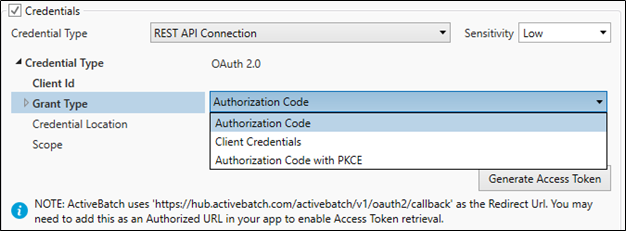
Properties:
There are 3 common properties:
Client ID: The Client ID of the application
Credential Location: Choose from a dropdown - Basic Header or Body. This defines how the credentials will be sent in the access token request.
Scope: The scope(s) of the access request.
Grant Types:
Authorization Code with PKCE – Properties below:
Access Token URL: The endpoint to use to exchange the authorization code for the access token.
Auth URL: The endpoint to use to get the Authorization code from the Authorization server.
Client Secret: The client secret value for the application.
Code Challenge Method: The method to use when generating the code challenge value.
SHA256
Plain
Save the User Account object before generating the token (see below - Generate Access Token).
Authorization Code – Properties below:
Access Token URL: The endpoint to use to exchange the authorization code for the access token.
Auth URL: The endpoint to use to get the Authorization code from the Authorization server.
Client Secret: The client secret value for the application.
Save the User Account object before generating the token (see below - Generate Access Token).
Client Credentials – Properties below:
Access Token URL: The endpoint to use to exchange the authorization code for the access token.
Auth URL: The endpoint to use to get the Authorization code from the Authorization server.
Client Secret: The client secret value for the application.
Save the User Account object before generating the Access Token. After saving, click on the Generate Access Token button. The system uses the Client ID and Secret to generate an access token. There is no interactive pop up with this Grant Type.
Password Credentials – Properties below:
Access Token URL: The endpoint to use to exchange the authorization code for the access token.
Password: The user's password.
Username: The username corresponding to a user in the tenant associated to the Tenant ID.
Auth URL: The endpoint to use to get the Authorization code from the Authorization server.
Client Secret: The client secret value for the application.
Resource: The resource to access.
Tenant ID: The ID for the tenant to authenticate against.
Save the User Account object before generating the Access Token. After saving, click on the Generate Access Token button. The system uses the Client ID and Secret to generate an access token. There is no interactive pop up with this Grant Type.
Generate Access Token – Applies to Authorization Code and Authorization Code with PKCE:
After saving the User Account object, Click on the Generate Access Token button. A spinner pop-up will appear stating “Use the browser to complete the authentication process”. A browser will automatically pop-up and prompt you to log into the service using the provided Auth URL. Login to your application. A successful login will result in the following Redirect URL:
https://hub.activebatch.com/activebatch/v1/oauth2/callback
You may need to add this as an Authorized URL in your app to enable Access Token retrieval. Ensure pop-ups are allowed for this website.

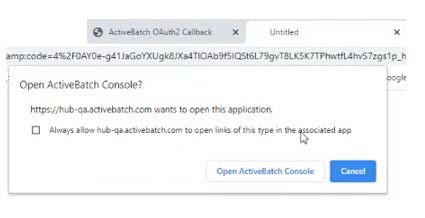
The above page will launch a popup, as per the rightmost “untitled” tab in the image below. Click on the tab,then click on the “Open ActiveBatch Console” button. When doing so, the system calls back into the ActiveBatch console, sending the credentials to complete the authentication. A message in the User Account object will indicate success or failure of the token generation
Notes about the OAuth Access Token:
If the service returns a refresh token, ActiveBatch will refresh the access token automatically when it expires. If the service does not return a refresh token, the Jobs using the access token will fail when the token expires. The Job log file will indicate that no refresh token was available. In this case, you will need to regenerate the access token in the User Account object.
If the User Account object is exported configured with an OAuth 2.0 credential, you will need to regenerate the access token in the User Account object where it was imported.
The User Account object will specify if the access token has been generated or not. If it has been generated, the
date and time it was generated will be specified. If the token is refreshed, the date will be updated.
AWS Credentials
AWS Credentials support the Amazon Web Services Signature – V4 only, including all AWS services except SimpleDB. Set the Sensitivity property to low.
Access Key ID: The access key ID for the AWS Account.
Secret Access Key: The secret access key for the AWS Account. The property is always masked (hidden).

This type of security credential is to be used when accessing the Microsoft Azure Job steps (Note: not the older Classic Job steps; those must use the alternative Azure credentials through the Username/Password type).

While the Username/Password type of authentication is straightforward as described, sometimes alternative uses for those fields are present. For example, when authenticating against Microsoft Azure systems a different method of encoding those fields are present. The following sub-sections provide additional information as to the use and deploying of those types of credentials.
Microsoft Azure Credentials
Note: This alternative security credential may only be used for the Microsoft Azure (Classic) Job steps and not the later version which requires the Azure Subscription Connection.
At the present time, Microsoft Azure requires a subscription id and a management certificate be presented for authentication purposes. ActiveBatch provides this support by requiring you to specify a “SubscriptionId=” prefix following by the subscription id itself in the Username property. The password can be blank or omitted. Your management certificate must be loaded into the Certificate property.
For example:
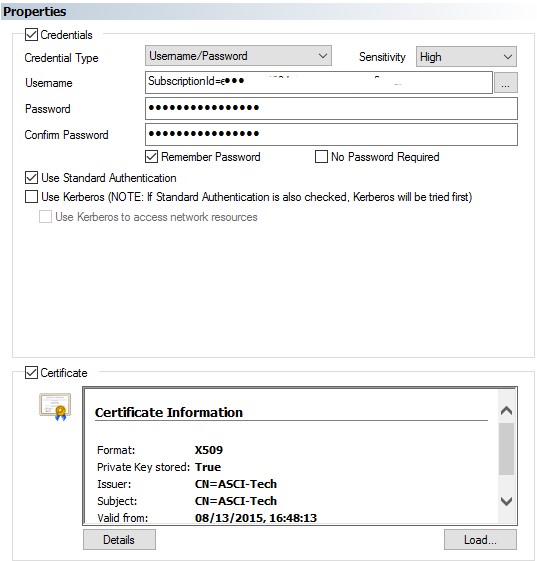
Note: The SubscriptionId is intentionally obfuscated.
Amazon AWS Access Credentials
Amazon AWS provides access keys which can be used for automation and when you need to provide security credentials for Amazon services. Amazon access keys consist of two (2) parts: Access Key ID and Secret Access Key. The Access Key ID is to be placed into the Username property and the Secret Access Key is to be placed into the Password property.
For example:
Note: The Access Key is intentionally obfuscated.
Amazon also supports the specification of X.509 Certificates for Web Services (SOAP) usage. The Credentials property supports that certificate and it may be used, if needed.
ActiveBatch Variables represent data that can be passed to Jobs, Plans, programs or used anywhere variable substitution may be used within ActiveBatch.
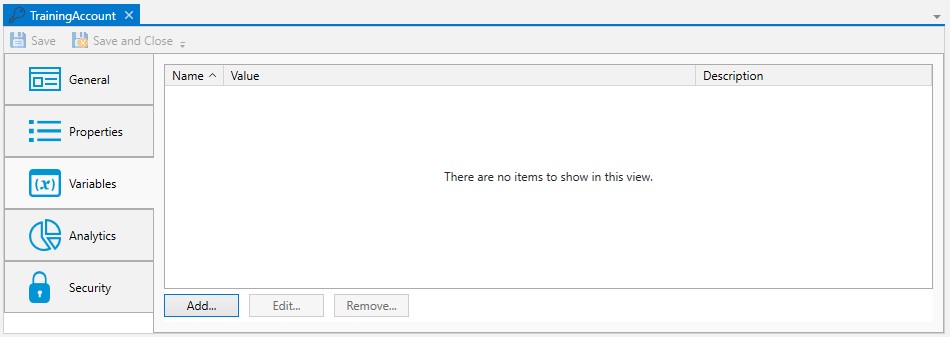
The figure above displays any variables associated with the User Account.
Variables have the following order of precedence (initial to last): Job, Plan, User Account and Queue. This means that the value of a variable associated with a User Account will have the next to final say as to that variable’s value.
For example, suppose you would like to assign a special directory to a variable when a Job is to run by a particular user. You can add the variable at the User Account level and, as long as it is not overridden by a Queue variable, this value would override any specified at the Job or Plan level. A good way to think about User Account variables is that it allows user customization, just like Execution Queue variables allow machine customization.
The Analytics properties are depicted in the image below. This section details any changes made to the User Account object, and provides you access to the object's revision history.
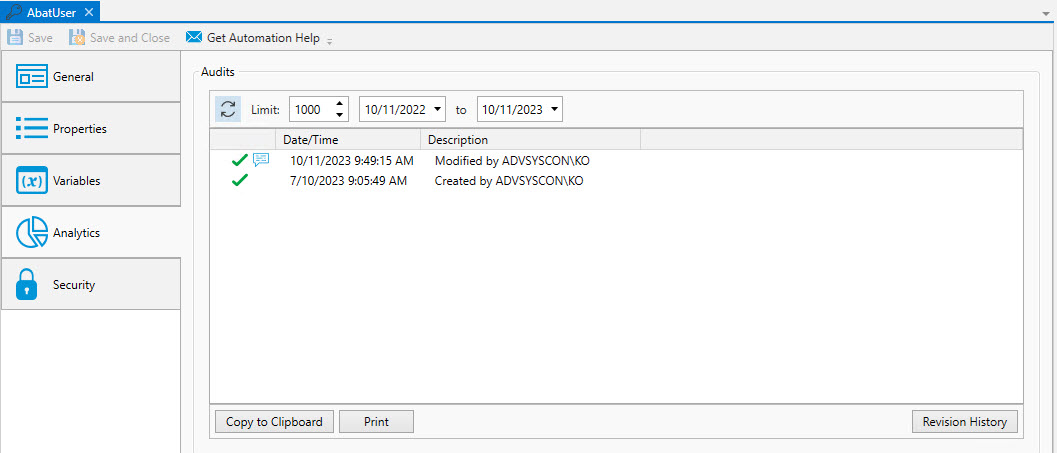
You can examine the audit trail for the User Account. The audit trail contains information such as when the Service Library was created, when it was modified, etc.
The Audits panel includes controls that allow you to filter the audits based on start and end dates. You can also limit the audits retrieved to a maximum number. The refresh button allows you to retrieve any audits that were generated after this dialog was initially displayed.
Each audit is contained in a single line in date and time sequence. Audits are read-only and cannot be modified. An icon appears at the beginning of each audit to help visually signal the severity of the audit. If an audit policy
Opening an audit item (by double-clicking on the item), depending on the nature of the audit, will sometimes reveal additional information concerning the audit.
The Copy to Clipboard button copies the contents of the retrieved audits into a copy buffer that you can later paste into a document or other program.
The Print button allows you to print the retrieved audits.
The Revision History button allows you to select one or more audits concerning changes made to an object and perform a difference operation between the selected revised objects.
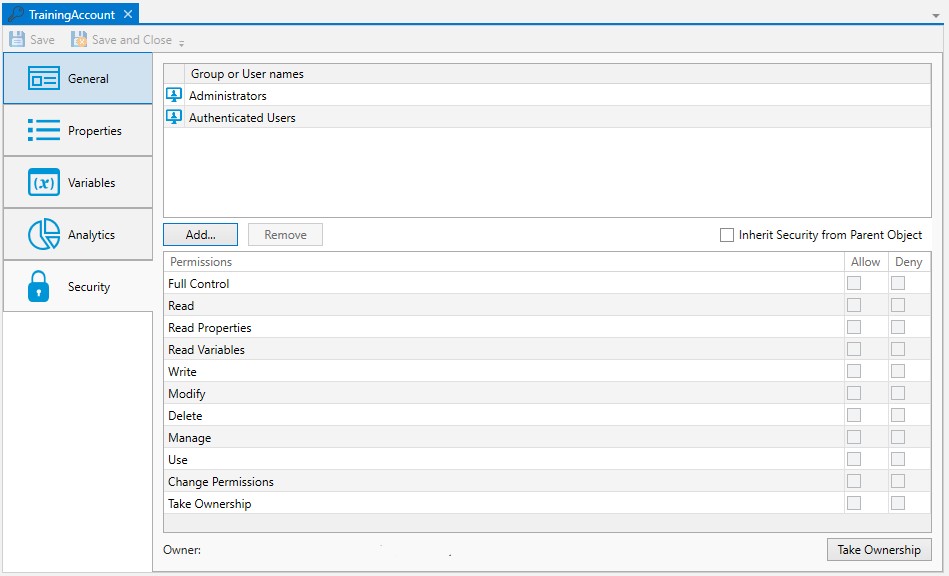
This tab is where object security is configured. Security in ActiveBatch mirrors how security is granted using Windows security. That is, permissions applicable to the object (Read, Write, Modify, Delete, etc.) are Allowed or Denied for the Active Directory users and/or groups assigned to the object.
When new objects are created, they will either be assigned factory default
When a default policy has been used to preset object security, the new object will either have:
The Inherit Security from Parent Object property checked (it is not checked by default). When checked, the listed users and/or groups along with their permissions granted will be read-only. The Add and Remove buttons will be disabled because security is being inherited from the object's parent container. When Inherit Security from Parent Object is checked, it is likely the ActiveBatch Administrator will be setting up security on parent container(s), and the Job author will not have to modify anything about security. This would require a larger discussion with an ActiveBatch Administrator who it typically tasked to manage object security, since there are options.
The Inherit security from Parent Object property is not checked. The users and/or groups are listed along with their permissions granted, but there is likely some differences when compared to the factory default security, since the purpose of setting a default policy for security is to add Active Directory groups and/or users (and their access permissions) that are specific to your organization. Since Inherit Security is not checked, the Add and Remove buttons will be enabled. When this is the case, Job authors will need to be advised if there needs to be any changes made to security when they create new objects.
As a best practice, it is best for an ActiveBatch Administrator to preset security using a default policy (for all object types) so Job authors do not have to manage security, which can be time consuming and error-prone. See the ActiveBatch Installation and Administrator's Guide for more best practice information regarding object security.
Below is a list of permissions related to this object.
Access
Description
Read
User is allowed to read the object (properties & variables).
Read Properties
User is allowed to read the object properties.
Read Variables
User is allowed to read the object variables.
Write
User is allowed to write to the object.
Modify
User is allowed to modify the object. (Read + Write)
Delete
User is allowed to delete the object.
Use
User is allowed to associate object with a Job/Plan
Manage
Account is allowed to perform Enable/Disable operations.
Take Ownership
User is allowed to take ownership.
Full Control
All of the above access is enabled.
The owner of an object is always granted Full Control by the system, and their permissions cannot be changed or reduced. If another user takes ownership, then the original owner's access will depend on how security is set up (if they are a user or group that has been given access). The new owner will automatically be granted Full Control, and once again, their permissions cannot be changed or reduced.
To take ownership, you will need to be granted the Take Ownership permission. Click the Take Ownership button and confirm the action. Another way to take ownership is to right-click on the object in the Object Navigation pane, then select Advanced > Take Ownership.
To modify security, you need "Change Permissions" security granted.
The Deny permission is generally used for users who have been granted access based on a group membership, but there is a need to override this for a particular user. Deny takes precedence over Allow.
Below you will find the instructions on how to modify security when Inherit Security from Parent Object is not checked.
To edit an existing account, select the listed user or group, then change the permission using the Permissions list box (Allow or Deny access).
To remove an existing account name, select the listed user or group and click the Remove button.
To add a new user or group, click the Add button and follow the dialog as depicted in the image below.
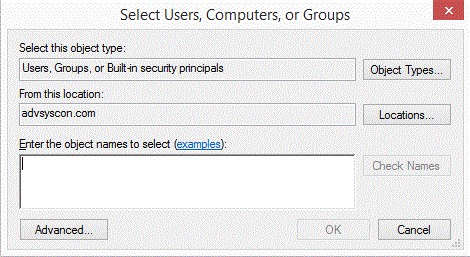
The dialog is similar to that of other Windows objects, and leverages Active Directory services. The Locations button allows you to select either the Job Scheduler machine or any applicable domain. Clicking the Advanced button allows you to search for specific users and/or groups. Alternatively, you may enter object names (a user or group) in the large edit box. Clicking the Check Names button allows you to validate the accounts. Click the OK button to add the selected Account to the object’s security list.
Note: Use caution as to which accounts or groups you grant Use access to. Use access allows that user or group to run Jobs using the account without having to specify a password (since the password is in the User Account). In addition, there are other features that require a User Account. No matter how it is used, granting Use access allows the Job author access to whatever resource (system, data source, directories, etc.) the account is being used for.
Using a User Account Object
The main reason for creating and using a User Account object is that you don’t have to embed a username/password everywhere security credentials are required. As you work with ActiveBatch you’ll see there are many places where security credentials need to be used. A User Account object allows you to secure references to a username/password.
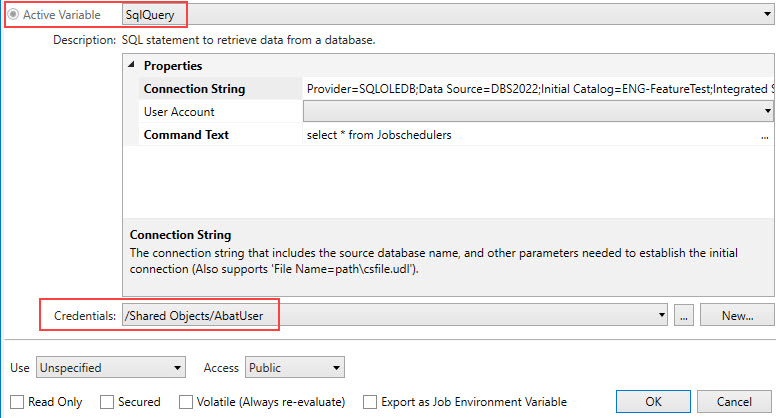
The image below is taken from the Variables property page. Active variables, since they retrieve information from a data source, require authentication. Note: If the Active Variable Credentials property is left blank, the system defaults to using the Job or Plan's Execution credentials. See Active Variables for more details.
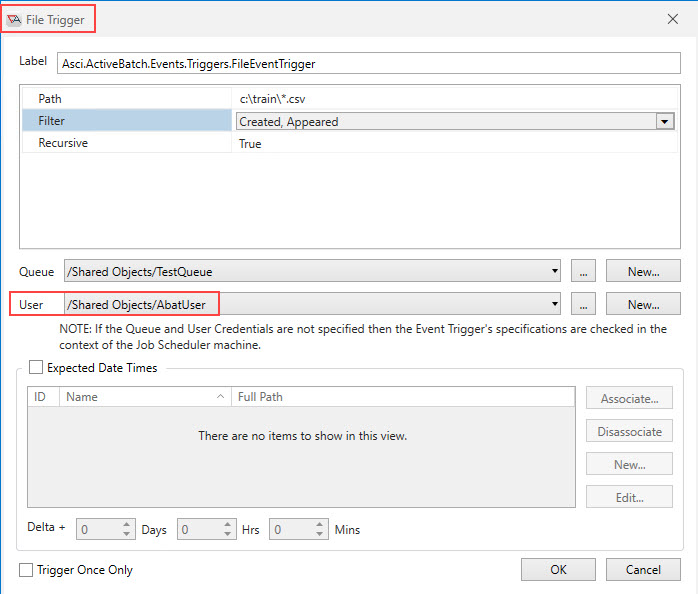
The image below is taken from the Triggers > Events property page. In this example, a File Trigger event is being configured, and specific user credentials are being used.
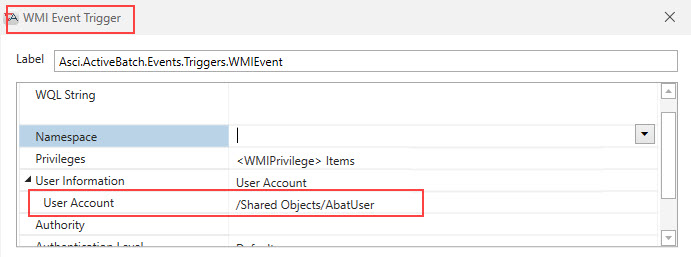
The image below is taken from the Events property page (WMI). When a WMI event notification is requested for a remote machine, authentication is performed.
The image below is taken from a Job’s Execution Properties, where User Account is one requirement. All ActiveBatch Jobs run under the security context of the associated User Account.
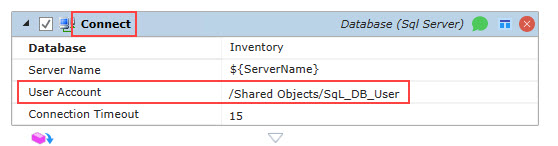
The image below is taken from a Jobs Library Job step. In this example, a SQL Server database account is required to access the database in the Connect Job step.
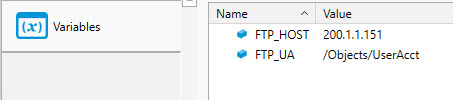
The image below is taken from a Jobs Library Job step. When the User Account object is a property of a Jobs Library Job step, you can select the “binding” button (to the far right of the step name) and specify a variable, then make sure that variable’s value is the fullpath of the User Account object you want to use. In this example, both the Host and Credentials are variables. The “Host” represents the FTP Server and the “Credentials” represents a path to the User Account object that is configured with the proper credentials.

The variables referenced above are defined in the image below. In this example, FTP_HOST is an IP address and the FTP_UA is the path to a User Account object.
As another example, you could use a FOR-EACH-ROW Job step in which a SQL query is issued that returns hostnames and User Account objects.
In summary, with all these uses of security, having a User Account object simplifies possible maintenance of the underlying OS account. In addition, using a User Account object also abstracts the actual account that is used. If conditions require the account name to be changed, no changes are required within any of the associated objects. The User Account object alone would change.
Specifying a User Account Object at Run-time
For many applications, the required security credentials are always the same. However, sometimes it is beneficial or a requirement to wait until execution to indicate what credentials are to be used. This implies that the User Account to use may vary on occasion. ActiveBatch supports this concept through the use of its variable system and the built-in RuntimeUserAccount object.
User Account objects can be specified in two areas within ActiveBatch Jobs and Plans. Either as part of the properties of the object (for example, Execution User) or as a property within a Jobs Library Job Step.
Using the built-in RuntimeUserAccount
When the User Account object is a formal property that you must select from a dropdown, select RuntimeUserAccount as the account. This selection means that you are deferring the exact User Account object to be used until run-time.
Next, add a built-in variable named #UserAccount and set its value to the fullpath of the User Account object you want to use.
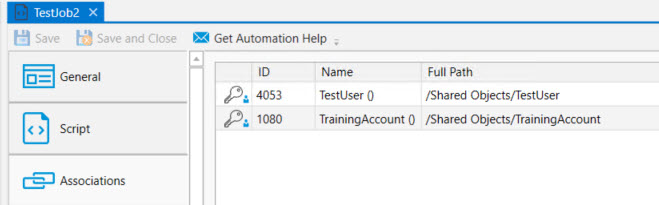
Lastly, any User Account objects that the variable may resolve to must be added to the Job's Associations property sheet. The reason you must do this is so the system, when you save the Job design-time, can check to see if you have "Use" rights to the User Accounts the variable may resolve to. Therefore, adding the User Account objects to the Associations property sheet is for security purposes.
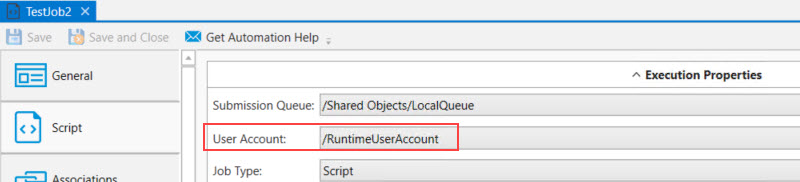
Example using the RuntimeUserAccount in the Job's Execution > User Account property
In the image below, the Job's User Account property has been set to RuntimeUserAccount.
Next, you must define the #UserAccount variable. The variable must resolve to a valid path of a User Account object that will be used to run the Job.
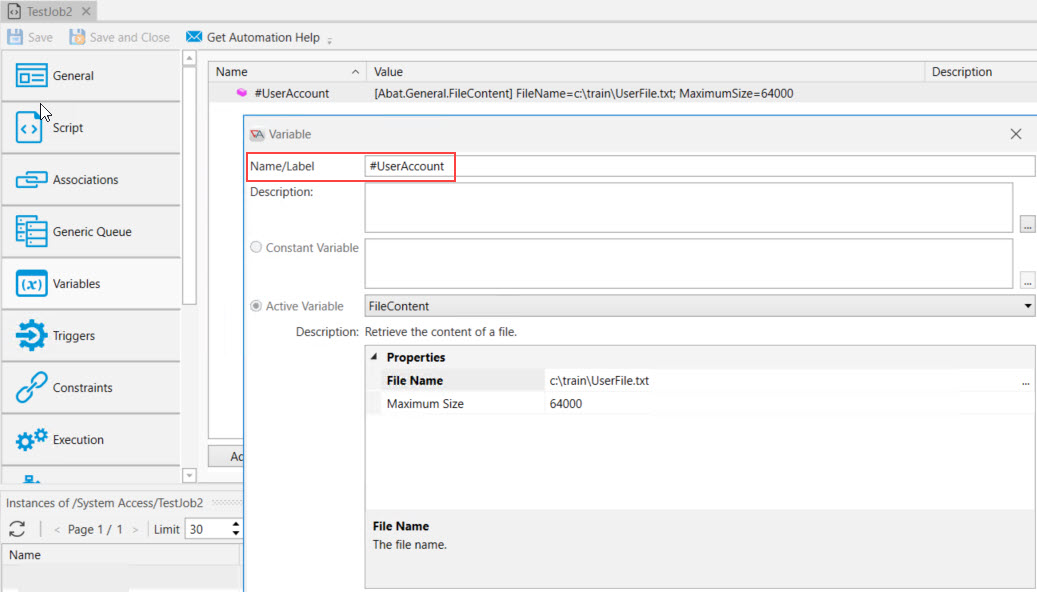
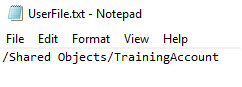
In this example, the full path to the User Account object is being read from a text file (see the image below). The variable can be Active or Constant. As long as it resolves to a User Account object's full path (where the User Account credential type is Username/Password), it will be supported.
Next, any possible User Account objects that the #UserAccount variable may resolve to must be added to the Job's Associations property, as depicted below. If the User Account variable resolves to a User Account object that is not in the list, the Job will fail run-time with an "Access Denied" reason in the Exit Code Description column of the Instances and Daily Activity views.