Map
Map View (or Map) is a real-time graphical display of the ActiveBatch workflows and their objects with specific emphasis on Plans and/or Jobs.
This section provides a brief overview of the Map View. Access this link: Using the Map View for a more in-depth description of this view.
Map is used by developers to create Jobs and Plans, and configure the relationships between them (e.g. constraints, completion triggers and alert triggers). To see the Map view for your entire Scheduler system, select Map View from the Views Pane or right-click on the Scheduler object (at the top of the Object Navigation Pane), then select View > Map. To see the Map view for a specific Plan or Folder, right-click on the desired Plan or Folder, then select View > Map.
Map View allows you to create and manipulate the various ActiveBatch objects. Map View is the predominant view for graphically creating workflows. Jobs and Plans can be linked together such that when one completes, another Job or Plan is triggered. In Map View, your Jobs and their relationships to other Jobs can be visually seen and graphically managed.
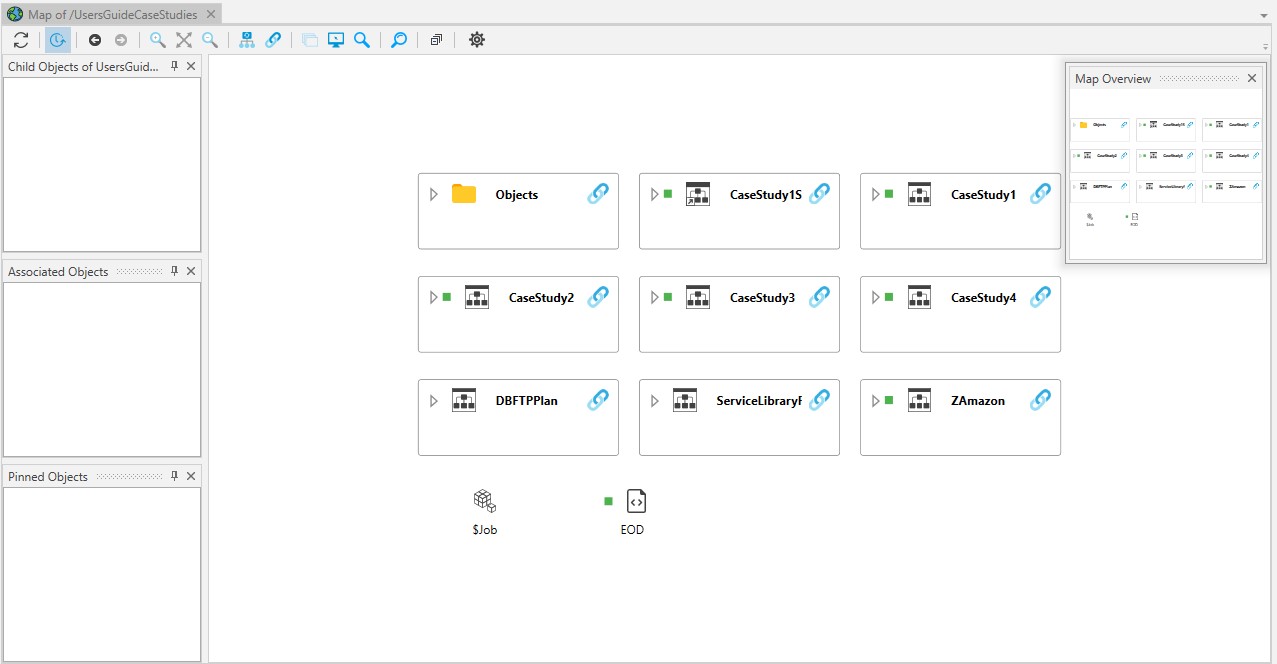
When Map View is first launched you will see the larger portion of the canvas containing whatever workflows and objects can fit in the space. You will also see a smaller “context” window (Map Overview) in the upper right corner that displays the entire level. This smaller window allows you to pan and bring other objects into view. Map supports both pan and zoom. All shapes and text will scale as you zoom in and out.
Next, there are 3 dockable panes: Child Objects, Associated Objects, and Pinned Objects. In the image below, they are displayed on the left. To open or close the panes, navigate to the Map view's toolbar, then select the gear icon (on the far right). From there, select View, then select the desired pane. Selecting a pane will open or close it, depending on its current state. A check next to the pane means it is currently open. However, if you don't see it, it may be hidden. When hidden, you should see a tab with the pane's name affixed along the perimeter of the Map view. Click on the tab to show the pane.
Child Objects refers to those objects at this level that are not Jobs or Plans. In other words, all of the rest of the ActiveBatch objects that reside at the level you are viewing.
Associated Objects contains the list of objects that are associated with a selected object. For example, a Queue and User Account object would minimally appear here for a Job (every Job must be assigned a Queue and User Account). To see associated objects, you must click the "Get Associated Objects" icon (a "chain link" icon) on the container you are viewing.
Pinned Objects contains those objects that are pinned. All objects in both the Child Objects and Associated Objects panes can be pinned. You can pin objects that you repeatedly use. Think of pinned objects as a type of favorites for the Map view. If you pin a Plan or Folder, you can also easily access the underlying nested objects in the container.
Map View also has operational aspects. As a workflow executes, the underlying Plans and/or Jobs are updated with a color-coded accent stripe (to the left of the object icon), depicting the state of the instance. This view can be used by ActiveBatch operators.
If multiple instances of the same Plan or Job execute, the Instances Pane will display each unique batch run. When Map View is launched through the Object Navigation pane, Map View will automatically select the latest instance. You can manually select an instance to view through the Instances pane. When all the instances have completed, the accent stripe displays the last completed instance's completion result (i.e. success - green, failure -red, or aborted - purple).
Map View is normally real-time auto refreshed. You can stop auto refresh by clicking on the toolbar's auto refresh button (second from the left). This button will toggle on and off the auto refresh feature.
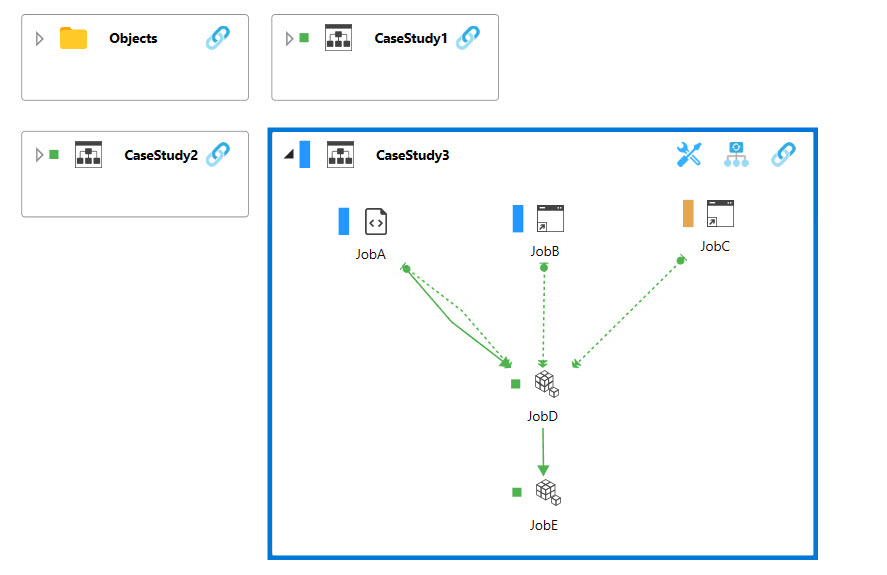
Let's take a closer look at the workflow in the CaseStudy3 Plan. The image below depicts the Jobs in the Plan before execution. The last time the Jobs ran, they ran successfully, which is what the green box symbolizes, next to each Job.
Note: Details about CaseStudy3 can be found in the ActiveBatch User Guide. The Case Study steps you through the creation of the Plan, Jobs and relationships briefly discussed below.
When the Plan is triggered, the top 3 Jobs will all instantiate at the same time, the remaining two will not, based on relationships and other features that have been configured. For the top 3 Jobs, a Resource Constraint has been configured which limits execution to only 2 Jobs at a time. When JobA or JobB completes, a Resource will be available for JobC to run.
JobD will be triggered for execution upon the success of JobA, as JobA is configured with a Completion Trigger. The completion trigger is depicted as a solid arrow pointing from JobA to JobD. Any one of the top three Jobs could have triggered JobD (as a Best Practice, typically its the Job that historically runs the longest).
Next, JobD has Instance Constraints configured that requires all 3 top Jobs to have completed successfully before it can run. The Instance Constraints are depicted as dashed lines.
 '
'
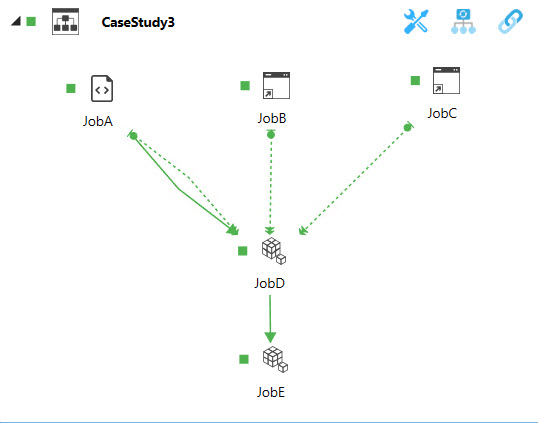
When Jobs are executing (JobA and JobB) its accent stripe is blue - as depicted in the above image. When it is waiting on a Constraint (JobC), the accent stripe is orange. While the instances are active, the accent stripes are replaced with larger bars. When they complete, the accent stripe is smaller.
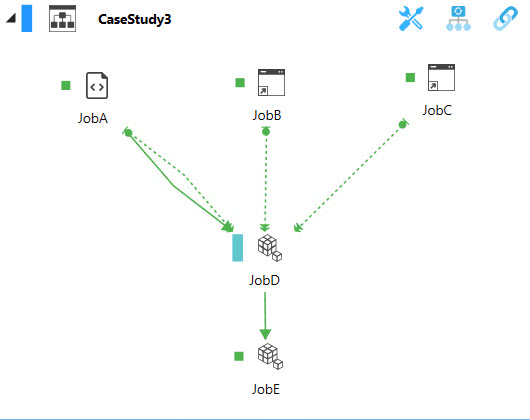
As per the image above, notice that the top three (3) Jobs have completed successfully, and JobD’s instance state is blue (meaning its executing). While ActiveBatch does use color to denote instance state, you can also mouse over the Job and/or completion triggers/constraints to learn more about the instance or relationships. You can also right-click on completion triggers/constraints (green arrow, dashed lines) to edit or delete them. If you right-click on a Job or Plan, you will see the standard right-click menu options associated with the object.
Finally, once JobD completes successfully, it will trigger JobE. Observe the green arrow pointing from JobD to JobE. This is another completion trigger. When JobE completes, the Plan's execution will also end.
Note: While Completion Triggers and Instance Constraints are depicted as relationships in the Map view, Resource Constraints are not.