Service Library Object
This section describes the purpose of the Service Library object and its properties. Below you will find a general overview, followed by a detailed description of Service Library Properties as they appear in the various Service Library categories (tabs).
The Service Library object is used to create your own Jobs Library Job steps from various sources. Sources supported include REST services, WSDL based Web Services, .NET Assemblies, and SQL Server and Oracle stored procedures and functions. The advantage of this approach is that you can reuse logic or code in its original implementation and derive all the benefits of these methods or APIs as Job steps. You simply drag and drop your methods into your workflow as Job steps, the same way you would drag and drop steps that are built-in to the Jobs Library.
Service library objects are associated at the root of the Job Scheduler, and on Jobs and Plans. To associate the Service Library to a Job, access the Job’s Associations property sheet, click on Associate, navigate to, then select the Service Library you wish to use. To associate the Service Library object to the Scheduler root or a Plan, access the desired object's Service Libraries property sheet, click on Associate, navigate to, then select the Service Library you wish to use. Alternatively, you can quickly associate the Service Library object to the desired Plan or Job by dragging the Service Library (in the Object Navigation pane) and dropping it on the target object.
See the Object List object for more information when you need to associate one or more objects within one or more Jobs or Plans.
Note: There are two REST adapters in the Service Library object, the original adapter named REST Adapter, and a newer one named REST Adapter (V2). REST Adapter (V2) is building on the original REST Adapter, offering many new features and an enhanced user interface. REST Adapter (V2) was introduced in ActiveBatch version 12 service pack 5. The original REST Adapter has not been modified, and existing Jobs will continue to work as before. REST Adapter has not been removed from the ActiveBatch product, but as a best practice, use REST Adapter (V2) when creating a new Service Library object.
To create a Service Library, right-click on the desired container (Scheduler root, existing Folder or Plan) in the Object Navigation Pane, select New, then select Service Library. When you’ve completed the Service Library settings, you must click the Save or the Save and Close button to save the Service Library. Click the X on the tab of the New Service Library if you wish to cancel the creation of the Service Library. When you save the Service Library, it will instantly appear in the Object Navigation pane (if auto refresh is enabled). To modify an existing Service Library, right-click on the Service Library in the Object Navigation pane, then select Properties.
General
The image below depicts the General category of a Service Library object.
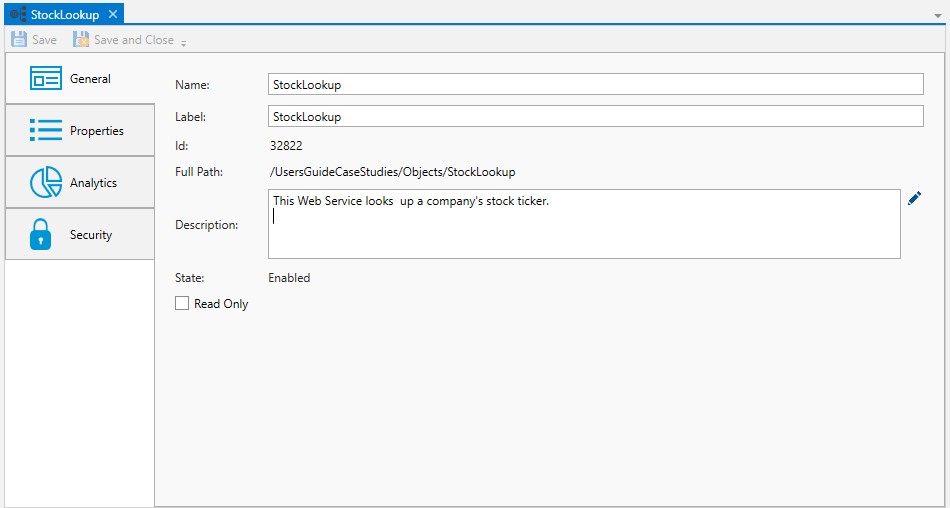
Name: This mandatory property represents the name of the object. The name is limited to 128 characters. The object’s name should be unique to avoid confusion. We recommend that it also be somewhat descriptive so it’s easy to find. The name is used (by default) to identify the object in the Object Navigation pane and other places in the UI. This can be changed to the label, if desired. See "Display Mode" in the General Settings
Label: Every object must be uniquely labeled within the scope of the namespace. The label is limited to sixty-four (64) characters. The label is typically the same value as the name (it is auto-filled to match the name you enter); however, uniqueness is always enforced for an object’s label. The label is recorded in the ActiveBatch namespace. The characters that may be used for the label property are restricted to alphanumeric (A-Z, a-z, 0-9), space, period (.), dash (-) and underscore (_). The label itself must begin with an alphabetic character. The label is typically used when scripting. All searches are case-insensitive. ActiveBatch does allow you to search for objects using either the label or the name properties.
ID: This is a unique read-only number that can be used to retrieve the object. Is it assigned by the system when a new object is saved.
Full Path: This read-only property provides the full namespace specification of the object. It consists of the container(s) the object has been placed in, with the object’s label appended to the end. For example, the fullpath: /IT Jobs/Nightly Run/<object label>, is such that IT Jobs is a root-level Folder, Nightly Run is a Plan, followed by the label of the object you are creating.
Description: This free form property is provided so you can document and describe the object to others. The description is limited to 512 characters. Clicking on the pencil icon will pull up a mini text editor where you can more easily enter your description.
State: This field indicates whether the object is enabled or disabled for use.
Read Only: This checkbox, when enabled, means the Service Library properties cannot be changed. You must have “Modify” access permission to the Service Library object to set this feature. To clear the read-only attribute, uncheck the box.
This Property dialog begins with your selection of the desired API-type adapter. You can either select a Web Service adapter, a REST adapter or an API adapter. The default selection is REST Adapter (V2).
This section describes the Web Service Adapter.
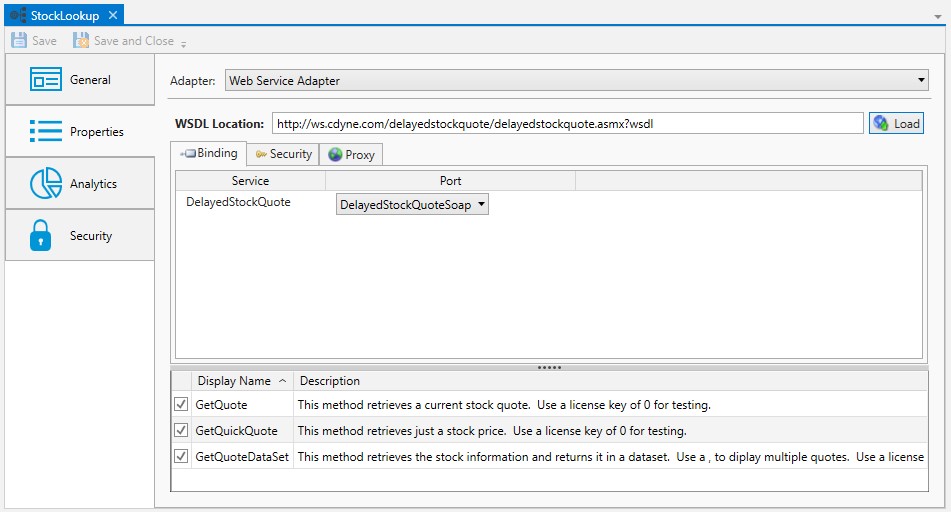
The Web Service that the Service Library object will define is described in a document known as a WSDL (pronounced “wiz-dil”). This document must be specified, either as a file or a URL location, in the property “WSDL Location”. When the specification is entered, the “Load” button is selected to process the WSDL document. If the service can be loaded you will see the service(s) that can be referenced, listed under the “Service” column, along with the type of transport listed under the “Port” column. Clicking on the “Refresh” button will then cause all the web service’s methods to be displayed (this may take a few moments depending on large the web service is). A checkbox is selected next to each method to denote whether the method may be used by an associated Plan or Job. De-selecting the method causes that method not to be made available to the Job Library.
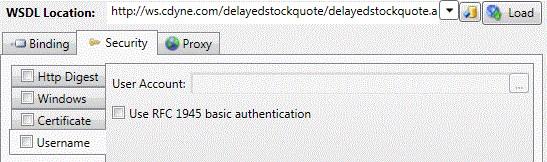
This section governs the security for accessing the web service. Four (4) selections may be made (none are mutually exclusive): Http-Digest, Windows, Certificate and Username. If no security options are specified, anonymous is used for both the loading of the WSDL as well as execution of the methods. If security options are specified, anonymous is used for loading the WSDL and the specified security credentials/access is used for method execution at runtime.
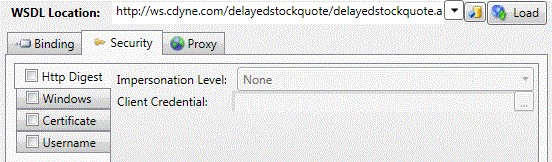
The figure above shows the properties for ‘Http Digest’. You may specify the Impersonation Level (None, Anonymous, Identification, Impersonation or Delegation) and Client Credential (a Username Account Object containing a Username and Password).
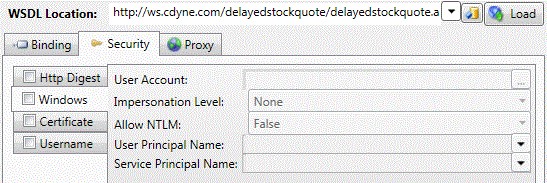
The figure above shows the properties for ‘Windows’. You may specify a User Account (for User Account object containing a Username and Password), Impersonation Level (None, Anonymous, Identification, Impersonation or Delegation), Allow NTLM (Boolean), User Principal Name and Service Principal Name.
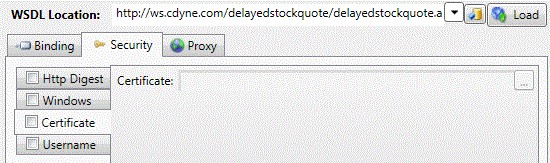
The figure above shows the properties for ‘Certificate’. The Certificate property is where you would specify a Username Account object that contains an acceptable x509 type certificate.
Note: If the WSDL requires authentication you must enter all applicable information prior to clicking on the Load button.
The figure shows the properties for ‘Username’. The single property ‘User Account’ represents a Username Account object containing a Username and Password.
This section governs proxy access that may be required when accessing the web service.
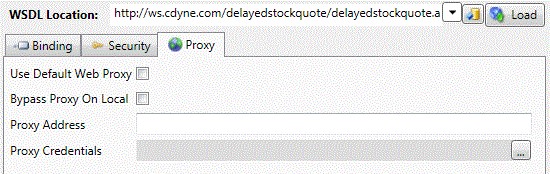
The ‘Use Default Web Proxy’, when enabled, indicates the proxy system to be used when none is specified. The ‘Bypass Proxy on Local’, when enabled, indicates that local IP addresses (relative to the Job Scheduler machine) should not use the proxy system. ‘Proxy Address’, when specified, indicates the IP address of the proxy machine to use. By default, proxy access is not otherwise enabled unless ‘Use Default…’ or ‘Proxy Address’ are specified.
This section describes the API Adapter option.

To select the API Adapter, use the dropdown for the Adapter property and select “API Adapter”. Now you’re ready to configure an API Adapter for your use by clicking on the “Configure” button.
The Adapter dropdown in the Configure dialog displays those API adapters that are presently supported on your system. The current list of adapters include: .NET Assembly methods, SQL Server Stored Procedures/Functions, Oracle Stored Procedures/Functions and Command-Line.
For API security settings: If no security settings are specified, the Job Scheduler Service Account is used to access the API specified when loading. The Job’s Execution User will be used to invoke the API methods at runtime. If security settings are specified, both the loading and execution of the API methods use the security settings specified. Note: The Execution User’s security credentials are not used or passed to the API.
Note: Using a Windows Network Service Account and/or denying or not granting file system access to the API files may result in “Access Denied” or other errors that have improper security as the root cause of the issue.
If successful, the Oracle Adapter Endpoint should appear in the list, like you see in the image below.

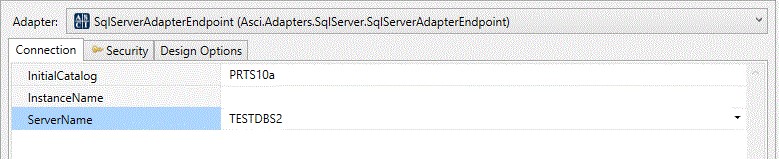
The API adapter in the figure below is “SQL Server”. This adapter supports connection to a database and then allows you to select one or more Stored Procedures and/or Functions for use as Job Steps within ActiveBatch. The figure belowindicates that we want to connect to ‘TESTDBS2’ and attach to the ‘PRTS8a’ database.
When we click the OK button we see the following:
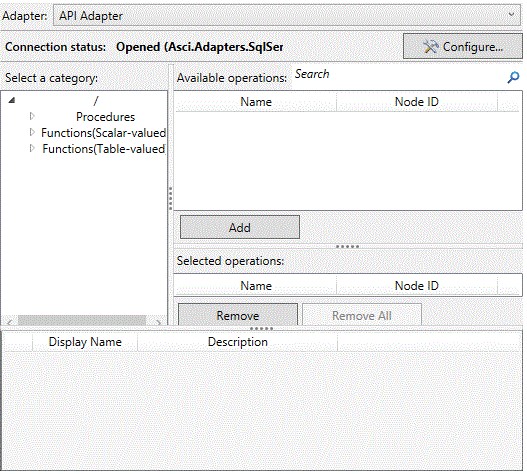
The dialog is divided into various parts. Beginning from left to right and top to bottom: ‘Select a category’ allows you to drill down into either Stored Procedures or Functions (Scalar or Table-based).
If you clicked on Procedures, the ‘Available Operations’ portion would list all the available Stored Procedures (or operations). To enable a procedure or function to become accessible as a Job step requires that you select the procedure/function (you can multi-select) and then click the ‘Add’ button. This will add the selected operations to the ‘Selected operations’ window as well as list the operations that are to become available as Job steps. For example:
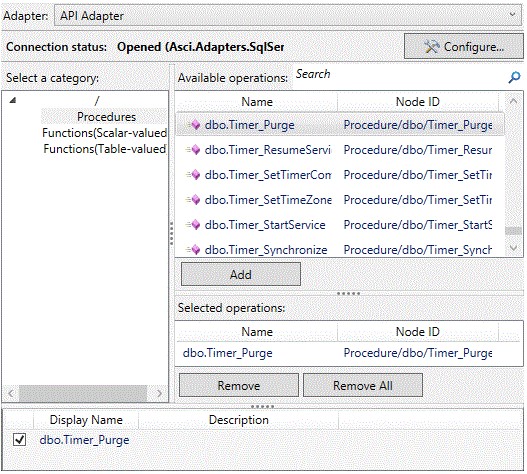
Note that ‘dbo.Timer_Purge’ has been selected and appears in both the Selected operations and the Job Steps windows. Clicking OK would save this Service Library and its Job steps for later use.
The .NET Assembly adapter is capable of extracting methods (and their properties) from a .NET Assembly for presentation as a series of Job steps.

The above figure shows the connection property for a .NET Assembly adapter. The assembly location is a Windows file specification that is expected to reside on the Job Scheduler’s machine. Since the assembly also needs to be present on the execution machine it may be a management issue in terms of replicating the assembly (and any of its dependencies over to the Job Scheduler machine). That is the purpose of the Design tab.

The Design Options tab allows you to reflect environment and/or other distinctions between the Job Scheduler machine where API Adapters ultimately reside and your system environment. For example, assume we had a set of .NET assemblies that only reside on certain execution machines. Normally the configuration of a .NET assembly is performed on the Job Scheduler machine. Using the “Queue” property we can indicate to ActiveBatch that we would like the interpretation and loading of the API adapter, during this design time (meaning when the Service Library object is created or modified), to be performed instead on a specific Execution Queue (and machine).
The Command Line adapter allows you to compose a series of Job steps that ultimately produce a command-line that is then executed through a command line shell. The purpose behind this functionality, besides its use with other Job steps, is that it allows you to use the constructs of a simple-to-use Job step to compose a command-line on the fly. Some command-line utilities provide very difficult to remember qualifiers and parameter combinations. With the Command Line Adapter you can easily create a Job step and have ActiveBatch compose the command-line for you. In the example below, the cURL command and its qualifiers are used to create a set of Job steps which can be used with other Job steps to create a uniform workflow.
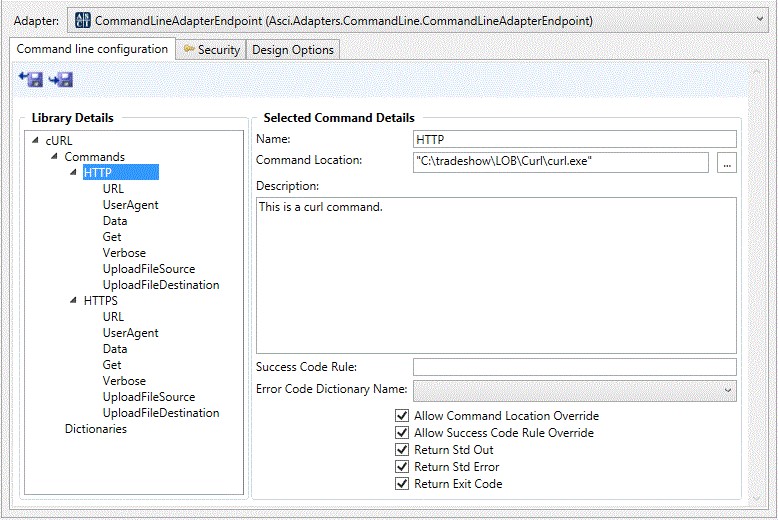
Looking at the “Library Details” you can see the tree level hierarchy which begins with the “category” of the Job steps above to be defined. For this example, the “category” is named “cURL”. The category name is used to classify the other Job steps above to be defined. The next level is “Commands”. To create a new command or Job step, right-click on the “Commands” verb and select “New Command”. The command which is currently highlighted happens to be named “HTTP” and is defined under the section named “Selected Command Details”. A command (or Job step) typically consists of arguments (parameters) and/or qualifiers. That said, you can define a command with no arguments.
Name: Name of the command and the name of the Job step.
Command Location: File specification representing the location of the command-line program. This specification must exist on the execution machine(s) you intend to run these Job steps on.
Description: Description of the Job step.
Success Code Rule: This property determines the success or failure of the Job step. Allowed values are: 0, range of numbers (n-n), series of numbers (x,y) and the keywords; ANY, ODD, EVEN, NTMSG, LZERO. Default is 0. Error Code Dictionary Name: This property allows you to map return code values to a string for more descriptive error reporting.
Allow Command Location Override: If enabled, this property will be created as part of the Job step and allow the author to specify a different location for the command-line executable.
Allow Success Code Rule Override: If enabled, this property will be created as part of the Job step and allow the author to specify a different success code rule. Return Std. Out/Std Error/Exit Code: If enabled (individually), one or more of these outputs will be returned as an output parameter(s) when the Job step exits.
Once a command is defined, the next definition are the argument(s) if any that are required for the command.
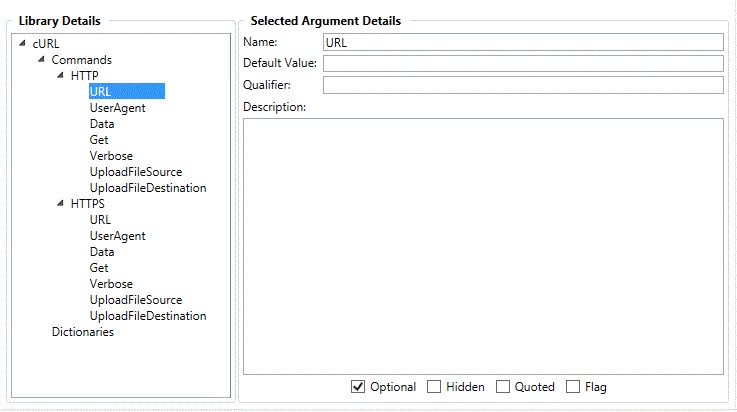
An argument can consist of a parameter, a qualifier or a qualifier with a value. For example, the argument URL is an optional positional parameter. Note that no qualifiers are provided.
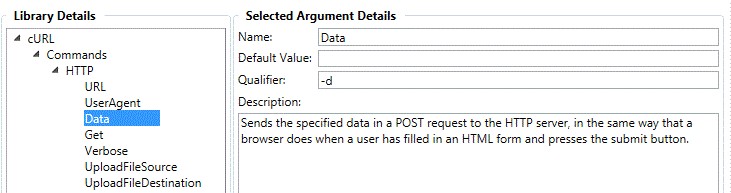
The argument Data is a qualifier. The “data” itself is passed after the qualifier. If an argument is to consist of only a qualifier, the checkbox “flag” must be enabled. You can specify a default value for the argument by specifying that value in the “Default Value” property. Each argument can also have zero or more attributes which are specified at the bottom.
Optional: If specified, the argument is optional and is not required.
Hidden: If specified, the argument is hidden when the Job step is shown.
Quoted: If specified, the argument value is enclosed in quotes when composing the command line.
Flag: If specified, only the “qualifier” portion is provided when composing the command line.

The above figure shows what the HTTP Job step will look like to the author. Note on the bottom left that the category cURL is defined and contains 2 commands: HTTP and HTTPS. For the HTTP command note the arguments specified.
This section describes the original REST Adapter.
Note: the REST Adapter documented here applies to the original REST Adapter, which is still fully supported. A newer adapter, named REST Adapter (V2) was released in ActiveBatch version 12 service pack 5. As a best practice, if you are creating a new REST adapter, please use REST Adapter V2.

To select REST Adapter, click on the dropdown and select “REST Adapter”. The REST Adapter Service Library allows you to create ActiveBatch Jobs Library steps using REST as the foundation. This unique approach, that’s also used by Web Services (WSDL), allows you to drastically reduce the complexity of REST itself in terms of usage. Your users will simply use the Job Steps and not have to worry about REST.
Since you’ll be creating those Job steps with REST you will need to be knowledgeable about REST and in particular about the usage of REST concerning the actual service you want to implement.
Elements of a REST Service
This section is meant to explain the elements of a REST service so it will be easier to explain the properties of a REST service as it applies to ActiveBatch. This is not meant to be an exhaustive discussion of REST.
REST which stands for Representative State Transfer is an architectural style of Web Service. REST is not a protocol (like, for example, SOAP). REST does not come with a WSDL. REST uses the standard HTTP verbs (or operations) and relies on a looser form of conventions and best practices.
The above figure shows some of the elements of REST. Every REST service has an endpoint (i.e. HTTP or HTTPS URL).
Every REST service requires an HTTP operation (i.e. GET, PUT, POST, etc). Since every HTTP request can also contain a Header, Body and Response, the REST service can make use of those areas as well. Whether a REST service does make use of any of those areas is entirely the province of the REST service author. This also applies to security credentials. A REST author can indicate security credentials be provided in clear text or some obscured or encrypted form. As every REST developer knows, when the time comes to using a REST service, documentation on the methods and use of the service are critically important.
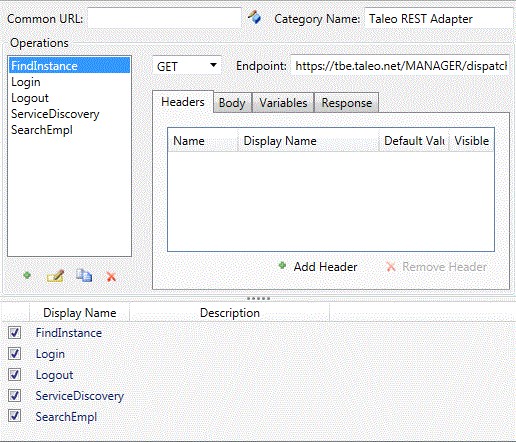
When you examine the above figure some aspects are clear REST and some are not. Let’s examine those first. Every REST service requires an endpoint. Depending on the author and use of the endpoints some aspects of an endpoint may be common. For example, if all of the endpoints for a given service begin with same URL prefix you can make things simpler and provide more flexibility by placing that portion of the endpoint URL in the “Common URL” property. So if the different endpoints are something like http://tbe.taleo.net/employee or http://tbe.taleo.net/division you can simplify by placing http://tbe.taleo.net/ in the Common URL property and then for each operation the Endpoint URL property would be “employee” or “division” as appropriate. This is because the Common URL is concatenated to the Endpoint URL to form a resultant endpoint.
The “Category Name” is purely for ActiveBatch and allows you to name the category of the Job Steps that appear in the Job Steps Editor.
Common URL and Category Name are common to all of the REST operations to be performed for this specific Service Library.
REST Variables
One area that will be new to those familiar with REST is the tab named “Variables”. These are special variables, specifically for REST that can be used to pass information from one REST Job step to another or to avoid hardcoding data. REST variables are not like any of the other ActiveBatch variables. The scope for a REST variable is limited to only the REST Job step.
Let’s look at a few REST examples of where you would specify a variable. These examples are based on Oracle’s Taleo Cloud Recruiting product and its REST API.
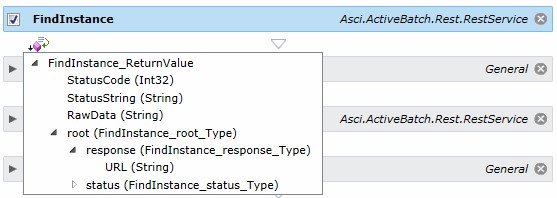
Suppose I invoke a REST service method named “FindInstance” which returns a URL that I’m supposed to use in a subsequent method named “ServiceDiscovery”; how would I set that up?
First, the “FindInstance” method would require the URL be defined in the Response Block of the method. That would look something like this, in XML:
<root>
<response>
<URL></URL>
</response>
<status>
<detail/>
<success>true</success>
</status>
</root>
So the URL is being passed back. For “ServiceDiscovery” to use that information requires a variable.
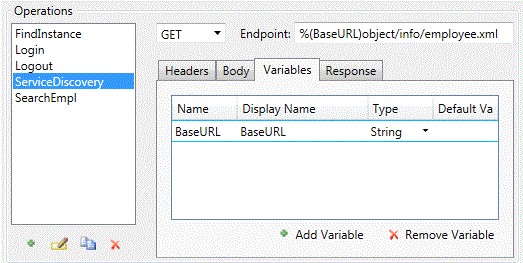
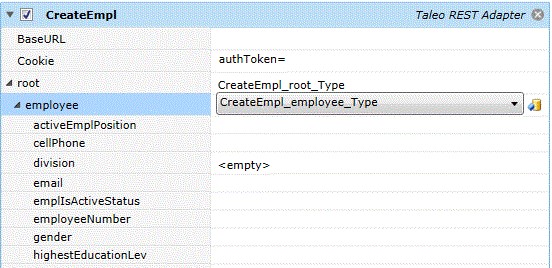
In the above example, we defined a variable named “BaseURL”. Note the “Endpoint” property. The variable “BaseURL” is substituted into the endpoint URL. REST variable substitution uses the following syntax: %(variable) (percent, left-paren, variable-name, right-paren). This syntax is different (and meant to be) from the other ActiveVariable syntax used within ActiveBatch. In this case, BaseURL is declared as a String variable.

The figure above shows what the ServiceDiscovery Job step looks like. We’ll discuss Cookie in a moment but notice that BaseURL is a property (variable) of the Job step. The URL passed back from FindInstance is used to populate this field.
REST variables can be one of three (3) types: String (default), Credential or Custom. Most of the time a REST variable will be String. Here’s an example of a Credential.
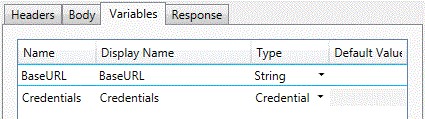
Credential means that the property will be populated with a Username Account object at run-time. This will allow you to retrieve the username and password properties of the object.
Note: You must set sensitivity in the selected Username Account object to “Low” for this assignment to work. High sensitivity objects will not allow the retrieval of their security credentials. We require Low sensitivity since it’s always possible for a REST service to require password information in the clear.
To access the username and password special syntax is used: %(var-name.username) and $(var-name.password).

REST variables can be declared in three (3) ways: Variables tab, Headers tab and Common variables. We’ve looked briefly at the Variables tab, let’s look at Headers.
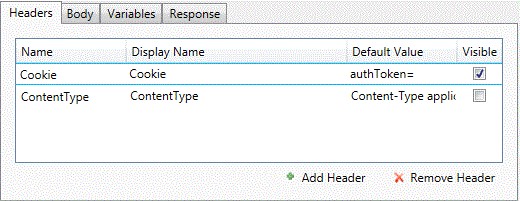
This particular REST service method requires that the authentication token be passed in the Header. The example above defines a Header variable named Cookie with a default value of “authToken=”. The default value is a reminder for the user to insert the authToken string into this variable. The last column is “Visible”. Many Header properties must be specified but do not need to be visible to the user. For example, Content-Type is a string indicating the format of the data (i.e. Content-Type application/xml). This string does not need to be shown or otherwise modified by the user so the Visible property is left unchecked.
The last method to declare a variable(s) is through Common.

Note the icon at the extreme right. If you click on this icon you can declare variables that will be present for all Jobsteps/methods serviced by this REST Service Library object.
REST Header
As discussed in the REST variables section, any required Header parameters must be specified in this section. As the contents for what properties need to be specified are solely based on what the specific REST operation requires, this section can contain one or more header variables; or none.
Remember that you can decide through the “Visible” property whether a user can see and modify the contents of a header variable or whether a read-only value needs to be set and then hidden from the user.
REST Body
The REST Body section is based purely on what the REST operation requires. There will usually be some level of documentation that indicates what type of Body is required.
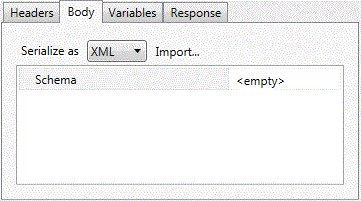
You can decide to serialize either XML or JSON. Rather than enter the metadata directly it is usually easier to import the XML or JSON and let ActiveBatch do the work. For example, click on the Import button and then copy and paste the required Body XML or JSON directly into the Import box.
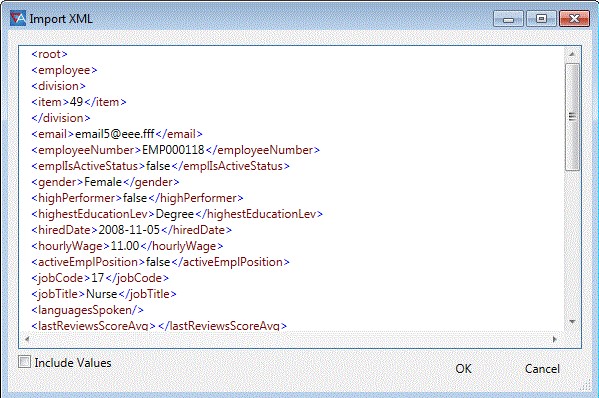
The data being imported has been copied from a PDF that describes the REST operation. Normally any sample values contained are ignored but you can check the “Include Values” checkbox to include those values (and then edit the import further by deciding to keep some and remove others).
Note: If you need to allow a collection of properties, simply include the specification twice. For example, if <employee> needed to be a collection, you would include the <employee> portion of the schema, twice.
Once you’re done you can click the OK button and allow ActiveBatch to serialize the data into the required format.
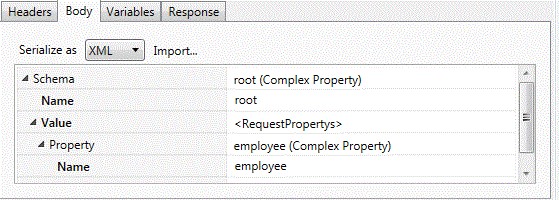
The above figure is an extract of what was imported previously. These properties will be presented as parameters to the Job Step when used. If you included any values for the properties they will be included as defaults.
The above figure is an extract of a Job Step that uses the CreateEmpl REST operation. If default values had been provided, those values would have appeared to the right of each property.
REST Response Block
The REST Response Block typically contains information that lets you determine if the operation was successful or not. Additional information that may be provided is purely up to the nature of the operation and what the method was written to provide via the Response. For example, a GET operation may retrieve information which is passed back via the Response block.
The REST Response Block is populated in the same manner as the REST Body. You can import the Response Block in either XML or JSON. Note that if the Response Block contains data which can form a collection that portion of the schema must be specified twice. That is how ActiveBatch determines that the response could form a collection.
The Response Block forms the basis for the ActiveBatch return value structure. In addition, ActiveBatch adds three (3) special variables to every REST Response Block used to pass information back: StatusCode, StatusString and RawData. The StatusCode and StatusString contain the status code and string which indicate how the HTTP operation itself fared. The RawData string contains the entire unfiltered Response block. This can be very useful when you’re not quite sure what is being passed back.
Custom REST Variable
One REST variable type that we haven’t discussed yet is the “Custom” data type. Custom data type is a bit of a misnomer. In this case, custom indicates that the string requires special processing. That processing is currently performed through the use of a PowerShell script (other script engines are expected to be supported in the future).

When you select “Custom” an “Edit…” button appears for the custom script editor.
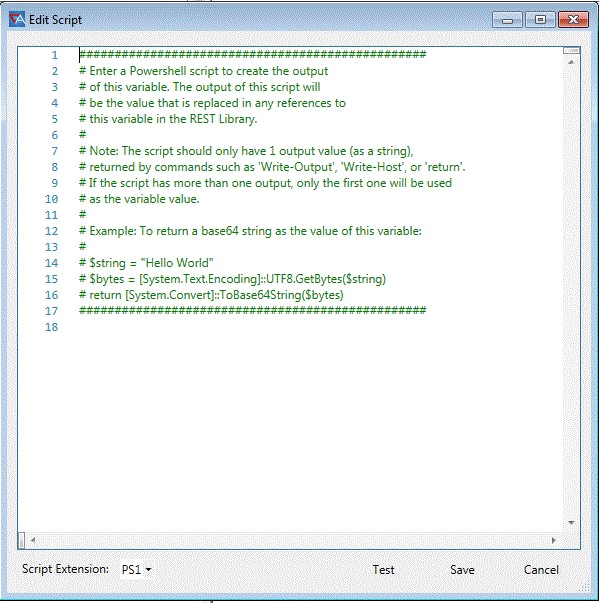
The instructions that are part of the standard script indicate how to return the proper information. From this script you can perform virtually any operation. The buttons at the bottom allow you to Test the script, Save the script or Cancel any editing of the script.
This section describes the Rest Adapter (V2).
REST Adapter (V2) was introduced in ActiveBatch V12 SP5. It includes new features and an enhanced user interface. It is building on the original REST Adapter that is still fully supported. Please use REST Adapter (V2) when creating new REST Adapters. The original adapter continues to have the same name - REST Adapter.
Many features that existed in the original REST Adapter have been enhanced in REST Adapter (V2). If you have used the original REST Adapter, you will detect the changes as you go through the documentation. The additions and enhancements are not highlighted or pointed out in the documentation for REST Adapter (V2), as the purpose is not to compare the two adapters. However, on this page, links are provided to the new features, not enhancements. Most notably, please review the new Login operation, how to configure it and how to use it. This built-in operation is used to configure REST authentication. Briefly, the Login operation, when configured, will be used to authenticate all the operations you create, automatically at runtime. This means that you do not need to set authentication on all your operations. While it is not necessary to configure the Login operation before you create your own operations, it is important to understand its purpose.
New Features in REST Adapter (V2)
Login Operation – REST Adapter Authentication Wizard
Custom Login Operation – Downstream Operation Properties
Test (Test your operations in the REST Adapter)
Params (Parameters)(A Grid to manage query parameters)
New Features in the User Account object (API Key/OAuth 2.0/AWS Credentials) as they apply to the REST Adapter (V2)
REST API Connection - OAuth 2.0, API Key and AWS Credentials - REST API Connection
REST Adapter (V2) – Overview
REST Adapter (V2) allows you to integrate with third-party REST API's. Operations are created using the REST Adapter. Each operation you create is a REST request. Every operation is converted, by the system, to a Jobs Library Job step. They are stored within their own category in the Jobs Library Steps Editor Toolbox.
All operations require an HTTP verb and an End Point (URL). All operations support the configuration of query parameters, headers, body and response. REST variables can be used to softcode Adapter properties, and provide a way for the Job author to enter values in the resultant Job step that are required in the REST request.
When the REST Adapter operations have been configured, the Service Library object should then be associated to a Jobs Library Job, a Plan or the Scheduler root. Service library categories and steps are always added at the bottom of the Jobs Library Toolbox. When you associate the Service Library object to a Plan, all the Jobs Library Jobs within the Plan will have access to the REST steps. When you associate the Service Library object to the Scheduler root, all the Jobs Library Jobs system-wide will have access to the REST steps.
The Service Library object association is located on the Job's Associations property sheet. For a Plan, the association is done on the Plan’s Service Libraries property sheet. As a quick way to associate the Service Library object, you can drag and drop it onto the target Plan or Job in the Object Navigation pane.
The REST Adapter author creating a Service Library object using REST Adapter (V2) should be familiar with REST in general, and any REST APIs they will be using. The Job author can use the resultant Job Steps without requiring knowledge of REST or the API itself.
REST Adapter UI Validation and Change Tracking
The REST Adapter (V2) user interface has a variety of real-time validation features designed to highlight any potential issues with your adapter configuration. There are also features designed to help you keep track of configuration and/or operations that you added and/or modified during the current edit session.
In the Operations pane, you will see:
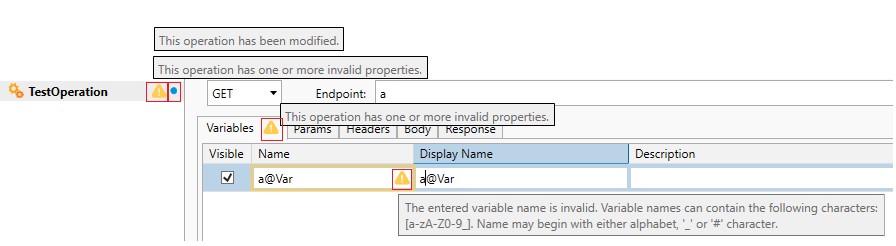
A blue dot to the right of the Category Name (top node) and/or Operation’s name when changes specific to the node have been made. If you mouse over the blue dot, a tooltip will appear stating the node has been modified. In addition to the blue dot, the node will also be bolded.
A yellow triangle exclamation icon to the right of the Category Name and/or Operation’s name if the node has invalid or missing information. If you mouse over the yellow icon, a tooltip will appear stating there are one or more invalid values.
If the field with a missing or invalid value is configured within a particular tab (Variables, Headers, Body, etc.), then the tab itself will also display the yellow triangle exclamation icon, with the same “invalid” tooltip message. The field with the missing or invalid value will have a yellow outline around it, and the yellow triangle exclamation icon will be present as well. If you mouse over the icon, the tooltip will describe the reason for the error.
See below the image where all the tooltips are displayed at once, to illustrate what you will see if an operation has an error (yellow triangle exclamation icon) or has been added/modified (blue dot icon). Validation errors must be resolved before saving the Service Library object. As you correct the issues, the yellow icon will automatically be removed. If you save the Service Library object and there are no errors, the blue dot/bolded text will be removed as well. If you attempt to save the Service Library when there are validation errors, a popup window will appear describing the error(s). They must be corrected before the object can be successfully saved.
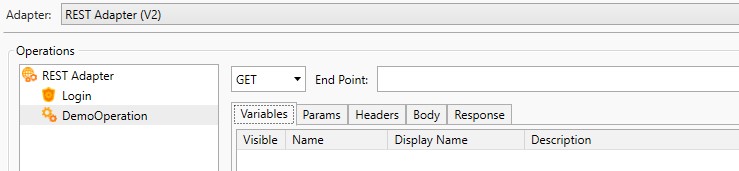
When creating a new Service Library object, the image below is what you will initially see when you click on the object’s Properties tab.
Adapter
This is the topmost property that identifies the selected Service Library adapter. When creating a new Service Library object, the default adapter is REST Adapter (V2).
Operations pane
The Operations pane is where the REST operations are stored. Each operation will be converted to a Job Step in the Jobs Library Steps Editor Toolbox. By default, you will see two built-in items in the Operations pane: REST Adapter and Login. They are always in this location, even if renamed. The user-defined operations are listed under Login, and they are sorted alphabetically.
REST Adapter is the top-level node in the Operations pane. This is the default Jobs Library category name that will be added to the Jobs Library Steps Editor’s Toolbox. The REST Adapter operations you add will be placed within this Jobs Library category. Under the Global Properties heading is a corresponding Category Name field. Notice the field name and the node in the Operations Pane have the same default name, “REST Adapter”. The Category Name can be changed, which is discussed under the Global Properties heading below.
Next, the built-in Login operation listed under the top-level REST Adapter node is used to login to the REST service, after Authentication has been configured using either the Built-in or Custom option. See Login Operation – REST Adapter Authentication Wizard
The four icons at the bottom of the Operations pane are used to manage the operations. From left to right, the icons are: Add, Rename, Duplicate and Delete.
When you select an existing operation in the Operations pane, you can rename, duplicate or delete it by clicking on the appropriate icon. You can do the same by right-clicking on the selected operation and choosing one of the same actions from the menu. Please note you cannot delete or duplicate the built-in REST Adapter category name and Login operation.
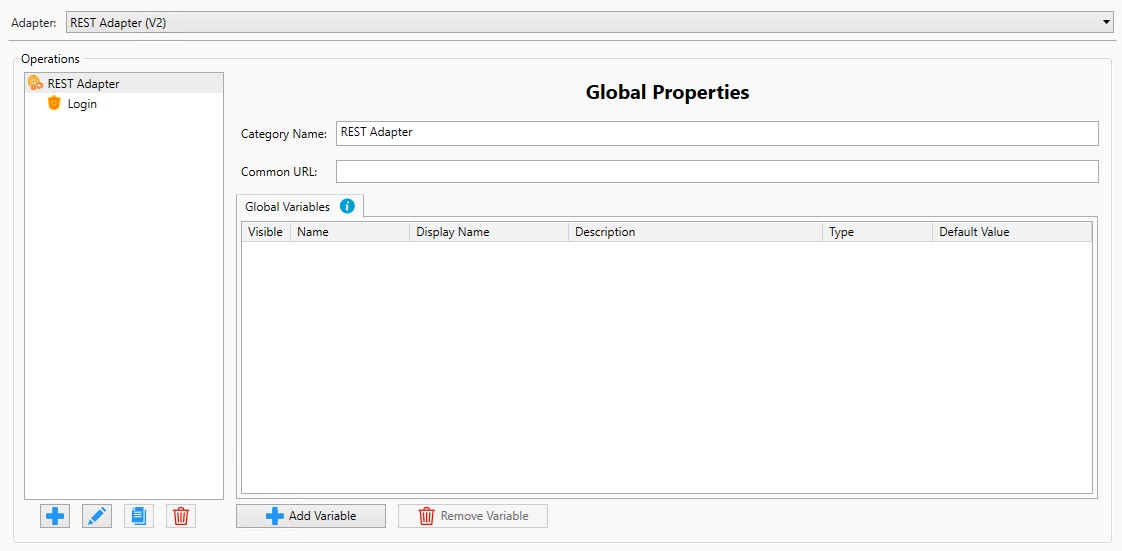
Global Properties:
When the category name node is selected in the Operations pane, you will see a Global Properties heading which consists of the Common URL, Category Name, and Global Variables grid.
Category Name
The Category Name is what will be added to the Jobs Library Steps Editor Toolbox. Only one category name per REST adapter is supported. The Category Name property length is limited to 499 characters. It must start with a letter or underscore and can only contain alphanumeric characters, underscores and spaces. To better identify your REST API’s purpose, you can rename the category name. There are few ways to do this.
Using the Category Name property - Edit the field and enter a category name. When the value is changed this way, the system will automatically synchronize the category name in the Operations pane.
Using the Operations pane - Select the REST Adapter category name node, then either:
A) Right-click on it, then select Rename Category from the menu.
B) Click on the Rename icon at the bottom of the Operations pane, which is second from the left, depicted with a pencil icon.
After performing either action described above, a Rename Category window will pop up, prompting you to enter a category name. Enter a name in the textbox, then click OK to save, or Cancel to discard. When the value is changed this way, the system will automatically synchronize the Category Name property.
Common URL
Every operation you create requires an endpoint (URL). Depending on the REST API author and their use of endpoints, some aspects of an endpoint may be common. For example, if the endpoints for a given service begin with the same URL prefix, you can provide more flexibility by placing that (base) portion of the endpoint in the optional Common URL property. The Common URL property will be prefixed, by default (this can be overridden), to each individual REST operation’s End Point property. See the Add Operation (HTTP Verb and EndPoint) section for more details about the End Point property, but for now, just know that each operation you create has an End Point property. You can leave the Common URL property blank if there is no Common URL for the REST API you are using. In that case, when a new operation is added, you must enter the complete endpoint in the operation’s End Point property.
It is a best practice to specify a Common URL if you have multiple operations in the adapter all accessing the same service but accessing different resources. The benefit of specifying a Common URL is if anything changes in the base portion of the endpoint, you only need to change it in the Common URL property. You will not need to update the individual operations, providing the resource identified in the operation’s End Point property has not changed.
As an example, assume there is a REST API that provides weather data. Here are two sample endpoints.
http://myweatherservice.com/weather/today/temp
http://myweatherservice.com/weather/news/storms
Both URL’s have http://myweatherservice.com/weather in common. This would be the Common URL property for the REST Adapter. The End Point property for one operation would be today/temp and the other would be news/storms. The system will prefix the Common URL property to the operation’s End Point property by default, which will create the complete endpoint.
Note: Do not add a forward slash at the end of the Common URL property, or at the beginning of the operation’s End Point property. The system will add it automatically when it combines the Common URL with the operation’s End Point property.
Global Variables
This feature is described in the Variables section.
Add Operation (HTTP Verb and EndPoint)
Operations are REST requests. As a reminder, every operation you create will be converted to a Jobs Library Job step.
To add a new operation, right click on the category name (top node in the Operations pane) and click on Add Operation, or click on the “+” icon at the bottom of the Operations pane. An Add Operation window will pop up, prompting you to enter a Name and Description.
Name: This property is the unique name of the operation (duplicates are not allowed). This will be the Job Step name. The Name must start with a letter or underscore, and it can consist of alphanumeric characters and underscores. The maximum length is 499 characters.
Description: This optional property is the description of the operation. If entered, it will be displayed as a tooltip when you hover over the Job Step in the Jobs Library.
Click OK to save the operation, or Cancel to discard. When saved, the operation’s name will appear in the Operations pane in alphabetical order. You can now begin to configure the operation’s properties.
HTTP Verb: Select or enter an HTTP verb from the dropdown list (the default verb is GET). The options in the list are GET, POST, PUT, UPDATE, DELETE and HEAD. If you need to use a different verb that is not listed, you can edit the property directly and manually enter the name.
End Point: The operation’s complete endpoint (URL). Variables are supported in this property.
Inherit: If enabled and checked, the operation’s End Point property will inherit (default behavior) the Common URL property, if configured. This means the Common URL will be prefixed to the operation’s End Point property. You will only have to enter the portion of the End Point that is not part of the Common URL.
Reminder: The Common URL property (which is global) is accessible by clicking on the REST Adapter’s category name, the top node in the Operations pane. If the Inherit property is enabled and checked, the End Point property will look like the image below:

The left text box is read-only, displaying the Common URL property. The right text box is what the user entered to complete the End Point property. The two textboxes combined form the complete endpoint.
The Common URL property should not be configured with an ending forward slash. This is discussed in the REST Adapter’s Properties Tab section. The remaining portion of the URL entered by the user should not start with a forward slash. The “/” you see in the UI, between the two End Point property text boxes, means the forward slash is added by the system.
In a different scenario, if the Inherit property is unchecked and disabled, this means the Common URL property has not been configured. When this is the case, the full endpoint must be entered in the operation’s End Point property. In the image below, the Common URL was not configured, therefore the Inherit property is unchecked and disabled.

Notice there is now only one textbox where the complete URL must be added.
As a final note, on a per operation basis, you can opt to not use the Common URL property if it is configured. To do this, uncheck the Inherit checkbox. This will remove the read-only Common URL textbox from the UI, and replace it with a single textbox, like what you see in the above image. The only difference is the Inherit checkbox is always configurable (you can check or uncheck it) when there is a Common URL configured. When it is not configured, the Inherit checkbox is unchecked and disabled, because there is nothing to inherit.
The REST Adapter supports the creation and use of variables that are available exclusively to support the adapter’s functionality. REST variables differ from regular ActiveBatch variables (constant and active) which are not supported in the REST Adapter. The REST variables are scoped within the adapter. They are primarily used to provide a way for the Job author to enter values in Job step properties that are used in the REST request. They can also be used by the REST Adapter author to soft code adapter properties.
Global and Local Variables
REST variables can be created globally or on a per operation basis (local). Global variables are available to all operations in the REST Adapter, and local variables can only be referenced within the properties of the operation where the variable has been created. If you create a variable on an operation with the same name as a global variable, the operation’s variable value will take precedence (override the global variable). Please note, in this scenario, the global/local variable Display Name property must be unique for variables with the same Name property, since the Display Name is the name of the property on the resultant Job Step (when visible).
Global Variable Access: To access Global variables, click on the REST Adapter’s category name, which is always the top node in the Operations pane. The Global Variables grid will appear under the Global Properties heading.
Local Variable Access: To access local variables for a given operation, click on the operation in the Operations pane. The Variables tab (the default) will display the Variables grid.
Properties that Support Variable Usage:
Variables can be referenced (used) in the following REST Adapter properties:
Common URL, End Point, Header Name/Value, Body fields (raw editors & Key/Value selectors), URL Parameters Key/Value, Response “File Download Path” (when using the File Download Response Type), and a “Custom” Login operation’s “Downstream Operations Properties” tab.
The Variables grid, where you add, edit or delete variables, as per the image below, is the same when creating a global or local variable. To add and remove variables, use the appropriate buttons at the bottom of the grid.

Variables are referenced by typing a percent sign, followed by a left parenthesis, then entering a variable name, then typing a right parenthesis. For example: %(VarName).
Note: REST variables are case-sensitive. When you reference a variable in the Adapter, it must match the case of the variable Name.
Variable Properties
Name: The name of the variable, which is what you will use when referencing the variable within the REST Adapter – e.g. %(VarName). Variable names can contain alphanumeric characters and _. The name may begin with a letter, '_' or character. The name must be unique in the location where it is being created (i.e. on a specific operation).
Display Name: The name of the variable you will see in the Job step, if the variable is visible.
Description: The optional description you will see in the Job step, when you hover over the variable’s Display Name in the Job step, when the variable is visible.
Variable Types (3)
String – This variable type is a simple string. The main use would be to allow user input in the Job Step for parts of the endpoint or fields of the request body. It can also be used to soft code properties in the REST Adapter.
Credential – This variable type allows the Job author to select an ActiveBatch User Account object to use as the value for this variable. It is a reusable way to provide credentials for the REST operation. The User Account object must be configured with a Credential Type of Username/Password, and a Sensitivity of Low. Both are User Account object properties, as depicted in the image below. The Job author will be able to select from a list of User Account objects that meets this criterion - other User Account objects will not be visible in the pick list.

The REST Adapter author can use the credential-type variable in any way that is needed for the REST API. To reference the username and password in the REST Adapter, the following syntax is used:
%(variable-name.username) and %(variable-name.password). These variables are built-in to the Credential Type variable, where the Name of your variable is prepended to the built-in username and password.
As an example, the ActiveBatch product includes an ActiveBatch REST API. There is a login endpoint that takes your credentials as a JSON object in the request body. Rather than hard-code the credentials in the body, a credential-type variable can be created as per the image below:

Next, below is the operation’s body using the JSON format. Note the use of the built-in username and password variables.
{
"JobScheduler": "%(JobSchedName)",
"username": "%(usercredential.username)",
"password": "%(usercredential.password)",
"validFor": "02:00:00"
}
The resultant Job step will include this credential variable as a property in the Job step. The Job author will select a User Account object from the pick list. The username and password variables referenced in the operations body will resolve to the credentials configured in the User Account object selected. See the image below, where the User Credential property is populated with a User Account object named “Train”, selected by the Job author.

3) Script – This variable type runs a PowerShell script to generate the variable’s value. It is run before the REST request is sent to the server. The script’s return value is the variable’s value. Only PowerShell is supported at this time. The script should only return a single string value. The script can reference other REST Adapter variables, such as string variables or credential variables.
To access the Script Editor from the Variables grid, select Script from the Type property’s dropdown list. You will see a pencil icon appear in the Default column. Click on it to launch the Script Editor. There are PowerShell comments in the Editor, offering tips on how the Script Editor works, and it also includes an example. Enter your script contents in the Script Editor. The ‘Test’ button allows you to test the script. This is a good way to ensure correct syntax and to see the potential output. Please note if other REST Adapter variables are used in the script, they will not resolve in the test run since they are provided at run time, not design time. After clicking on the Test button, a Results window will popup, displaying the output, or it could return an error message if the script did not run successfully.
Visible: This controls the visibility of a string variable in the resultant Job step. When Visible is checked, the variable will be visible as a Job step property, allowing the Job author to enter a value. A string-type variable is the only type where the REST author can set the Visible property. Please note one exception, if the string variable is Secured (hidden), it cannot be made visible. For Credential and Script variable types, the Visible property is set by the system and cannot be changed. A Credential-type variable is always visible as a property on the Job step. A Script-type variable is never visible as a property on the Job step.
Default Value: This applies to string-type variables only. Credential and Script variables do not support a default value. This property will populate the string variable with a default value. If the string variable is visible, the default value will be visible and pre-populated in the Job Step. Note: You cannot reference another variable in the default value property.
Secured: This applies to String-type variables only. This feature allows you to hide the Default Value property of the string variable. The lock icon to the far-right in the Variables grid controls whether the string variable is secured or not. By default, Secured is disabled, and the icon’s image depicts an unlocked lock.
If you click the lock icon, enabling Secured, the Default Value property is replaced with *****, and the variable is now secured. The lock icon image also changes to locked. If you click on the locked icon to disable Secured, the Default Value is no longer secure, and you will see the previously entered text. This is true providing you have not yet Saved and Closed the Service Library object. Once the object is Saved and Closed with a Secured variable configured, you will not see the Default Value property in clear text in the next edit session.
When a string variable is secured, the string’s Visible property is automatically unchecked and disabled, meaning the secured variable will not be visible as a property in the Job step (and therefore cannot be overridden by the Job author). Please note if you export a Service Library object with a secured variable, you have the option to remove the variable value, and upon import, re-enter the value. If you do not remove the variable value, the value is encrypted when exported.
Variables and ASCI-Sense
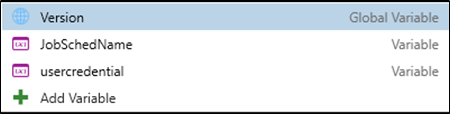
While working with the REST Adapter, if you type percent, then left parenthesis “%(“ in any property that supports REST variable usage, an ASCI-sense popup helper will appear with a drop down list of in-scope variables you can select from. To clarify in-scope, when working in the Global Properties section of the REST Adapter (when the top-most category name node is selected in the Operations pane), you will only see global variables in the ASCI-Sense popup helper’s list. When working with an individual operation, the popup helper will list global variables and local variables defined on the operation you are currently accessing. Global and local variables are depicted in the helper with different icons in the list, to assist in differentiating the type. You will also see the labels Global Variable and Variable (where Variable means local).
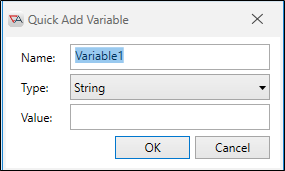
When you invoke the popup helper, you will also see an Add Variable option in the list. When selected, the system will add the variable locally if you are currently configuring an operation, or it will add it globally if you are currently in the Global Properties section of the REST Adapter interface. This feature will allow you to create a variable in the moment, without having leave where you are currently working. When Add Variable is selected, a Quick Add Variable window will popup, allowing you to configure the variable’s Name, Type and Value (if applicable).
The Quick Add Variable form is not the complete list of variable properties. At a later time, you will need to access the Variables grid if you wish to update any other properties.
The Params section provides a way to add, edit and remove the End Point property’s query parameters. This is especially useful if you have multiple query parameters and/or query parameters with long names or values.
You can also add, edit and remove the query parameters directly in the End Point property. No matter what option you choose, the parameters will be kept in sync, automatically by the system. That is, if you add, modify or delete a query parameter in the Params grid, the system will automatically make the change in the End Point property. If you add, modify or delete a query parameter in the End Point property, the system will automatically update the Params grid.
Params Grid
When you click on the Params tab, you will see a grid with two columns. Use the buttons at the bottom of the grid to add and remove parameters.
Params Properties
Key - The query parameter’s key name. Variables are supported.
Value - The value for the key. Variables are supported.
The End Point property is URL encoded automatically at runtime, so the information entered in the End Point property or in the grid’s Properties can include special characters, spaces, etc.
Query Parameters and Variables
Query parameters do not automatically appear as a property in the resultant Job Step. If you would like the Job author to be able to enter a query parameter value, you would need to create a REST variable that is a visible string, and reference it in the query parameter. Let’s look at an example.
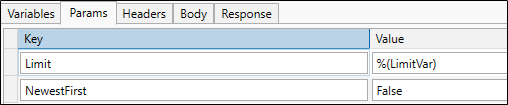
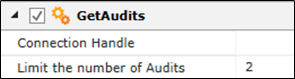
In the above image, the first parameter has a Key name of Limit, and a value that is a REST variable - %(LimitVar). This is a visible string variable, defined in the image below.

The query parameter portion of the End Point property looks like this:

Below is the resultant Job Step. The value for the query parameter named Limit is configurable by the Job author. Notice the Step’s property uses the variable’s user-friendly Display Name, “Limit the number of Audits”. The default value of 2 can be used or overridden by the Job author.
The value for the NewestFirst query parameter is not configurable by the Job author, as it is hard-coded with a value of “False”. If you use a variable as its value, you would see it as another property in the Job Step.
Headers
The Headers section provides a way to add, edit, and remove operation headers.
Headers Grid
When you click on the Headers tab, you will see a grid with two columns. Use the buttons below the grid to add and remove headers. Each row in the grid represents a header that will be added to the request.
Header Properties
Name: The required name of the header, manually entered or selected from a predefined list. The name must be unique in the operation where it is being configured. Variables are supported.
Value: The value of the header, manually entered or selected from a predefined list, where the list is only present if there are corresponding value(s) for the Name in the header property. Variables are supported.
Content-Type Header and Runtime Auto Generation
For operations that include a body, you will need to select the content type to configure the body (in the Body tab of the operation). For all body content types except RAW and None, the system will automatically generate a Content-Type header runtime that matches the content type configured in the Body tab. An auto generated header will not appear in the Headers grid, it will be generated at runtime. If you need to override the Content-Type header that is applied at runtime, you can do so by adding a Content-Type header as a Header property on the operation. It will override the auto generated value.
Headers and Variables
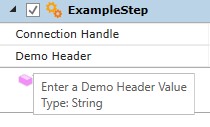
Headers support the use of variables in both the Name and Value property. By default, they are not visible in the resultant Job Step. Oftentimes headers are configured to remain as-is. However, there may be times when you would like the Job author to be able to configure a header value. To allow for this, create a visible variable and reference it in the Header’s Value property. Below is an example:
Observe the variable definition, its use in the Header’s value property, and its presence as a property on the Job Step.

Body
Body – General
The body of an operation is the data that is sent to the server in the request. The REST API you are using will determine if the operation needs a body. The operation’s Body tab is where you add, edit and remove body information. When you click on the Body tab of any operation, you will see a Content Type property. This is a dropdown list of the supported content types, which include: JSON, XML, URL Encoded, Binary, Form-data, Raw and None. All of the content types are discussed in this section, but first let’s go over some general body information.
Body and Auto-Generated Content-Type Header
For all body types except RAW and None, the system will automatically add a header named Content-Type (not visible in the UI) to the operation at runtime. The header’s value is based on the body’s Content Type configured. You can override the runtime Content-Type header by adding a Content-Type header manually in the operation’s Headers tab. If the automatic runtime header is used, an informational tooltip icon to the left of the body’s Content Type property will appear describing this. If there is no informational tooltip icon displayed, this means that you have created your own Content-Type header in the operation’s Headers tab. If you have created a Content-Type header, and it does not match the Content Type selected for the body, there will be a warning tooltip icon to the left of the Content Type property, indicating a mismatch.
Body Properties - Job Step Visibility
Body properties are not automatically converted to properties on the operation’s resultant Job Step. This is true for all supported Content Types. If you would like the Job Step author to be able to configure values in the body properties, you must create a visible variable and reference it in the appropriate location. An example of this is described under the JSON heading below.
Content Types
JSON:
When using JSON, a Content-Type header will be generated at runtime with a value of application/json (not visible in the UI and can be overridden by explicitly creating your own Content-Type header in the Header tab).
When JSON is selected, a script editor will appear. The script editor supports JSON validation and syntax highlighting. The JSON body can be manually entered, or more conveniently, copied from the REST API Documentation and pasted into the JSON editor. REST variables are supported in the script editor, therefore the ASCI-Sense popup helper will appear when the user types %(. None of the body information will be converted to configurable properties in the resultant Job Step unless you reference a visible REST variable.
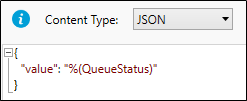
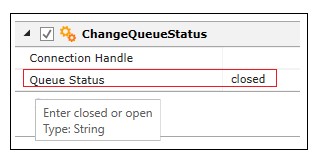
For example, ActiveBatch includes a REST API interface. There is an operation called Set Queue Status that allows you to set a specified Queue’s status (closed, open). This request requires a JSON body. The JSON body, when copied from the REST API documentation and pasted into the JSON script editor, looks like this when complete:

If the above body remains as-is, the operation’s resultant Job Step will not be configurable by the Job author, and when the Step is run, the Queue specified in the operation’s query parameter will be closed. If you want the Job author to be able to set the value to open or closed, create a visible string variable, then replace “closed” in the JSON script with the variable. Below is an image of the QueueStatus variable defined:

Below is an image of the QueueStatus variable referenced in the JSON script:
Below is an image of the resultant Job Step, where the Job author can change the default value from closed to open (the Default Value property defined in the string variable’s definition is optional). If the variable was not used, the Queue Status property would not be present on the Step.
XML:
When using XML, a Content-Type header will be generated at runtime with a value of application/xml (not visible in the UI and can be overridden).
When XML is selected, a script editor will appear. The script editor supports XML validation and syntax highlighting. The XML body can be manually entered, or more conveniently, copied from the REST API and pasted into the XML editor
REST variables are supported in the script editor, therefore the ASCI-Sense popup helper will appear when the user types %(. None of the body information will be converted to configurable properties in the resultant Job Step unless you use visible REST variables.
URL Encoded:
When using URL Encoded, a Content-Type Header will be generated at runtime with a value of application/x-www-formurlencoded (not visible in the UI and can be overridden).
When URL Encoded is selected, you will initially see an empty grid with 2 columns named Key and Value. Using this grid, you can add, edit and remove key-value pairs. All the necessary formatting and encoding of the strings is done automatically by the system.
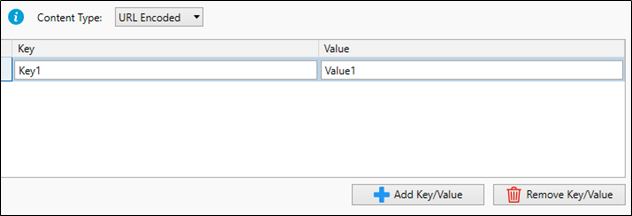
None of the body information will be converted to configurable properties in the resultant Job Step unless you use REST variables. If you would like the Job author to be able to configure value(s) in the Job Step, create a visible variable and reference it in the desired value column. Since REST variables are supported in the grid, the ASCI-Sense popup helper will appear when you type %( in the property.
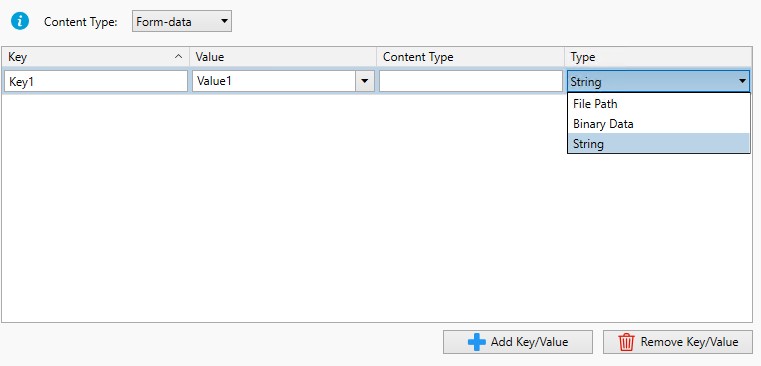
Form-data:
When using Form-data, a Content-Type Header will be generated at runtime with a value of multipart/form-data (not visible in the UI and can be overridden).
When Form-data is selected, you will initially see an empty grid with 4 columns, Key, Value, Content Type, and Type. The Type column is a dropdown list where your choices are String, File Path and Binary Data.
Type - String: The Value is a string.
Type - File Path: The Value is a path to a file. When File Path
is selected, the system will add the contents of the file to the operation at runtime.The file specified must be accessible to the Execution Agent where the Job will run.
Type - Binary Data: The Value is binary data. The system will take the content that is provided in the Value property and send it directly in the request’s body, without modification.
The Content Type column is an optional property that is used to specify the custom content type (media) for each item in a multipart-form upload. When empty, the Content Type is set automatically based on the Type selected.
Using the Form-data grid, you can add, edit and remove key-value pairs. Use the appropriate buttons at the bottom of the grid.
None of the body information will be converted to configurable properties in the resultant Job Step unless you use REST variables. If you would like the Job author to be able to configure value(s) in the operation’s resultant Job Step, create a visible variable and reference it in the desired value column. Since variable usage is supported, the ASCI-Sense popup helper will appear when the user types %(.
Binary:
When selected, this Content Type option Includes a Binary Type property dropdown list that consist of 2 options, Binary and File Path, as per the images below.


Binary Type - Binary: When selected, a Content-Type Header will be generated at runtime with a value of application/octet-stream (not visible in the UI and can be overridden).
There is a single textbox to configure when Binary is selected. Raw binary data can be entered, but in most cases a visible variable will be referenced in this property. This will allow the Job author to populate the Binary property using a Jobs Library context variable that references an upstream Job Step where the binary value was generated.
Binary Type - File Path: When selected, a Content-Type Header will be generated at runtime with a value that depends on the type of file extension specified in the File Path (not visible in the UI and can be overridden).
This property requires the path to a file that will be uploaded. The File Path cannot be blank. You can manually enter the file path or click on the Choose File button that allows you to select a file. The file must be accessible to the Execution Agent where the Job will run. If you would like the Job author to be able to configure the File Path property, you must create a visible variable and reference it in the File Path property.
Raw:
When selected, this Content Type does not add a content-type header at runtime. A plain text editor is provided for you to enter the script content. If you wish any values in the script to be configurable by the Job author in the resultant Job Step, reference a visible REST variable. Since variables are supported, the ASCI-Sense popup helper will appear when the user types %( in the editor.
None: The operation does not require a body.
The response is the data that is returned from an operation’s request. The Response types supported in the REST Adapter include JSON, XML and File Path.
b
First, every REST Job Step automatically returns the following information:
StatusCode - The return code of the HTTP operation (e.g. 200).
StatusString – The return string of the HTTP operation (e.g. OK).
RawData – The entire unfiltered Response body
Headers - The Response headers, returned as a collection.
The raw data is the operation’s response, normally in JSON or XML format. To retrieve specific fields using the raw data would require scripting, additional Job Steps, etc. to accomplish this. When you configure the Response properties using JSON or XML, the system will create a Response object that consists of the response’s fields. The Response will automatically be included in the resultant Job Step’s return value. This will allow the Job author to easily access the Response fields in downstream Job Steps, using Context variable syntax.
JSON and XML Response Types
To configure the response for either XML or JSON, click on the operation’s Response tab. The Response Type property is a dropdown list. Click on the down arrow and select XML or JSON. After doing so, an empty grid will appear that consists of 2 columns, Mapping and Display Name (more details on the grid to follow). Typically, the XML or JSON response is imported. The import feature will read a sample response you provide and construct a matching response object structure, retaining the properties and discarding any sample response values. After the import, the grid will automatically be updated, displaying the imported fields.
Importing the data can be accomplished in one of two ways:
Test Dialog Import Button: Run the operation using the Test button to the far right of the operation’s End Point property. See the Test section for more information about this feature. When the Test runs successfully, click on the Response tab in the Test Operation’s window, then click on the Import button, which is only enabled when the test runs successfully. After clicking on the Import button, a successful import message will be displayed, and the Response properties will be automatically updated in the grid. These are the properties that will be available in the resultant Job Step.
Operation Response Tab Import Button: Most REST APIs include sample responses in their documentation. Copy a sample response. Click on the Import button to the right of the Response Type property. An Edit Script window will popup. Paste the sample response into the editor, then click OK to save. The system will format the Response properties as you see it appear in the grid.
The Script Editor used during the import is either a JSON or XML formatter, depending on your Response Type. The editor supports syntax highlighting and validation. If any errors are detected when you save the script contents, an error message will appear at the very top of the window. You may still see the grid updated, but make sure to resolve all errors. If you import the data more than once, you will be prompted to confirm that the existing data will be overwritten. You can manually edit the JSON and XML script contents, after using the Import feature described here (not possible using option 1). If there are any properties you do not want to include in the Response (the Job author won’t need them), you can remove them using the script editor (they cannot be removed using the grid).
JSON and XML Grid Description
The imported response properties are displayed in the grid. Rows cannot be added or removed in the grid. Both the Mapping and Display Name columns display the same information. The Mapping column is read only and cannot be modified. It is the name of the property that is expected from the response. The Display Name is designed to optionally allow you to enter a more user-friendly name, if the response name is not how you would like it to appear in the return value of the resultant Job Step. It is the Display Name that is visible in the Job Step, and it is the Display name that is referenced in the Jobs Library as a Context variable. To edit the Display Name, click on the desired Display Name row and make your changes.
Note: If you update the Display name, and then reference the Display Name in a Jobs Library Job step in a Context variable, be careful if you ever re-import the response. It will overwrite what is currently in the grid, reverting the Display Name back to match the Mapping column. You would need to make sure the Display Name is updated in the grid to match what is already being used in existing Job Steps, or the Context variable will not resolve.
Notes about XML Response
When importing an XML response using method 1 or 2 previously described:
If the xml has namespace prefixes, the colon (:) will be removed from the imported property name and from the resulting variable. However, it will still be mapped properly when the response comes in with the colon.
Attributes from xml nodes are imported as properties with no special prefixes.
Example:
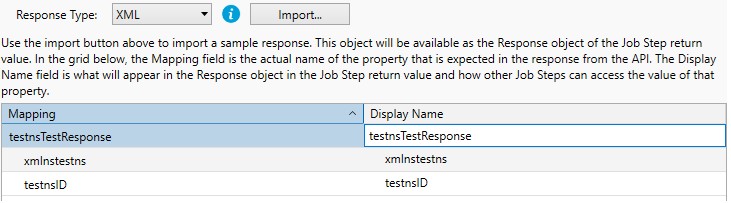
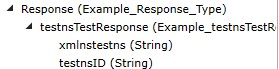
The sample XML below will result in the properties listed in the Response mapping window and in the generated context variables on the Job Step:
<testns:TestResponse xmlns:testns="http://testns.test.com/">
<testns:ID>12345</testns:ID>
</testns:TestResponse>
Property Structure:
testnsTestResponse
xmlnstestns
testnsID
The image below is a snippet from a Job Step’s Return Value where the REST Adapter operation name is “Example”.
Response Type: File Download
This option returns the response in a file. To configure File Download, click on the operation’s Response tab. The Response Type property is a dropdown list. Click on the down arrow and select File Download. What you will see is depicted in the image below.
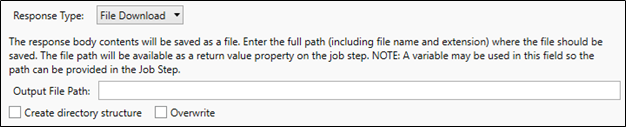
Output File Path: This is the full path of the output file, including the file name and extension. It is where the contents of the Response will be saved. If you use a visible REST variable in the Output File Path property, the Job author will be able to enter the path in the resultant Job Step. Since variables are supported in this field,ASCI-Sense will be available when the user types %( in the property.
Overwrite File Path: If checked, the file will be overwritten if it already exists. If this property is not checked and the file already exists, the Step will fail.
Create Folder Path: If checked, any missing folders in the path will be created when saving the file. If not checked, the Step will fail if the whole folder structure does not exist.
Note: A ‘FilePath’ property containing the file full path is added to the Response object for the resultant Job step.
Response Type: None
When none is selected, the resultant Job Step will not include a “Response” in its return value. The built-in return values will be included - headers, raw data, status code and status string.
Example:
Below is an example of an operation when the Response property is configured using JSON, and the resultant’s Job Step’s return value.
The Operation’s Response after an Import is on the left, and the Job Step’s return values are on the right.
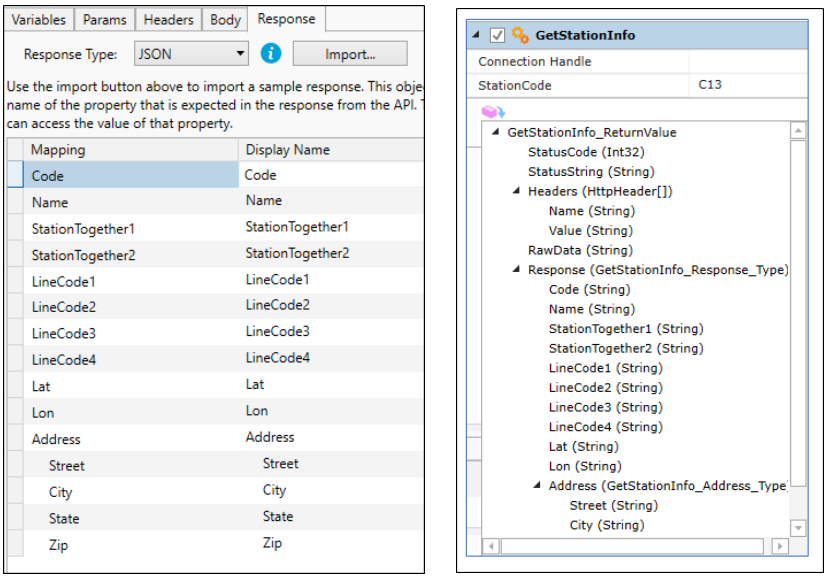
The Step’s StatusCode, StatusString, Headers and RawData are automatically returned for all requests, as this is a built-in feature. The Response structure in the image is present because the Response tab was configured. If it was not configured, the Response would not be part of the Job Step’s return values. Notice the Response’s field names under the Response heading. They can be accessed by downstream Job Steps, using Context variable syntax, as per the examples below.
%{GetStationInfo.ReturnValue.Response.LineCode1}
%{GetStationInfo.ReturnValue.Response.Address.City}
Rename, Duplicate and Remove Operations
This section describes how to rename, duplicate and remove an operation in the Operations pane.
Rename:
To rename an operation, select the operation in the Operations pane, then right click and select Rename. Alternatively, you could select the operation, then click on the remove icon second from the left at the bottom of the pane. The Name and the Description can be modified.
The Name is the operation’s name and the resultant Job Step’s name. If you rename the operation, it will create a new Step in the Jobs Library REST Category with the new Step name. The old one will no longer be present in the REST Category. Any Jobs using the old Step name will fail. You will need to remove the old Job Step from the Job and drag the renamed one to the workspace and configure it. In addition, if any downstream Steps referenced the upstream Step’s return value, they will need to be updated to reference the new name as well.
The Description is the tooltip that you see when you mouse over the Step name in the Job Steps Editor. Renaming the Description means the new Description will appear when you mouse over the Step name. This will not have any negative impact on an existing Job Step.
Duplicate:
To Duplicate an operation, select the operation in the Operations pane then right click and select Duplicate. Alternatively, you could select the operation, and then click on the duplicate icon third from the left at the bottom of the pane. Duplicating the operation will copy all the properties of the operation exactly as it is configured, including headers, variables, end point, etc. The name will include an “_copy” appended to the operation’s name. The new Step will appear in the Jobs Library Steps Editor the next time you edit a Job using the REST Adapter.
Remove:
To remove an operation, select the operation in the Operations pane then right click and select Remove. Alternatively, you could select the operation, and then click on the right-most Remove icon at the bottom of the pane. If you remove an operation that is already configured as a Step on a Job, you will need to remove it from the Job, or the Job will fail. Also, if any downstream steps referenced the removed Step’s return data, they will have to be modified as well.
The Test button allows you to test an individual operation configured in the REST Adapter. This means you do not need to create a Job, associate the Service Library to it, then configure the Job and run it, to test how your operation runs. You can do this using the REST Adapter’s Test feature.
Select an operation in the Operations pane that you wish to test. Click the Test button. A Test Operation window will load, which consists of 2 panes. The top pane is reserved for values that would normally be configured on the Job Step by the Job author. You can enter the values for the test run. The bottom pane displays the endpoint used in the operation. To the far right of the endpoint is an arrow that will fully expand the pane (initially it is collapsed). Click on this arrow to expand and collapse the bottom pane. When the pane is expanded, you will see Request and Response tabs. If you are testing a Custom Login step, you will also see a Generated Downstream Properties tab if the Downstream Operation Properties tab has been configured.
Please note that if a Login operation is configured with either Custom or Built-in, the Login operation will automatically run before the test, and its (authentication) properties will be applied to the Test operation.
Top Pane:
Login Operation Variables - In the Test Operation window, you will see a Login Operation Variables heading if there are properties you must configure for the Login operation to function properly. For example, a User Account object must be selected, or perhaps additional properties are required, which is a possibility when using a Custom Login operation. As a reminder, the Login operation sets the authentication for all other operations, which is why you must set any required Login properties.
Operation Variables - In the Test operation window, you will see your operation name, followed by an Operation Variables heading if there are visible variables on the operation you are testing. This includes visible string variables and credential variables. When a credential variable is configured, you must select a User Account object from a dropdown list. If there is a default value established for any of the string variables, it will be pre populated in the property, but it can be overwritten by entering a new value.
No Login or Operation Variables - If there are no Login operation properties to configure, and the operation you are testing has no visible variables configured, the window will simply state: “No Variables”
Run the Test
Click the Test button. The operation will be invoked.
Bottom Pane:
If the bottom pane has not been previously expanded, the system will expand it automatically after the test runs. A status message will appear to the right of the endpoint property, depending on how the call went.
Request tab: The Request tab displays all the latest information for the last test run, which includes the verb, endpoint, headers, body, string and credential variables. Secured variable values are masked (****), and the password of a credential variable is always hidden as well.
Response tab: The Response displays either the return response when the test is successful, or an error message if the test fails. When the test is successful, the Response is divided into two headings: Headers and Body. By default, the Response body is expanded, and the Response headers is collapsed, as per the image below.
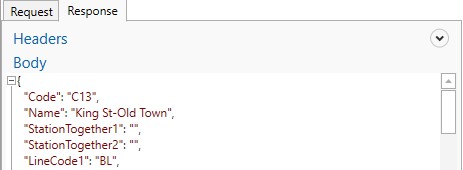
You can import the response’s body into the Response of the operation by clicking on the Import button. The import button is enabled when the last test returns a successful status. If you import the response, then click on the operation’s Response tab, you will see the properties in the Response grid that were populated based on the import.
Generated Downstream Properties tab: If you are testing a Custom Login operation, you will also see a Generated Downstream Properties tab in the bottom pane, providing this property has been configured on the Login operation. When it is configured, you will see the authentication that will be applied to Downstream Steps in this tab (e.g. a Header token named Authorization will be added to downstream Steps where the token value is <value>).
Below is an example of a Test, using an operation from the ActiveBatch REST API:
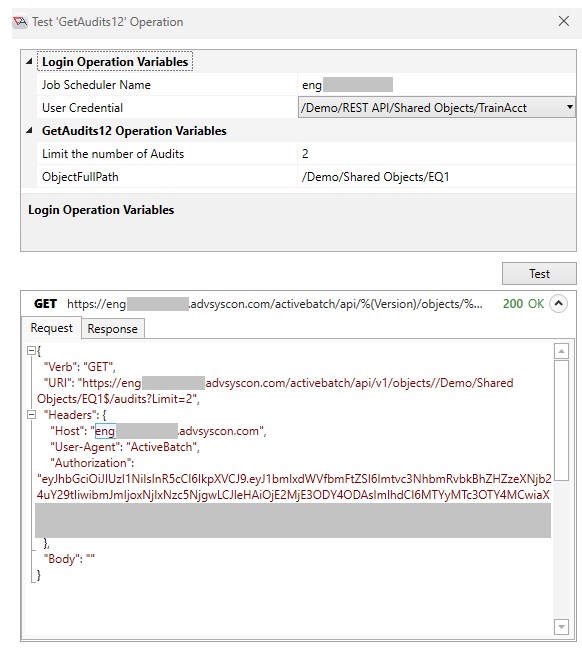
Test Response:
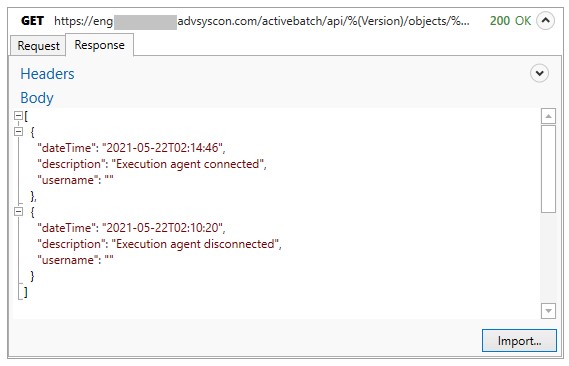
Login Operation – REST Adapter Authentication Wizard
Every REST Adapter (V2) has a built-in Login operation located in the Operations pane. It will always be the first operation in the list, under the category name (REST Adapter by default). You can rename the Login operation, but it cannot be duplicated or deleted. One Login operation is supported per REST Adapter.

The purpose of the Login operation is to configure the REST authentication that will be applied automatically, at runtime, to all the other operations created in the REST Adapter. This means the authentication only needs to be configured in one place – on the Login operation. This saves the REST Adapter author time, as they will not be required to manually configure authentication on every operation. The Login operation (like all operations) is converted to a Jobs Library Job step. Please section Login Job Step usage.
REST Adapter Authentication Wizard- Authentication Operation options
The REST Adapter Authentication Wizard is used to configure the Login authentication, as well as modify an existing configuration. The Wizard includes 3 Authentication Operations:
Use Built-in authentication operation
Set up a Custom login operation
No Authentication
After the Wizard’s initial Welcome page, you will be required to select one of the above options. Your REST API’s authentication requirements will determine which option to use. The next section describes these options at a high level. A step-by-step guide for each of the above Authentication Operations will follow. Whenever possible, use the Built-in Authentication Operation. If the REST API has authentication requirements that Built-in does not support, then check to see if the Custom option will work for you. Use No Authentication when Built-in or Custom does not meet your REST API’s authentication requirements (this means you will configure the authentication on all operations).
Built-In Authentication Operation – High level Overview
The following describes the Authentication Wizard’s Use Built-In authentication operation option. A step-by-step guide for configuring built-in authentication follows this section.
When Use Built-in authentication operation is selected, the Authentication Wizard will step you through one of its predefined flows that establishes authentication for all the other operations in the REST Adapter. This option requires the least amount of work to configure REST authentication. The Login operation does not perform a REST request. The Login operation is used by the system to automatically apply the configured authentication to all other operations at runtime.
The Use Built-in Authentication operation supports the authentication types listed below:
OAuth 2.0, Basic, API Key, AWS Signature, or NTLM.
When using Basic, the system constructs a standard Basic Auth header named Authorization, and the value is: ‘Basic <token>’, where the token is a base64 encoded string of ‘username:password’.
When using NTLM, the credentials (username and password) are set by the system on a field in the request.
When using OAuth 2.0 or the API Key, the access token or API Key is specified in the header or URL query parameter (configurable).
When using AWS Signature, the system constructs a header named Authorization, and its value will be the computed AWS Signature for that request.
Two Built-in examples:
Basic: The REST API requires you use Basic authentication for all your requests.
OAuth 2.0: The REST API requires an access token in the header of all your requests.
Custom Login Operation - An Introduction
Custom Authentication is used when the Login requirements are different from any of the Built-in flows. When Custom Login Authentication is configured, the Authentication Wizard will step you through setting up the authentication for the Login request only, not all the other operations. This is useful for scenarios where a Login endpoint has a different authentication type than all the other operations in the REST Adapter. The authentication for all the other operations can still be configured on the Login operation, but this is accomplished using properties of the Login operation, not the Authentication Wizard.
Unlike the Built-in option, the Custom Login operation does perform a REST request, because the REST API requires a Login operation to authenticate with the service. When the Authentication Wizard is finished configuring the authentication portion of the Login operation, you will still need to configure other Login properties required in the REST request, such as the verb, endpoint, etc. After configuring the Login properties, you will then need to configure the authentication for all the other operations using the Login operation’s “Downstream Operation Properties” tab.
The Set up a Custom login operation supports the authentication types listed below:
Basic, API Key, NTLM or None
When using Basic, the system constructs a standard Basic Auth header named Authorization, and the value is: ‘Basic <token>’, where the token is a base64 encoded string of ‘username:password’.
When using NTLM, the credentials (username and password) are set by the system on a field in the request.
When using API Key, the API Key is specified in the header or query parameter (configurable).
When using None, the Login authentication is not one of the above 3 types (see an example below).
Two Custom examples:
Basic: The REST API requires you use Basic authentication in a request where the response is a token that is specified in the header of all subsequent operations.
None: The REST API requires you enter a username and password in a request’s body where the response is a token that is used in the header of all subsequent operations.
No Authentication
This option should be used when the Built-in or Custom selections do not provide what you need for your REST API’s authentication requirements. The Login operation will not do anything. This means any necessary authorization headers or query parameters must be configured on each operation.
Note: When using No Authentication, a Login Job Step will still be present in Jobs Library, within the REST category, but there is no need to use it. If used, it is “harmless”, but it offers no value.
REST Adapter Authentication Wizard: Step-by-Step instructions for the “Use Built-in authentication operation”
To configure Built-in authentication, click on the Login operation in the Operations pane, then click on the Configure Authentication button located on the Authentication Properties tab. The REST Adapter Authentication Wizard will load and step you through the process.
Initially, you will see a welcome page that provides a high-level description of the Wizard’s purpose. You can disable the welcome page from appearing again by checking the Don’t show this page again checkbox. Click Next.
In the next window, you will see 3 authentication options to select from, as previously discussed in this document.
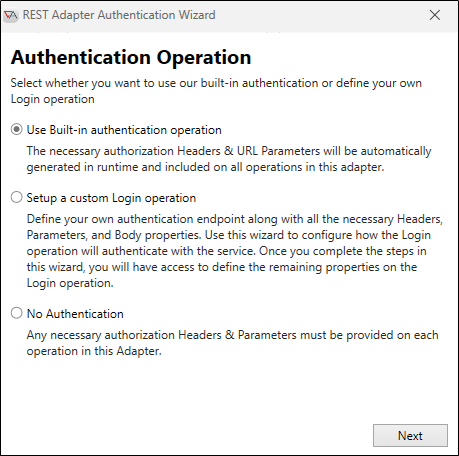
Select Use Built-in authentication operation, then click Next.

From the Authentication Type dropdown list, select the Authentication type used by your REST service, then click Next. The next Wizard window has textual differences based on the authentication type you select, but the information requested is the same. You will select one of two options. The options are described below (numbers 1 and 2). Images from the Wizard for each authentication type will follow.
All five authentication types have information in the ActiveBatch User Account object that the Login step requires. For Basic and NTLM, it is a username and password. For API Key, it is an API Key. For OAuth 2.0, it is an access token. For AWS Signature, it is an access key. For more information on OAuth 2.0, API Key and AWS Signature User Account credential types, see the REST API Connection section.
The Wizard requires you specify whether the User Account object is embedded (static) in the Adapter, or configurable on the Job Step by the Job author.
Embedded in the Adapter – This option requires you select or create an ActiveBatch User Account object that will be embedded in the Adapter.
If you select an existing account, only User Account objects that have properties configured that match the criteria in the list below will appear in the Wizard’s pick list (e.g. Basic requires a Username/Password type with low sensitivity). If you select an existing User Account, you can optionally view and/or edit its properties (if you have rights to do so) by clicking on the ellipsis to the right of the User Account selected.
To create a new User Account object, click on the New button. You will be prompted to select a container (JS Root, Folder or Plan) to place the new object in. After selecting the desired container, the property sheets of the User Account object will load. Configure the Account, making sure the Credential Type and Sensitivity properties are entered correctly as per the list below.
Configurable in the Login Job Step – This option allows the Job author to select a User Account object design time from a picklist on a Login Step’s property. For the account to be visible in the list, it must adhere to the User Account properties specified in the list below.
Authentication Type User Account Object Credential Type User Account Object Sensitivity Basic
Username/Password
Low
NTLM
Username/Password
Low
OAuth 2.0
REST API Connection - OAuth 2.0
Low
API Key
REST API Connection - API Key
Low
AWS Signature
REST API Connection - AWS Credentials
Low
Below are 5 images taken from the Wizard, for each Authentication type. The two options are the same as described above, but the text descriptions vary, and what to do next also varies.
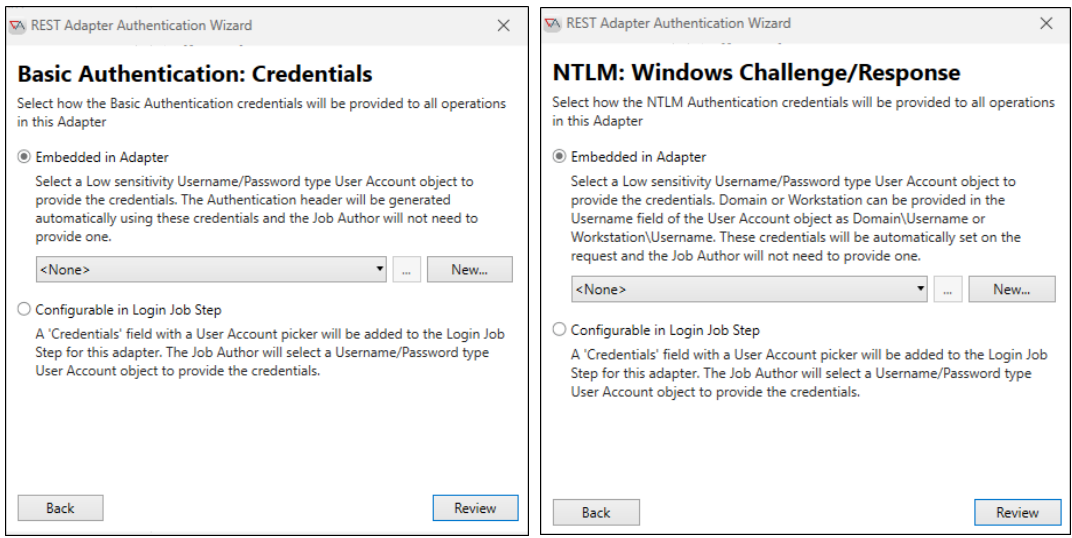
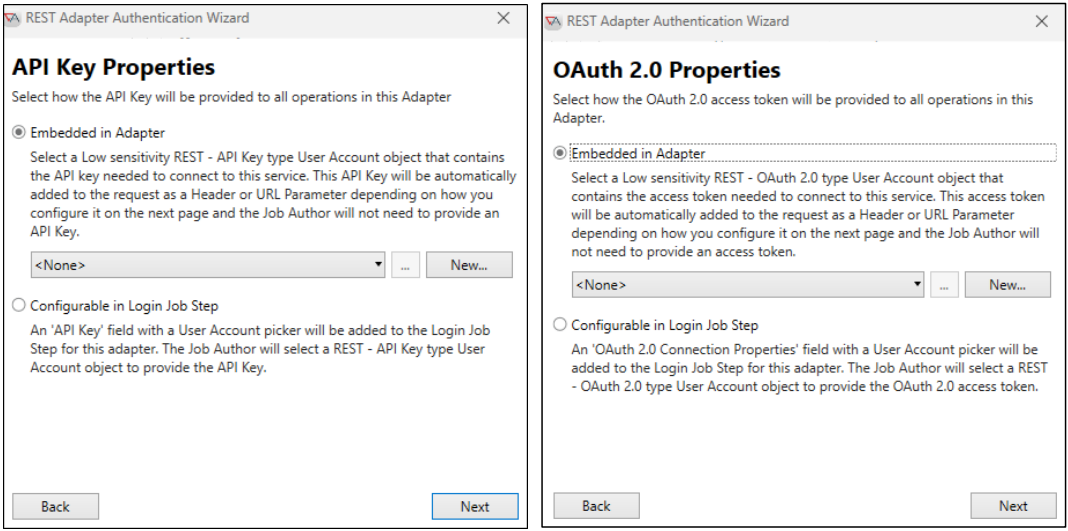
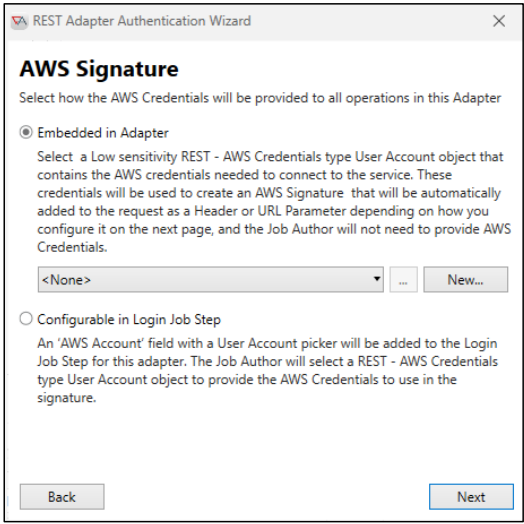
After the Embedded in the Adapter or Configurable in Login Job Step option is selected, the next Wizard button will vary depending on the authentication type you are using.
For Basic and NTLM, no additional information is required. Click the Review button. You will be presented with a Review window, allowing you to review the Properties and a Summary. Click the Back button to make any changes or click the Finish button to save the information and close the Authentication Wizard.
For OAuth 2.0, API Key, and AWS Signature, there is one more window of properties to configure. Click the Next button. Let's look at OAuth 2.0 and the API Key first, because for both of these authentication types, the two options presented in the Wizard window are the same, but there are some textual differences. The two options consist of selecting the location where the API Key or OAuth 2.0 access token will be placed in the REST request. The choices are Header or URL Parameter.
First, let’s describe the two options, numbered 1 and 2 below. Two Wizard images will follow, one for the API Key authentication type, the other for OAuth 2.0.
Header – This field requires you enter a header name. The Value Prefix field is optional. If entered, it will be appended before the API Key or OAuth 2.0 access token in the header value (e.g. Value Prefix = Bearer would yield a value of ‘Bearer <API Key>’ or ‘Bearer <Access Token>’).
URL Parameter – This field requires the name of the query parameter that will be added to the request’s URL
Below are 2 images taken from the Wizard, for each Authentication type. The two options are the same as described above, but the text descriptions vary.
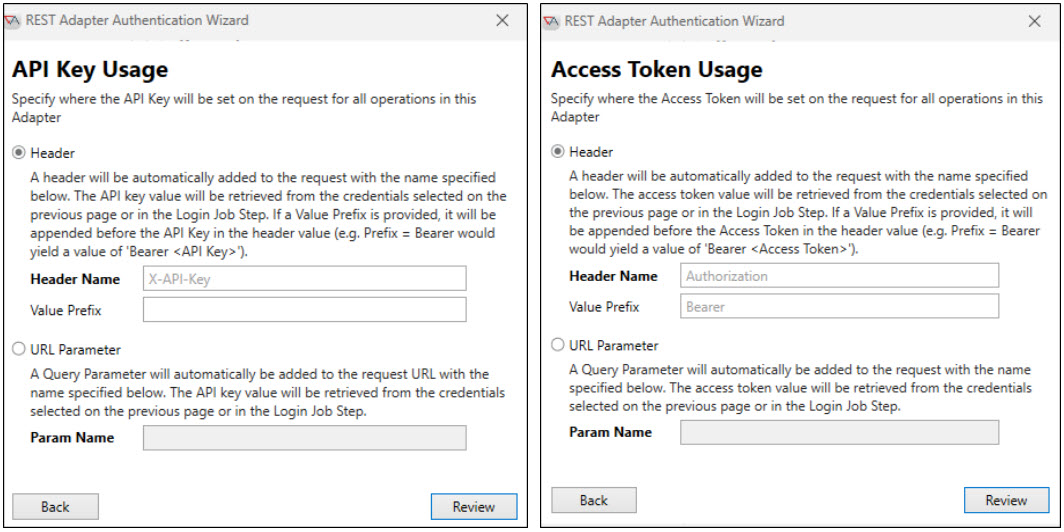
After the above is configured, click the Review button. You will be presented with a Review window, allowing you to review the Properties and a Summary. Click the Back button to make any changes or click the Finish button to save the information and close the Authentication Wizard.
Lastly, we will now describe what you will see next when AWS Signature has been selected. There are 2 properties in this Wizard window, Service Name and AWS Region.
Service Name - This is a required field that consists of the AWS Service you wish to access. If there is more than one service you wish to access, you will need to create additional Service Library objects.
AWS Region – This is the region name that the AWS Service resides in. If you enter an AWS Region and do not check the “Configurable in Login Job Step” checkbox, the region will be embedded in the adapter. This works well when there is only one region for the AWS service. The Job author will not have to configure it in each Job. Please note this is a required property if the “Configurable in Login Job Step” checkbox is not checked.
If you check the “Configurable in Login Job Step” checkbox, an AWS Region property will be present on the Job Step, which is configurable by the Job author. If you are using the same AWS service across multiple regions, setting the region to be configurable in the Login Job Step allows the same Service Library object to be used to access the different regions. A Job author could access one region per Job. Or, they could create one that Job accesses multiple regions, where two or more Login Steps are configured with the different regions. See section Login Job Step for more information about the Login Job Step and its return value named “Connection Handle”. Lastly, if the Configurable checkbox is checked and an AWS Region is entered (it is optional in this scenario), it will appear as the default region in the Job Step property (which the Job author could keep or override).
Note, in the image below the Service Name and AWS Region depicted in gray are “hints” and not actual values.
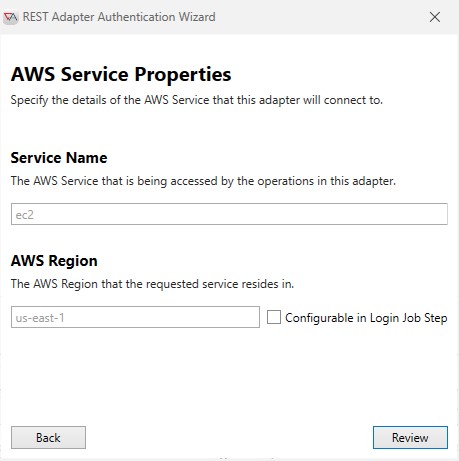
After the AWS Service Properties have been configured, click the Review button. You will be presented with a Review window, allowing you to review the Properties and a Summary. Click the Back button to make any changes or click the Finish button to save the information and close the Authentication Wizard.
Below is an example of what you will see upon exiting the Authentication Wizard. Notice the Authentication Properties tab, displaying the details and summary based on your selections (in this example, API Key was selected).
Anything automatically generated at runtime will not be visible properties when viewing any of the other operations. This is because they are generated at runtime. Any other required headers or query parameters can be added to the individual operations. In addition, if you create a header or query parameter on an individual operation with the same name as one used in the Login Step, the operation’s value takes precedence.
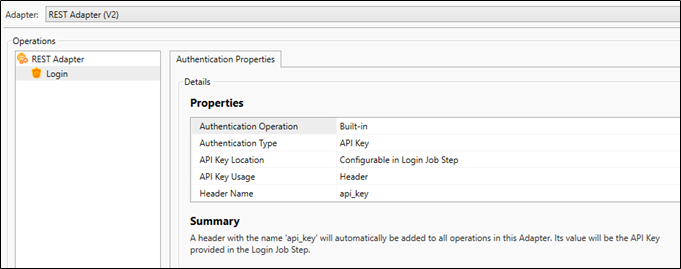
REST Adapter Authentication Wizard: Step-by-Step instructions for “Setup Custom login operation”
To configure Custom authentication, click on the Login operation in the Operations pane, then click on the Configure Authentication button located on the Authentication Properties tab. The REST Adapter Authentication Wizard will load and step you through the process.
Initially you will see a welcome page that provides a high-level description of the Wizard’s purpose. You can disable the welcome page from appearing again by checking the Don’t show this page again checkbox.
In the next Window, you will see 3 authentication options to select from, as previously discussed in this document.
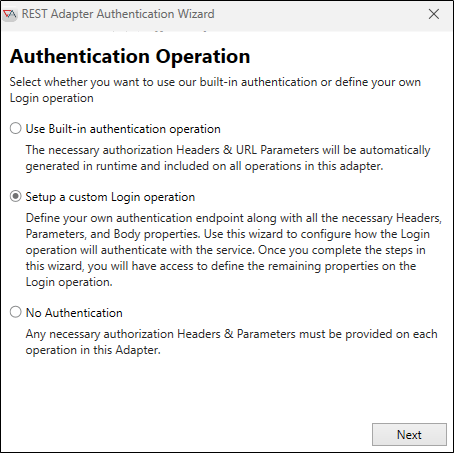
Select Setup a custom Login operation, then click Next.
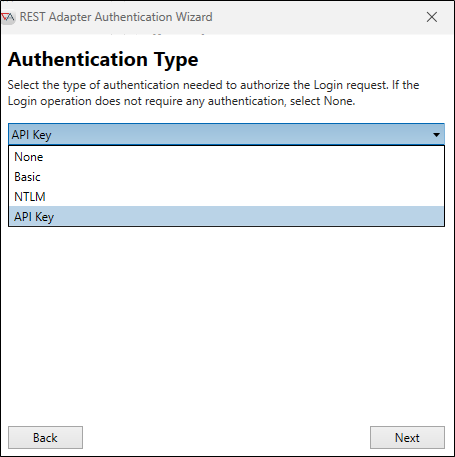
From the Authentication Type dropdown list, select the Authentication type used by your REST service (or None), then click Next. When None is selected, there is nothing else to configure in the Wizard, therefore the Wizard’s Review page will appear when Next is clicked. Click the Finish button to save the information and close the Authentication Wizard.
For the remaining 3 authentication types, the next Wizard window has textual differences based on the authentication type you select, but the information requested is the same. You will select one of two options. The options are described below (numbers 1 and 2). Images from the Wizard for each authentication type will follow.
Basic, NTLM, and API Key have information in the ActiveBatch User Account object that the Login step requires. For Basic and NTLM, it is a username and password. For API Key, it is an API Key. You must decide if the User Account object is embedded (static) in the Adapter, or configurable on the Job Step by the Job author. Note: For more information on the API Credential type in the User Account object, see the REST API Connection section.
Embedded in the Adapter – This option requires you select or create an ActiveBatch User Account object that will be embedded in the Adapter.
If you select an existing account, only User Account objects that have properties configured that match the criteria in the list below will appear in the Wizard’s pick list (e.g. Basic requires a Username/Password type with low sensitivity). If you select an existing User Account, you can optionally view and/or edit its properties (if you have rights to do so) by clicking on the ellipsis to the right of the User Account selected.
To create a new User Account object, click on the New button. You will be prompted to select a container (JS Root, Folder or Plan) to place the new object in. After selecting the desired container, the property sheets of the User Account object will load. Configure the Account, making sure the Credential Type and Sensitivity properties are entered correctly as per the list below.
Configurable in the Login Job Step – This option allows the Job author to select a User Account object design time from a picklist on a Login Step’s property. For the account to be visible in the list, it must adhere to the User Account properties specified in the list below.
Authentication Type User Account Object Credential Type User Account Object Sensitivity Basic
Username/Password
Low
NTLM
Username/Password
Low
API Key
REST API Connection - API Key
Low
Below are 3 images taken from the Wizard, for each Authentication type. The two options are the same as described above, but the text descriptions vary, and what to do next also varies.
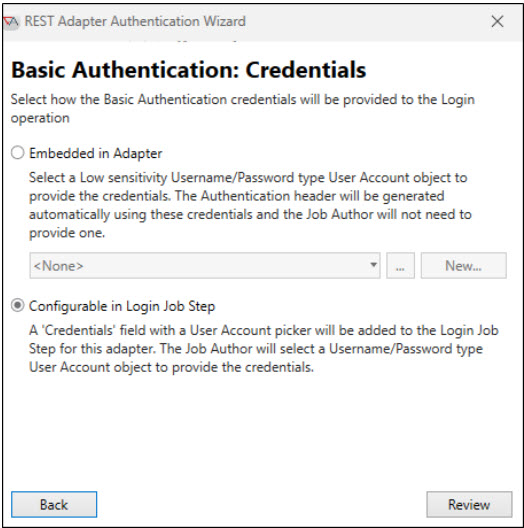
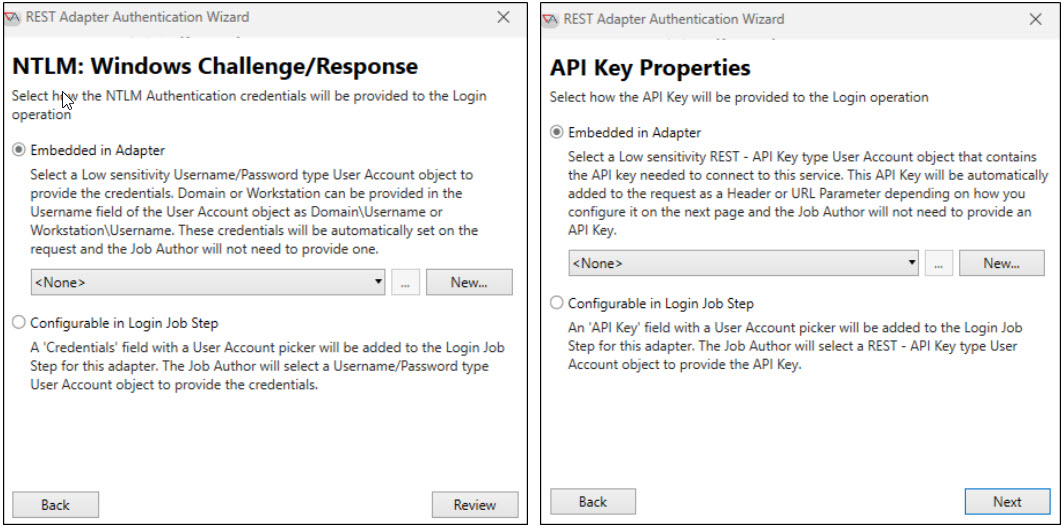
After the Embedded in the Adapter or Configurable in Login Job Step option is selected, the next Wizard button will vary depending on the authentication type you are using.
For Basic and NTLM, no additional information is required. Click the Review button. You will be presented with a Review window, allowing you to review the Properties and a Summary. Click the Back button to make any changes or click the Finish button to save the information and close the Authentication Wizard.
For the API Key authentication type, there is one more window of properties to configure. Click the Next button.
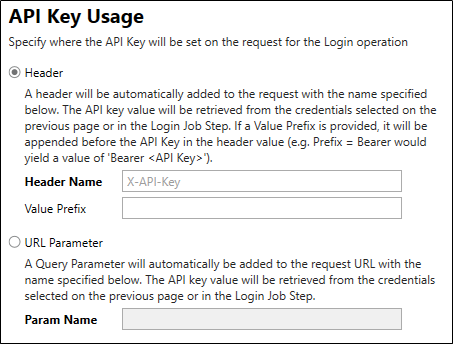
You must select the location where the API Key will be configured for the Login operation. The choices are Header or URL Parameter.
Header – This field requires you enter a header name. The Value Prefix field is optional. If entered, it will be appended before the API Key in the header value (e.g. Value Prefix = Bearer would yield a value of ‘Bearer <API Key>’)
URL Parameter – This field requires the name of the query parameter that will be added to the Login request’s
URL
After the above is configured, click the Review button. You will be presented with a Review window, allowing you to review the Properties and a Summary. Click the Back button to make any changes or click the Finish button to save the information and close the Authentication Wizard.
Below is an example of what you will see upon exiting the Authentication Wizard. Notice the Authentication Properties tab, displaying the details and summary based on your selections.
As a reminder, only the authentication has been configured for the Login request. Other properties such as the HTTP Verb, End Point and Response must be set. Automatic properties constructed runtime are not visible on the Login operation in the UI. For example, when Basic is selected, the Authorization Header will be constructed automatically, at runtime. You will not see an Authorization Header configured on the Login operation’s Headers tab. Your custom Login step may require other query parameters and/or headers, which is why the tabs are available for this operation. Read the Authentication Operation Summary information which clearly describes what the system will automatically be constructing. On a final note, you also need to configure authentication for all the other operations using “Downstream Operation Properties”. This is discussed in section Custom Login Operation – Downstream Operation Properties
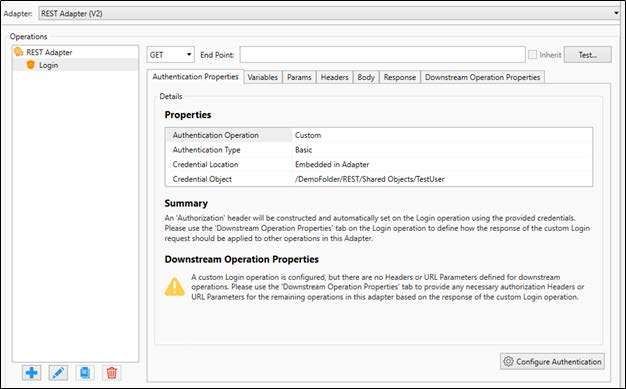
Please note, you can import the Login operation’s Response by testing the Login operation. This will invoke the REST request. After configuring the Login operation’s verb, endpoint, etc., click the Test button. When the Login operation tests successfully, the Response is returned in the Test Operation’s window. It can be imported into the Login’s Response property by clicking on the Import button in the Test operation’s Response tab. See the Test section for more information about this feature.
Custom Login Operation – Downstream Operation Properties
If you configured the Login operation using the Authentication Wizard’s “Set up a Custom login operation” option, authentication was configured for the Login operation only. You can configure the authentication for all the other operations using the Downstream Operation Properties, a tab you will only see when a Custom Login is configured.
The properties set in the Downstream Operation Properties will automatically be applied to all the other REST Adapter operations at runtime. This will be a time saver, as authentication will not have to be set up on every operation. The Downstream Operation Properties provides a way for you to access the response from the Custom Login operation and use it to authenticate all other operations. The Login request returns a response (e.g. a token) that will be used to configure a header or a query parameter to authenticate all other operations. The headers and query parameters are applied automatically to all other operations at runtime. Any authentication properties automatically applied at runtime do not appear in the other operations Headers and/or Query parameter properties since they are generated at runtime. If you would like to override a header or query parameter on any individual operation, you can do so by explicitly adding a header or query parameter with the same name on the operation itself. This will take precedence over the automatic configuration established on the Downstream Operation Properties.
Downstream Operation Properties Grid
Click on Login operation in the Operations pane, then click on the Downstream Operation Properties tab to access the grid where the properties are configured. As you can see in the image below, the grid has 4 columns.
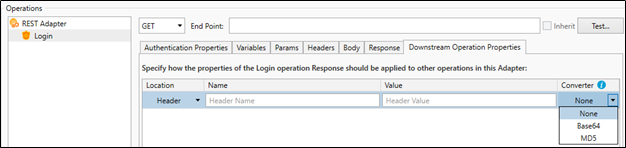
You can add one or more headers or query parameters, which is designed to offer the most flexibility when configuring what is required to authenticate all other operations. This will depend on the requirements of the service you are connecting to.
Location - This required property is a dropdown list with two options, Header or Param (query parameter). It identifies where the property will be set on all the other operations.
Name - This required property is the name of the header or parameter. When header is selected as the Location, the name can be manually entered or selected from a predefined common list of header names. If adding multiple headers or multiple parameters, the Name property must be unique within each Location. Variables are supported.
Value – This is the value assigned to the header or parameter. When Header is selected as the Location, the value can be selected from a predefined list, where the list will only be present if there are corresponding value(s) for the Name in the header property. Variables are supported.
Converter - This property allows you to optionally apply a converter to the resolved Value property before applying its value to downstream operations. Options include Base64, MD5, and None.
Add and Remove a Property
Use the buttons at the bottom of the grid to add and remove properties.
The Value property for a header or parameter can be populated from the Login request’s response. If you type “%(“ in the Value property, the ASCI-Sense popup helper will appear, with a list of variables including a special one named Response. The Login operation’s Response tab must be configured with the response schema for the ASCI-Sense popup helper to provide a response suggestion. Please note for the Login operation only, a Response type of “File Download” is not supported. Configuring Response properties can be found in the Response section.
Enable Cookies -When the Enable Cookies checkbox is checked, any cookies that are returned in the Set-Cookie header of the Login Response will automatically be set on all subsequent requests made to other operations in this adapter.
Let’s look at an example configuring Downstream Operation Properties.
ActiveBatch has a REST API interface. Using the Custom Login authentication operation works best for this API. The ActiveBatch REST API includes a login endpoint operation. The endpoint takes credentials as a JSON object in the request body, then returns a ‘token’ field in the response to be used on all downstream operations.
Continuing with this example, below is an image where the JSON Response is configured for the Login operation. A token is returned.
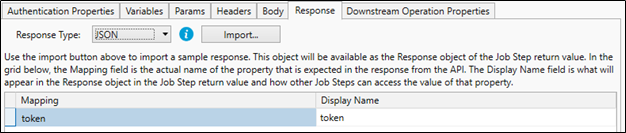
The next image depicts the Downstream Operation’s Properties grid, where the Value property is being populated. When typing, %( in this property, the ASCI-Sense popup helper will include “Response” in the list because the Response property in the above Response tab was configured.
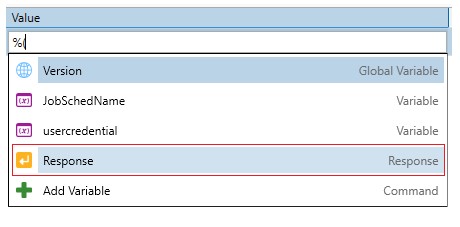
After selecting Response from the popup helper, then typing a period, “token” appears.
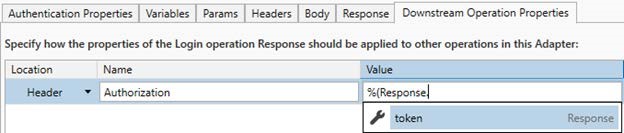
The token is selected, and the user types a closing parenthesis.

In this example, this is the only row that needs to be added to the Downstream Operation Properties Grid. When clicking on the Login operation in the Operation pane, the “Authentication Properties” will be updated, as per the image below.
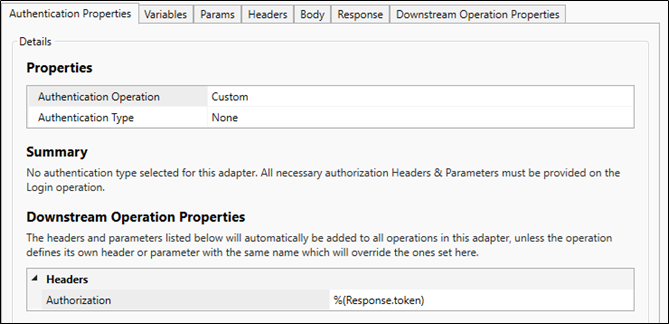
The REST Adapter’s Login operation is configured using the REST Adapter Authentication Wizard. The Wizard’s options include Built-in, Custom, or No Authentication. Please see Login Operation – REST Adapter Authentication Wizard section that describes the Authentication Wizard in detail.
This section discusses the Login Step. The REST Adapter’s Login operation is converted to a Login Step that is used by a Job author when creating a REST workflow. The Login Step is always present under the Jobs Library REST Adapter’s category name, even when No Authentication is selected using the Authentication Wizard. There are differences in the behavior of the Login Step, depending on which Wizard option was used. In this section, the behavior of the Login Step is discussed, based on how it was configured.
Login Job Step – Configured using Built-in Authentication Operation
The Login Job Step must be the first Step used when creating a REST workflow. A REST Adapter Login operation created using Built-in authentication does not invoke a REST call. It is designed to establish authentication for all the other Steps. When you drag and drop the Login Step to the Jobs Library Steps Editor workspace, you may see a property that requires the selection of a User Account object from a picklist. This was an option when configuring the Login operation using the Authentication Wizard.
In the example below, the API Key is configurable and therefore a User Account object (configured with the API Key) must be selected from the User Account picklist. If the User Account object was embedded in the Login operation, the resultant Login Step would have no properties to configure. Next, you may see an AWS Region property on the Login Job Step. This is true when the Wizard’s Built-in AWS Signature authentication type was selected and the AWS Region field was checked as configurable.
When you click on the Login Step’s return value icon, you will see StatusCode, StatusString and ConnectionHandle, as per the image below.

Because the Login Step is not executing a REST request, when the Job runs, the Login’s StatusCode will always be 0, and the StatusString will be blank. This is because the code and string are the return codes and messages of an HTTP operation, which does not take place using the Built-in authentication Login Step. The Login Step will return a valid ConnectionHandle. The connection handle is applicable to a Custom Login as well, and its purpose is discussed later in this section.
If the Login Step experiences a problem (e.g. the API key is invalid), the Login operation itself will not fail, but rather, the first downstream REST Step will fail, causing the Job to fail. The Login Step will fail when the Step itself has not been configured properly. For example, the required User Account object has been left blank in the Job Step property.
Login Job Step – Configured using Custom Authentication
The Login Job Step must be the first Step used when creating a REST workflow, since authentication for all the other REST Steps is constructed at runtime using the Login Step. A Custom Login Step does execute a REST request.
When you drag and drop the Login Step to the Jobs Library Steps Editor workspace, you may see a property that requires the selection of a User Account object from a picklist. This was an option when configuring the Login operation using the Authentication Wizard, when the authentication type is Basic, NTLM, and API Key, but does not apply to None. In the Login Step example below, “None” was the Custom authentication type selected using the Authentication Wizard.
The User Credential property in the image is present on the Job Step not because of Wizard configuration, but rather because the REST author can configure various properties of the Login operation so that they appear as Job Step properties. This example is using the ActiveBatch REST API. The API has a login URL that requires a JSON body that includes user credentials and a Job Scheduler name. When using visible variables in the JSON body, they appear as configurable Login Step properties. The key point is the Custom Login Step could look very different from Built-in, because the REST author is customizing it.
When you drag and drop the Login Step to the Jobs Library Steps Editor workspace, then click on the Step’s return value icon, this is what you can expect to see, as per the image below. The StatusCode, StatusString, Headers, RawData, and ConnectionHandle are built-in return values for all operations, not just the Login Step. Since the Login operations Response tab was configured in the REST Adapter, the Login operation also returns a Response.

Because a REST call is made when using a Custom Login Step, if the Login request fails, the Login Step will fail. The StatusCode and StatusString will consist of HTTP codes and messages that indicate the success or failure of the HTTP call. The response headers are returned as a collection, which if desired, can be passed to a ForEachItem Step, in order to access each header in a loop (see the example below).
The RawData is the Login request’s response, with no special formatting. The Response is the same data, but it just the value is returned, which is based on how the Response tab is configured for the Login operation, using the JSON or XML Response type option in the REST Adapter.
The ConnectionHandle is discussed later in this section.
In continuing with the above example, the workflow below is using the REST Login Step, to demonstrate what it returns and how to access the return values using Jobs Library Context Variables. Context variable usage in Jobs Library Job steps are described in the Jobs Library Reference Manual.
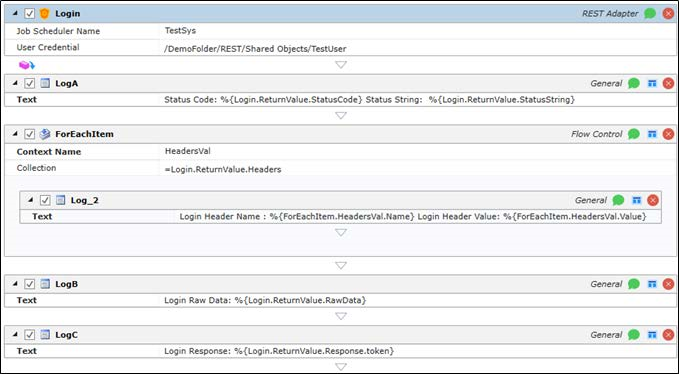
No Authentication
When No Authentication is used, the Login Step does not need to be used. For consistency, the Login Step is always generated. Using it would be harmless, but not necessary.
Since it can be used, a description of what to expect is warranted. The Login Step will not execute a REST call if used. You will see Return Value information when clicking on the return value icon in the Login Step. But, since an HTTP call is not made, the Status code will be 0, the StatusString will be blank, and the connection handle will not provide any value.
In summary, you do not need to use this step because all the authentication requirements are configured on each operation.
Connection Handle:
The Login Step returns a connection handle. Every Job Step automatically includes a Connection Handle property built-in to the Step. If you have a single Login Step in the Jobs Library Job, then all the downstream REST Steps will inherit the connection handle from the single Login Step. There would be no need to configure the Connection Handle property. You could, but it would not be required.
If you have a Login Step that has configurable properties (e.g. the User Account object is configurable), then you may have a scenario where you would use two or more Login Steps in a single Job. If you do not configure a downstream Step’s Connection Handle when there are multiple Login Steps, then the downstream Step will inherit the Connection Handle from the upstream Login Step that is closest to it. If you would like the Step to use another Connection Handle, you can configure the Step’s Connection Handle property and specify the return connection handle of the Login Step you wish to use. The syntax used is %{<LoginStepName>.ReturnValue.ConnectionHandle}. Each Login Step will have a different name (e.g. Login, Login_1, etc.) if not renamed by the Job author.
For example, assume the following is configured in the Jobs Library Job:
Login_1
Login_2
REST Job Step
Rest Job Step will inherit the connection handle of Login_2, the upstream Login Step closest to it. If you would like it to use Login_1’s Connection Handle, you must specify it in the REST Job Step’s Connection Handle property - %{Login_1.ReturnValue.ConnectionHandle}
See an image below where a Login Step’s connection handle is specified in a sample downstream Step’s Connection Handle property.

The Analytics properties are depicted in the image below. This section details any changes made to the Service Library object, and provides you access to the object's revision history.
You can examine the audit trail for the object. The audit trail contains information such as when the Service Library was created, when it was modified, etc.
The Audits panel includes controls that allow you to filter the audits based on start and end dates. You can also limit the audits retrieved to a maximum number. The refresh button allows you to retrieve any audits that were generated after this dialog was initially displayed.
Each audit is contained in a single line in date and time sequence. Audits are read-only and cannot be modified. An icon appears at the beginning of each audit to help visually signal the severity of the audit. If an audit policy
Opening an audit item (by double-clicking on the item), depending on the nature of the audit, will sometimes reveal additional information concerning the audit.
The Copy to Clipboard button copies the contents of the retrieved audits into a copy buffer that you can later paste into a document or other program.
The Print button allows you to print the retrieved audits.
The Revision History button allows you to select one or more audits concerning changes made to an object and perform a difference operation between the selected revised objects.
This tab is where object security is configured. Security in ActiveBatch mirrors how security is granted using Windows security. That is, permissions applicable to the object (Read, Write, Modify, Delete, etc.) are Allowed or Denied for the Active Directory users and/or groups assigned to the object.
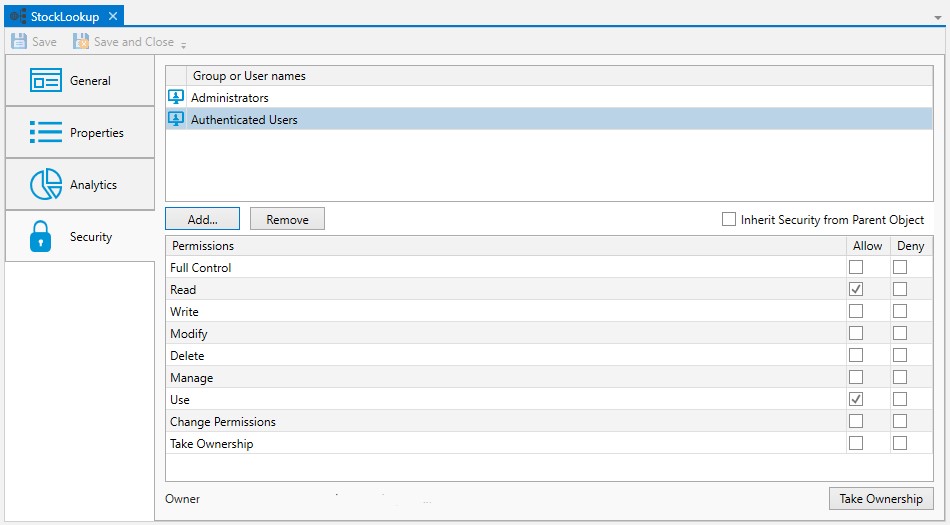
When new objects are created, they will either be assigned factory default
When a default policy has been used to preset object security, the new object will either have:
The Inherit Security from Parent Object property checked (it is not checked by default). When checked, the listed users and/or groups along with their permissions granted will be read-only. The Add and Remove buttons will be disabled because security is being inherited from the object's parent container. When Inherit Security from Parent Object is checked, it is likely the ActiveBatch Administrator will be setting up security on parent container(s), and the Job author will not have to modify anything about security. This would require a larger discussion with an ActiveBatch Administrator who it typically tasked to manage object security, since there are options.
The Inherit security from Parent Object property is not checked. The users and/or groups are listed along with their permissions granted, but there is likely some differences when compared to the factory default security, since the purpose of setting a default policy for security is to add Active Directory groups and/or users (and their access permissions) that are specific to your organization. Since Inherit Security is not checked, the Add and Remove buttons will be enabled. When this is the case, Job authors will need to be advised if there needs to be any changes made to security when they create new objects.
As a best practice, it is best for an ActiveBatch Administrator to preset security using a default policy (for all object types) so Job authors do not have to manage security, which can be time consuming and error-prone. See the ActiveBatch Installation and Administrator's Guide for more best practice information regarding object security.
Below is a list of permissions related to this object.
Access Description Read
User is allowed to read the object.
Write
User is allowed to write the object.
Modify
User is allowed to modify the object (Read + Write)
Delete
User is allowed to delete the object.
Use
Account is allowed to use the object.
Manage
Account is allowed to perform Enable/Disable operations.
Take Ownership
User is allowed to take ownership.
Change Permissions
User is allowed to change permissions for the object.
Full Control
All of the above access is enabled.
The owner of an object is always granted Full Control by the system, and their permissions cannot be changed or reduced. If another user takes ownership, then the original owner's access will depend on how security is set up (if they are a user or group that has been given access). The new owner will automatically be granted Full Control, and once again, their permissions cannot be changed or reduced.
To take ownership, you will need to be granted the Take Ownership permission. Click the Take Ownership button and confirm the action. Another way to take ownership is to right-click on the object in the Object Navigation pane, then select Advanced > Take Ownership.
To modify security, you need "Change Permissions" security granted.
The Deny permission is generally used for users who have been granted access based on a group membership, but there is a need to override this for a particular user. Deny takes precedence over Allow.
Below you will find the instructions on how to modify security when Inherit Security from Parent Object is not checked.
To edit an existing account, select the listed user or group, then change the permission using the Permissions list box (Allow or Deny access).
To remove an existing account name, select the listed user or group and click the Remove button.
To add a new user or group, click the Add button and follow the dialog as depicted in the image below.
The dialog is similar to that of other Windows objects, and leverages Active Directory services. The Locations button allows you to select either the Job Scheduler machine or any applicable domain. Clicking the Advanced button allows you to search for specific users and/or groups. Alternatively, you may enter object names (a user or group) in the large edit box. Clicking the Check Names button allows you to validate the accounts. Click the OK button to add the selected Account to the object’s security list.