Schedule Object
This section describes the purpose of the Schedule object and its properties. Below you will find a general overview, followed by a detailed description of Schedule Properties as they appear in the various Schedule categories (tabs).
A Schedule object provides you with a way to specify dates and times that a triggerable objects should run. The Schedule object is a shared object. It can be associated with Jobs and Plans.
To create a Schedule, right-click on the desired container (Scheduler root, existing Folder or Plan) in the Object Navigation Pane, select New, then select Schedule. When you’ve completed the Schedule property settings, you must click the Save or the Save and Close button to save the Schedule. Click the X on the tab of the New Schedule if you wish to cancel the creation of the Schedule. When you save the Schedule, it will instantly appear in the Object Navigation pane (if auto refresh is enabled). To modify an existing Schedule, right-click on the Schedule in the Object Navigation pane, then select Properties.
See the Object List object for more information when you need to associate one or more objects within one or more Jobs or Plans.
Schedule Properties
General
This tab allows you to name and describe the Schedule object.
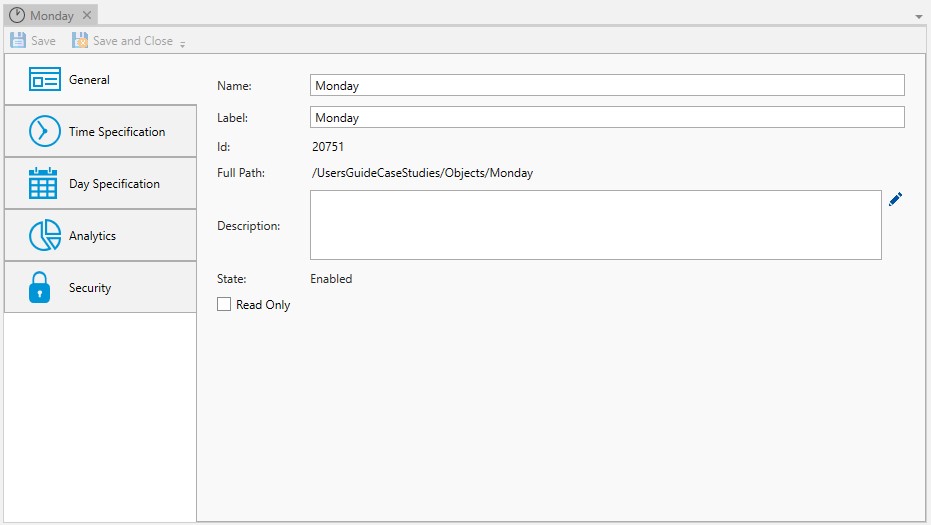
Name: This mandatory property represents the name of the object. The name is limited to 128 characters. The object’s name should be unique to avoid confusion. We recommend that it also be somewhat descriptive so it’s easy to find. The name is used (by default) to identify the object in the Object Navigation pane and other places in the UI. This can be changed to the label, if desired. See "Display Mode" in the General Settings
Label: Every object must be uniquely labeled within the scope of the namespace. The label is limited to sixty-four (64) characters. The label is typically the same value as the name (it is auto-filled to match the name you enter); however, uniqueness is always enforced for an object’s label. The label is recorded in the ActiveBatch namespace. The characters that may be used for the label property are restricted to alphanumeric (A-Z, a-z, 0-9), space, period (.), dash (-) and underscore (_). The label itself must begin with an alphabetic character. The label is typically used when scripting. All searches are case-insensitive. ActiveBatch does allow you to search for objects using either the label or the name properties.
ID: This is a unique read-only number that can be used to retrieve the object. Is it assigned by the system when a new object is saved.
Full Path: This read-only property provides the full namespace specification of the object. It consists of the container(s) the object has been placed in, with the object’s label appended to the end. For example, the fullpath: /IT Jobs/Nightly Run/<object label>, is such that IT Jobs is a root-level Folder, Nightly Run is a Plan, followed by the label of the object you are creating.
Description: This free form property is provided so you can document and describe the object to others. The description is limited to 512 characters. Clicking on the pencil icon will pull up a mini text editor where you can more easily enter your description.
State: This read-only field indicates whether the Schedule is enabled for use. It is either enabled or disabled.
Read Only: This checkbox, when enabled, means the Schedule's properties cannot be changed. You must have “Modify” access permission to the calender object to set this feature. To clear the read-only attribute, uncheck the box.
This selection governs the time portion of a Schedule.
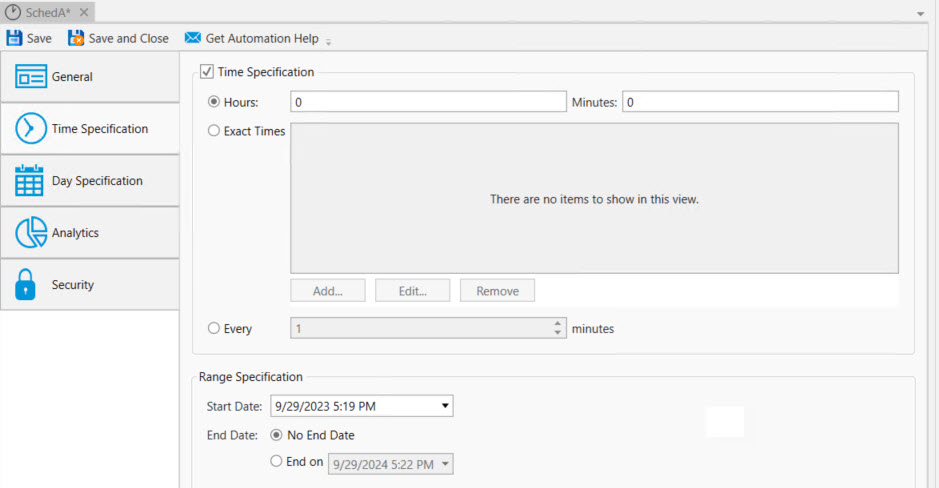
The Time portion is optional. While it’s possible that many Jobs can share the same trigger dates, it is unlikely that many Jobs will also need to run at the same time. So while you can specify a Time specification, the most flexible approach (and likely reducing the amount of Schedules you need) is to specify the time with the Job and not as part of the Schedule.
Note: When the time is set on the triggerable object that is associated with a Scheduler object, any time(s) set on the Schedule are ignored. This means some triggerable objects may get their trigger dates and times from the Schedule, and using the same Schedule, some triggerable objects may just get their trigger dates.
Time Specification: This checkbox indicates whether you want the Time Specification to be enabled for use.
Three (3) radio buttons allow you to select a method to set the time.
Hours / Minutes: These two (2) fields allow you to specify hours and minutes using a single value, or a series and/or a range of values. The two field values produce a union of results. For example, Hours: 6,7 and Minutes: 0,15 would produce 6:00, 6:15, 7:00 and 7:15.
Exact Time: Enabling the radio button means you want to enter exact times and/or a time range with interval. Exact times are entered because they don’t fit a pattern. For example, a Job needs to run at 3:14 and 9:52. A time range involves a start, end and interval set of values.
To enter a time value, click the Add button.
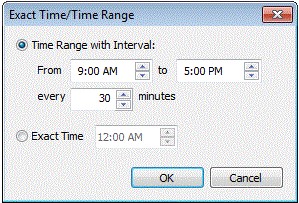
To enter a Time Range with Interval, enter times to the From and To fields. The To field time must be greater than the From field. The Interval, expressed in minutes, will generate a range of time values ending with the To field time.
To enter exact times simply enter a time value in the Exact Time control box to add the time to the list. To remove an already entered time, select the time from the Exact Times list, then click the Remove button.
Every: Enabling this radio button means you want to enter an interval time period specified by minutes and bounded by the minute. For example, 10 means a Job is to execute every 10 minutes on a nn:10 minute boundary. For example, with a starting hour of 5 the possible execution times would be 5:10, 5:20, 5:30, etc. The legal range is 1-59.
Range Specification: This section indicates the effective date and time range this Schedule should be considered active.
Start Date: By default the starting date is today’s date and time. You can however specify a different starting date and time.
End Date: You can either indicate that the Schedule is not to have an end date or you can specify an exact ending date and time. Note that even though a Schedule may no longer be used for scheduling based on the effective date/time range, the Schedule is not removed from the system and can always be modified to become effective again.
This selection governs the day/date portion of a Schedule. There are many ways to specify days/dates using a Schedule.
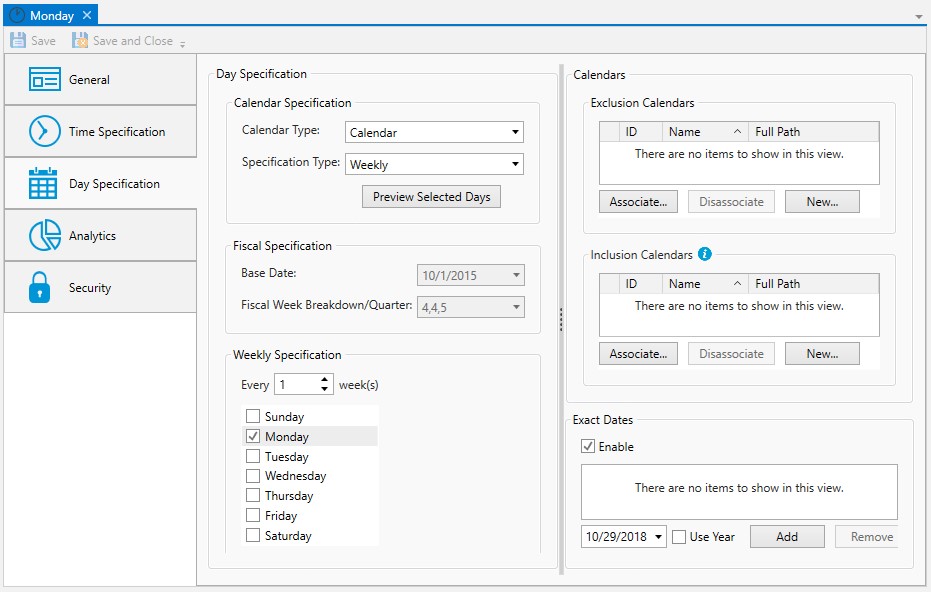
Calendar Specification
Calendar Type: This dropdown lists two (3) types of Schedules: Calendar, Fiscal and Business. Calendar (not to be confused with the Calendar object) means that dates are expressed through the standard measures of day, weeks, months and years. Fiscal means that fiscal period measurements are to be used. Business means that one or more Calendar objects (exclusion) are associated with the Schedule. Since Calendar objects specify non-business days and holidays, the Schedule is now producing business dates.
Specification Type: This dropdown allows you to specify the interval period for this schedule. Selections include: Use Exact Dates Only, Daily, Weekly, Monthly, Yearly, Quarterly and Custom.
The button Preview Selected Days displays a calendar that depicts trigger dates based on your selections.
Fiscal Specification: If fiscal type scheduling is specified, these two (2) fields indicate the start date and week-toquarter breakdown.
Base Date is the starting day in the fiscal year and Fiscal Week Breakdown/Quarter allows you to select the type of weeks to quarter period for the fiscal year. This section varies depending on the dropdown selected for Specification Type.
Use Exact Dates Only: This selection allows you to create whatever specific dates you want as a simple list. Note this selection can also be specified with an Inclusion Calendar and an empty Exact Dates list.
Specification - This section varies depending on the Specification Type you selected in the Calendar Specification section. As a reminder, you can choose Use Exact Dates Only, Daily, Weekly, Monthly, Yearly, Quarterly and Custom.
Daily: This Specification Type means you want to schedule a Job on some type of daily basis. This field allows you to enter a number of days which will be interpreted as “every n days”. For example, 1 means every day, 2 means every other day, etc.
Weekly: This Specification Type means you want to schedule a Job on some type of weekly basis. A field and seven (7) checkboxes will appear. The field indicates the frequency as in every n week(s). So 1 means every week, 2 every other week, etc. Clicking on a checkbox means you want the Job to run on that day.
Monthly: This Specification Type means you want to schedule a Job on some type of monthly basis. Two (2) mutually exclusive fields will appear with a third frequency field.
Day: This field represents a day in the month. A legal range is 1-31 (note that for months ending in less than 31 days, a day greater than the number of days in the month simply means the last day in the month). The Day is dependent on the type of Schedule selected. For the Calendar, Day is every day of the calendar. For the Business Calendar, Day is every business day, which is determined by the Calendar object associated to the Schedule.
The…relative… day: This field contains two controls. The first is a relative schedule whose values are: First,
Second, Third, Fourth and Last. The second is days value as in: Sunday, Monday, Tuesday, Wednesday, Thursday, Friday, Saturday, Day, Weekday and Weekend Day. So you can combine the 2 fields such as Second Monday in the month or First Day in the month. Regardless of the type of Schedule, Weekday is always M-F and WeekEnd Day is always Sat-Sun.
Series Days: This field allows you to specify one or more days (1-31) as a series. You may enter each day separated by a comma (for a list) and/or with a dash as a range of days. The keyword LAST indicates the last legal day of the month.
Of every…month(s): This field represents the frequency of the monthly specification. Legal values are 1-12. So 1 means every month, 2 means every other month, etc.
Quarterly: This Specification Type means you want to schedule a Job on a quarterly basis.
Yearly: This Specification Type means you want to schedule a Job on some type of yearly basis. Three mutually exclusive fields will appear.
Every: These two (2) controls represent a month and day specification. For example, the 2nd day of every March.
The…relative…day…of every month: This field contains three controls. The first is a relative schedule whose values are: First, Second, Third, Fourth and Last. The second is a day value as in Sunday through Saturday and Day, Weekday and Weekend. The third is a frequency expressed in a month (January through December). So: The third Saturday in January or the Last Weekday in December is easily achievable.
Series Months: This field allows you to specify one more months (1-12) as a series. You may enter each month separated by a comma (for a list) and/or with a dash as a range of months.
Series Days: This field allows you to specify one or more days (1-31) as a series. You may enter each day separated by a comma (for a list) and/or with a dash as a range of days. The keyword LAST indicates the last legal day of the month.
Custom: This Specification Type means you want to enter a Date Arithmetic Uses and Syntax specification. Using Date Arithmetic you can compute a date of your own choosing.
Calendars
This selection governs the Business day/date portion of a Schedule. This means that you can only associate Calendar objects to a Schedule object when the Calendar Type is set to Business Calendar. You can specify one or more Calendar Object objects, which allows the Schedule object to generate business dates. Two (2) grids are presented; one for excluding non-business days and holidays and one for including special holidays or processing dates.
Exclusion Calendars - Any days and/or dates specified in the Calendar object(s) that are added to this (exclusion) list will be considered as non-trigger dates - meaning dates the triggerable object will not run. This is the typical business day scenario. For example, assume a Schedule is configured to run daily. If a Calendar was created to include typical US holidays, several holidays fall on a Monday, and those Monday(s) would not be trigger dates. In addition, Saturday and Sunday might be added as “non-business days” in the Calendar object, and those would be excluded as well.
Note: You can also associate a Calendar object to a Job or Plan (and not a Schedule object, described here). The key difference is, when associated to the Schedule object, you lose the ability to defer the holiday execution to a different day (e.g. the next business day). For example, assume you want to run a Job once a week, on Mondays. If you associate an Exclusion Calendar to a Monday Schedule, that would essentially become “every business Monday”. That effectively means your Job will not run on any Monday holiday specified in the Calendar object - the run will be "skipped". On the other hand, if you wanted the flexibility to run a Monday schedule on Tuesday, whenever Monday is a holiday, you would not use the Calendar association described here, but rather associate the Calendar object to the Plan or Job on the Constraints property sheet, then configure the "On non-business day" property and select the "next" or "previous" business day.
Inclusion Calendars - Calenders in this list are the antithesis to the Exclusion model described above. Adding a Calendar object to this list indicates that the holiday dates specified (relative and fixed) should be merged with the Schedule object's trigger dates (in other words, a union of dates is formed). Non-Business Days specified in a Calendar used for inclusion purposes are used only for determining holiday conflicts; they are ignored otherwise. That is, if a holiday date falls on a non-business day, it will not be a trigger date, otherwise non-business days do nothing more (they don't result in triggers like the holiday dates). The Inclusion Calendar results in triggers on holiday dates (that do not fall on a non-business day), and any Scheduled dates. If you only want trigger dates on the holiday dates specified in the Inclusion Calendar, then select the Schedule object's Specification Type of "Use Exact Dates Only", but do not add any Exact Dates.
Note: Any conflict between Exclusion and Inclusion Calendars is resolved by excluding that date.
Example:
Suppose a normal End-of-Day (EOD) run starts at 7pm but on a half-day holiday, you would like the EOD run to start at 3pm, how would this be done?
The answer is that two (2) Calendars are needed. CALHOL would contain all holidays even the half-day ones. This Calendar would be associated with the Schedule for 7pm runs on the Exclusion list. CALHLFHOL would contain all half-day holidays only and be associated with the 3pm runs. This Calendar would be specified on the Inclusion list. The EOD Plan (EOD_PLAN) would contain both Schedules. The 7pm Schedule would execute on all business days. The 3pm Schedule would execute on all half-day holidays.
Exact Dates
This selection, if enabled, allows you to specify exact dates. The dates can be in month/day or month/day/year fashion. This selection will only be used if Use Exact Dates has been specified as part of the Day Specification.
The Analytics properties are depicted in the image below. This section details any changes made to the Schedule object, and provides you access to the object's revision history.

You can examine the audit trail for the object. The audit trail contains information such as when the Schedule was created, when it was modified, etc.
The Audits panel includes controls that allow you to filter the audits based on start and end dates. You can also limit the audits retrieved to a maximum number. The refresh button allows you to retrieve any audits that were generated after this dialog was initially displayed.
Each audit is contained in a single line in date and time sequence. Audits are read-only and cannot be modified. An icon appears at the beginning of each audit to help visually signal the severity of the audit. If an audit policy
Opening an audit item (by double-clicking on the item), depending on the nature of the audit, will sometimes reveal additional information concerning the audit.
The Copy to Clipboard button copies the contents of the retrieved audits into a copy buffer that you can later paste into a document or other program.
The Print button allows you to print the retrieved audits.
The Revision History button allows you to select one or more audits concerning changes made to an object and perform a difference operation between the selected revised objects.
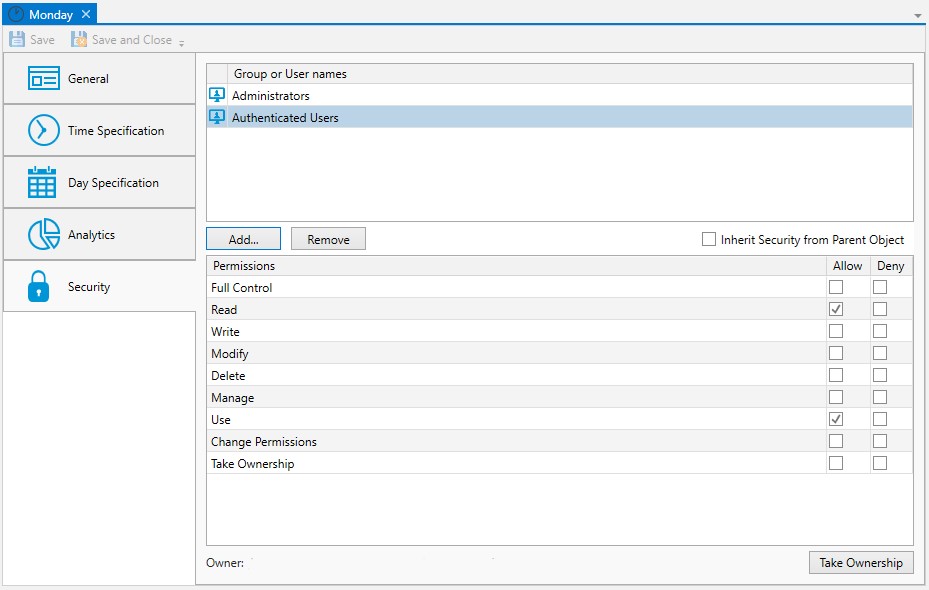
This tab is where object security is configured. Security in ActiveBatch mirrors how security is granted using Windows security. That is, permissions applicable to the object (Read, Write, Modify, Delete, etc.) are Allowed or Denied for the Active Directory users and/or groups assigned to the object.
When new objects are created, they will either be assigned factory default
When a default policy has been used to preset object security, the new object will either have:
The Inherit Security from Parent Object property checked (it is not checked by default). When checked, the listed users and/or groups along with their permissions granted will be read-only. The Add and Remove buttons will be disabled because security is being inherited from the object's parent container. When Inherit Security from Parent Object is checked, it is likely the ActiveBatch Administrator will be setting up security on parent container(s), and the Job author will not have to modify anything about security. This would require a larger discussion with an ActiveBatch Administrator who it typically tasked to manage object security, since there are options.
The Inherit security from Parent Object property is not checked. The users and/or groups are listed along with their permissions granted, but there is likely some differences when compared to the factory default security, since the purpose of setting a default policy for security is to add Active Directory groups and/or users (and their access permissions) that are specific to your organization. Since Inherit Security is not checked, the Add and Remove buttons will be enabled. When this is the case, Job authors will need to be advised if there needs to be any changes made to security when they create new objects.
As a best practice, it is best for an ActiveBatch Administrator to preset security using a default policy (for all object types) so Job authors do not have to manage security, which can be time consuming and error-prone. See the ActiveBatch Installation and Administrator's Guide for more best practice information regarding object security.
Below is a list of permissions related to this object.
Access Description Read
User is allowed to read the object.
Write
User is allowed to write the object.
Modify
User is allowed to modify the object (Read + Write)
Delete
User is allowed to delete the object.
Use
Account is allowed to use the object.
Manage
Account is allowed to perform Enable/Disable operations.
Take Ownership
User is allowed to take ownership.
Change Permissions
User is allowed to change permissions for the object.
Full Control
All of the above access is enabled.
The owner of an object is always granted Full Control by the system, and their permissions cannot be changed or reduced. If another user takes ownership, then the original owner's access will depend on how security is set up (if they are a user or group that has been given access). The new owner will automatically be granted Full Control, and once again, their permissions cannot be changed or reduced.
To take ownership, you will need to be granted the Take Ownership permission. Click the Take Ownership button and confirm the action. Another way to take ownership is to right-click on the object in the Object Navigation pane, then select Advanced > Take Ownership.
To modify security, you need "Change Permissions" security granted.
The Deny permission is generally used for users who have been granted access based on a group membership, but there is a need to override this for a particular user. Deny takes precedence over Allow.
Below you will find the instructions on how to modify security when Inherit Security from Parent Object is not checked.
To edit an existing account, select the listed user or group, then change the permission using the Permissions list box (Allow or Deny access).
To remove an existing account name, select the listed user or group and click the Remove button.
To add a new user or group, click the Add button and follow the dialog as depicted in the image below.
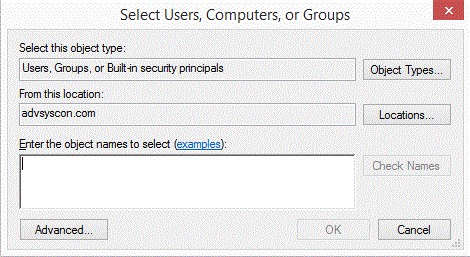
The dialog is similar to that of other Windows objects, and leverages Active Directory services. The Locations button allows you to select either the Job Scheduler machine or any applicable domain. Clicking the Advanced button allows you to search for specific users and/or groups. Alternatively, you may enter object names (a user or group) in the large edit box. Clicking the Check Names button allows you to validate the accounts. Click the OK button to add the selected Account to the object’s security list.
Below are examples of permissions you would need to take actions against an existing Schedule.
Copying a Schedule
To copy a Schedule, select the Schedule, then right-click and select the Copy operation. You must have “Read” access permission to the Schedule object.
Editing a Schedule
To edit an existing Schedule, select the Schedule, then right-click and select the Properties operation. You must have “Read/Write/Modify” access permissions to the Schedule object in order to make changes to it.
Deleting a Schedule
To delete an existing Schedule, select the Schedule, then right click and select the Delete operation. A confirmation message box will appear asking you to confirm the deletion. You must have “Delete” access permission to the Schedule object. Deleting a Schedule will automatically disassociate the Schedule from all triggerable objects which are referencing it. However, you will be warned first; a pop-up window will appear that displays a list of objects dependent on (using) the Schedule. You can opt to continue on with the deletion, or cancel the delete operation.
Associate/Disassociate
To associate an existing Schedule with a Plan or Job, select the Plan or Job, right-click, then select Properties. Navigate to the Triggers tab. Make sure the Enable Date/Time Trigger property is checked, and then click on the Associate button under the Schedules section.
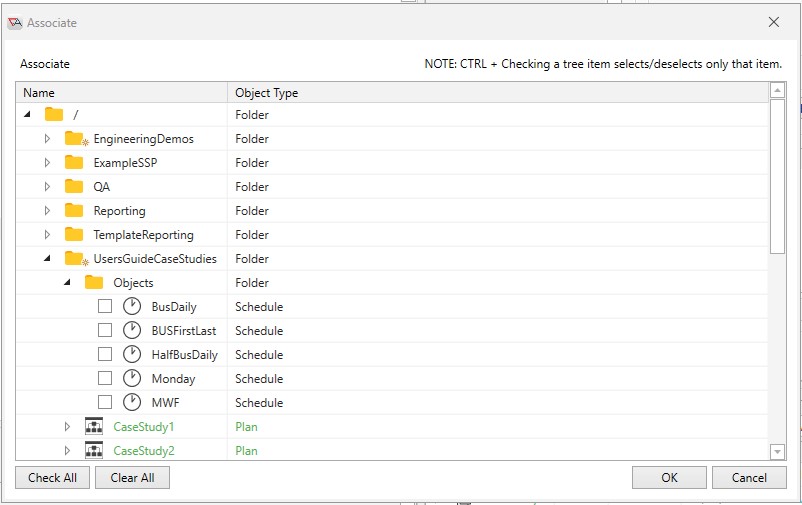
An Associate window will appear, listing all the container objects since Schedule objects may be stored in them. You will need to know where your Schedule object is stored in order to navigate to it. As you expand Folders and/or Plans, you will only see child containers (if any) and Schedule objects (if any) that have not yet been associated to the triggerable object (Schedules already associated to the object will not be in the Associate window). To select a Schedule object, click on the checkbox to the left of the Schedule name, then click OK.
Note: To help you find where Schedule objects are located, navigate to Views > Developers > Definitions. See Definitions for more details.
To disassociate a Schedule in the Schedules list, select the desired Schedule, then click the Disassociate button.